
Hey friends! I’ve been enjoying some HAMMER TIME lately And I’ve got a cool new hammer to show you that’s going to take your metal stamping to the next level with all kinds of texture options. You all KNOW I’m an ImpressArt girl if you’ve ever read here before, and they are sponsoring today’s design and tutorial. I captured my love of the big city in today’s piece, and I’m going to share with you how to use the stamps you already love to create new looks!

Now, you don’t already need to know how to stamp to get get today’s look. However, I am going to be focusing primarily on the textural elements in today’s design. If you’re looking to learn more about getting started with jewelry stamping after reading about this project, I’ve got some comprehensive resources in my beginner’s jewelry stamping tutorial (which includes video), in my subscribers-only free ebook, or in any of the other dozens of stamping tutorials that I’ve shared over the years.

Today’s design uses the following supplies (you can click to learn more about each product by clicking the link and visiting our sponsor, ImpressArt Metal Stamps):
- Steel Block
- 1 lb. Brass Stamping Hammer
- NEW ImpressArt Texture Stamper
- 6mm ImpressArt Brick Pattern Design Stamp
- ImpressArt Lollipop Alphabet Letter Set
- ImpressArt Stamp Straight Tape
- ImpressArt Stamp Enamel
- 3/4 inch Square ImpressArt SoftStrike Pewter Blank
- 15/16 inch Square ImpressArt SoftStrike Pewter Blank
- 12mm Open Heart Charm, or charm of your choice
- 10mm Jump Ring
- 18″ Cable Chain Necklace
- Chain Nose Pliers
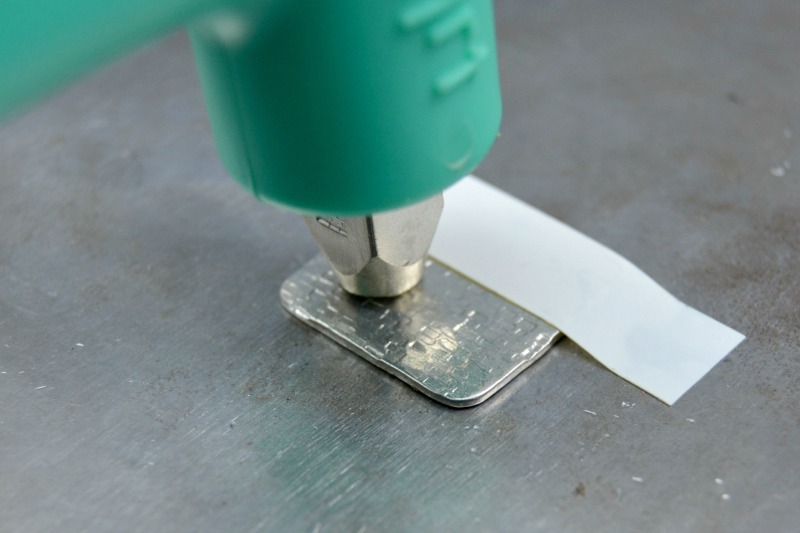
Now the texture stamper is a just-released product that helps you quickly add a design to a metal blank. I’m using pewter blanks with the brick pattern stamp. The stamp screws into the front of the hammer-like stamper, and instead of placing the stamp and striking it, you lift ad strike with the stamp itself.
So I am going to be real with you here. I was convinced that for any halfway-decent stamper, this tool would be totally unnecessary. But it did two impressive things: It created a light, even texture, and it did it in well under a minute. Seriously. Had I stamped this brick design by hand, I would have created deep impressions which would have required lining the pattern up and striking again. It could be done, certainly! But it would have taken a while to fully cover this 15/16″ blank, and even then, if I didn’t line everything up just so, I would not have gotten the same rich texture as I did with the stamper.
To texturize your piece, you should tape it to your block first so that it stays put while you strike it. I stamped the lower half first, moved the tape, then stamped the upper area. It’s just like you’d hammer a nail. Just hit it all over.
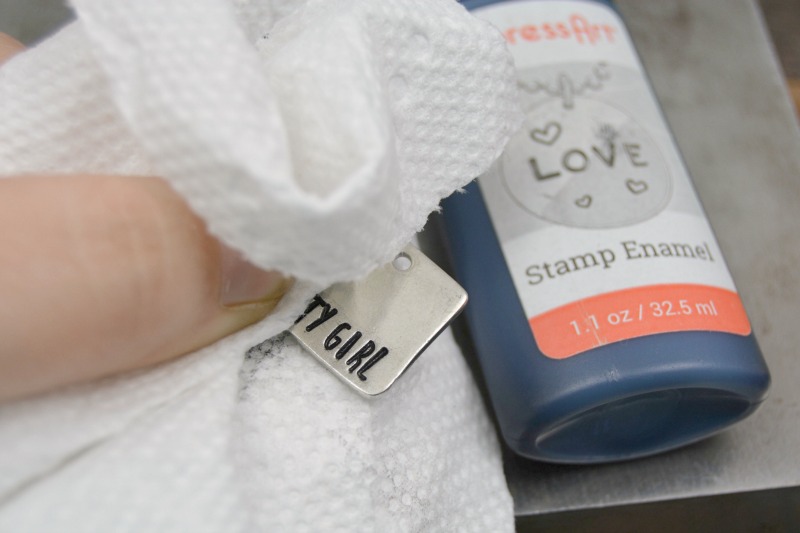
Next, I used the ImpressArt Lollipop font to add my message: City Girl. Which is totally me! The brick texture reminds me of an urban area. You could of course stamp your name or any other message you like. I darkened both pieces with stamp enamel – just quirt some on, rub it gently into all the impressions with a paper towel or shop cloth, and wait ten seconds. Then, wipe the excess away.
It’s not necessary to darken textured pieces, but because I really wanted the brick look to look that much more authentic, I used stamp enamel on it also. Just like a real brick wall, some tiny brick impressions took a little more or a little less enamel, making them lighter or darker.

Finally, I stacked the two petwer blanks together with the larger textured one behind. I decided it needed a little charm, and I added this sweet 1/2 inch open heart connector on top. Twist open a jump ring with your pliers, stakc the elements on together, and twist it closed again.
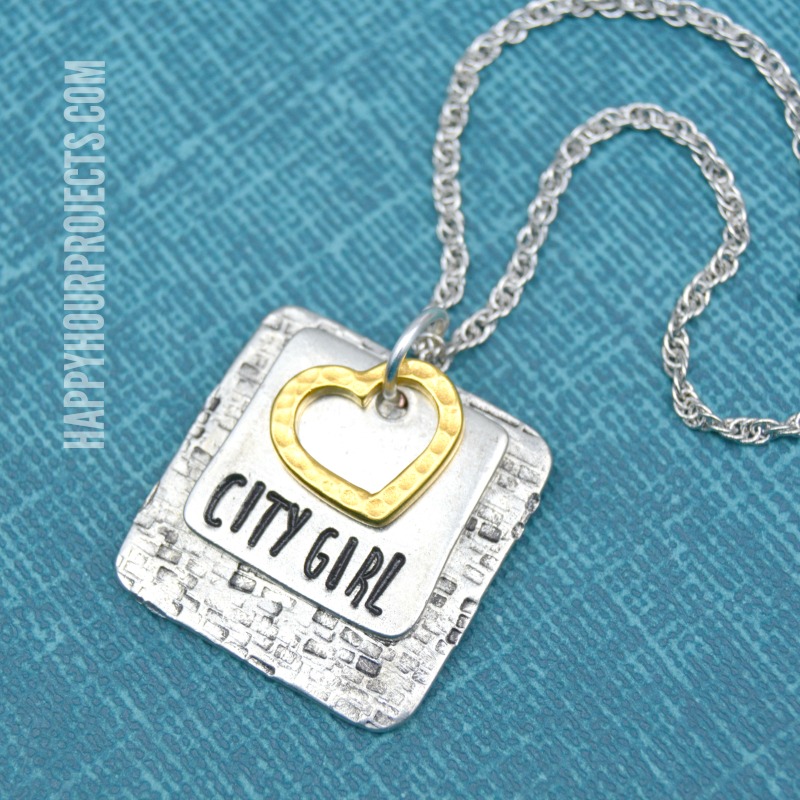
String it on a necklace chain and wear it with attitude! I love creating my own custom sassy jewelry, even if this does make me a little crazy to venture out of the suburbs again very soon.
Thanks for joining me for today’s project and be sure to show our sponsor, ImpressArt Metal Stamps, some love. It has been FIVE YEARS now that I have been working with their products, and I’m so excited and inspired by some of the new stuff hitting the shelves in 2016. (Curious? You’ll just have to follow along as see!)

nice post
wow looking good
Thanks for the wonderful inspiration! The hammer looks like a really clever tool and your design helps me justify purchasing it! LOL. I popped over to ImpressArt to investigate more. It’s comes with the “sprinkle” pattern stamp and at a very reasonable price, too!
Beautiful necklace!!!! that new texture stamper is COOOOOOLLL!!!!!! I LOVE ImpressArt!! They have fantastic products!!