
Are you thinking ahead to what you’re going to make for the dad in your life for Father’s Day this year? Handmade gifts are my favorite, but I’ve got to be honest – I draw a blank when it comes to gifts for guys, most of the time. I’ve been doing a lot of mixed media projects lately and all that hammering, punching, and riveting reminded me that personalized gifts don’t have to be girly. You can stamp a great Father’s Day gifts with a bit of leather, rivets, and a big, bold font choice.

I decided to make a keychain because (like many men) my husband really isn’t into jewelry at all. Literally the only piece of jewelry he has ever worn since we’ve known each other is his wedding ring. But metal stamping is for so much more than just jewelry! You can add blanks to decor pieces, journals, and more. I kept this message basic (“Dad Rocks”) but you can add a name, a date – whatever the man in your life is into – with this easy idea.
If you’re searching for the right supplies to complete this project, I’ve got links below to what I’ve used. They’re affiliate links (which means if you decide to buy anything after visiting the site, it supports my blog at no extra cost to you) but I only recommend products that I actually use and love.

- Bench block and hammer
- Metal stamps – I used ImpressArt’s upper case Newsprint font
- ImpressArt 1-1/2 x 5/16 inch pewter SoftStrike stamping blank
- Split key ring
- Permanent marker and polishing pad
- Stamp Straight Tape
- 4-5 inches 10 mm flat leather (I used tan/black)
- Large double-hole punch
- 2 – 4mm compression rivets
- Rivet setting tool
- 9-Piece Hollow Leather Punch

First, stamp your message. I was down to just ONE bar blank left, and my stamping got a little bit crooked. I would have liked a do-over, but now I have to wait to order more blanks, haha. I really love this 1.5 inch ImpressArt SoftStrike pewter blank though – it’s a versatile size that works well in lots of designs.
If you just happened to see this post and you’re new to stamping, well, welcome to an addiction. I’ve been stamping for 4 years now, still learning, still making mistakes, and still pushing past traditional with my own style. I’m not going to get into all the mechanics of stamping today, except to give you a little insight about choosing a font for this project. I opted for the upper case Newsprint font by ImpressArt to give it a big, blocky feel that filled the blank. This is a 3mm font, but it’s quite wide, and you’ll only be able to fit 8-9 characters (including spaces) with this particular set. If you want to fit a longer word, then you can try a smaller or thinner font. Another font I love is ImpressArt’s Lollipop font, which is a 4mm uppercase font that’s very skinny. You’d be able to fit 12 characters easily – maybe even 14 if you really squeeze them in – which would also fill out this blank nicely.
Stamp your blank with one firm tap to each letter, and darken the impressions with a permanent marker. Use a polish pad to remove the excess ink and make it shine. If you want to know more about metal stamping, I wrote a comprehensive tutorial that even includes video in my beginner’s stamping post, so please visit that resource if you’re interested in knowing more!

The blank I used only came with one hole, and it’s not large enough to accommodate a rivet. You’ll need to punch a new, larger (1/4 inch) hole over the existing hole, and a second hole at the end of the blank. I use a screw-down hole punch for this (just position your blank, and twist the punch until it pierces the metal).
At this point, fold your leather in half and determine where to punch your holes. You’ll need to leave enough room at the center to allow the key ring to move freely, so I punched a pair of 1/4 inch holes with my hollow leather punch approximately 3/4 inch apart. Measure down the leather and punch a second pair of holes that will line up with the second hole in your metal blank. You can trim the excess leather from the end of you wish to. I feel like I got mine a little short and would have liked it to be slightly longer, but as I mentioned I am OUT of blanks, haha, so I had to make do with my first try on this project.

Compression rivets are really easy to set – there’s a post side and a cap side. I looped the leather over the key ring, stacked the blank on top, and fed the post up through the back side of the leather. Press the cap onto the post, attaching the three layers together. It will be a strong enough hold to continue, but your rivets won’t have a permanent hold until you set them with a setting tool and hammer.
To do this, lay the flat sides of the compression rivet against your steel block, and use the concave end of the rivet setter against the rounded cap. Tap the setting tool with a hammer a few times until the rivet is firmly set.
If you’re using a leather with black edges like I did, then you may wish to color the raw cut edge black with a marker just to help it blend and to give it more finished look.
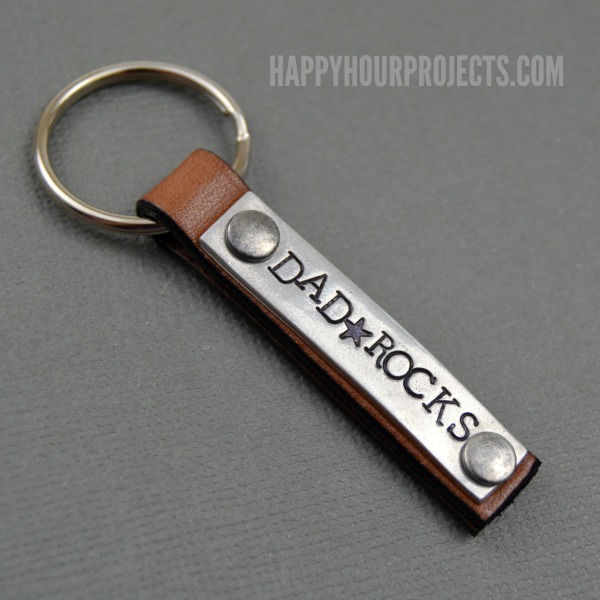
And in just a few minutes, you’ve got a great, personalized piece that any dad would be proud to get for Father’s Day or any occasion. I let my kids give this one to my husband already and he loved that I made him something! He thinks it’s manly, but quite honestly I’m planning to make another one for myself as soon as I restock my supplies, because it’s such a showcase of my style. :)
Thanks for joining me today, and I hope you enjoyed this handmade Father’s Day gift idea!

Love this idea and can’t thank you enough for the instructions!
I love this project! Thank you! I cannot find the 4mm compression rivets, would I be able to use 6mm size and it would work just fine as well.
Amy
This is so unique and adorable for every Dad. I’ll try to make the same as it showing.
I just love your blog so far….looking forward to browsing some more.
Carla
Father’s Day is a tough one to craft/shop for – this is a great idea! Pinned.