
When I sat down to stamp this bracelet, I had visions of making it much more fancy. And complicated. But I got this far and couldn’t bear to add more because I love, love the simplicity of it (and the whimsical dandelion pattern)! So I’ll be sharing a very basic piece today, and who knows, I still may get around to making the other design that prompted me to start this project in the first place. What do you think?

The good news? This is a beginner-friendly project! Design stamps are tricky when you first start, so you can hammer away on a piece like this without worrying about lining it up, or even getting really consistent impressions. It’s a GREAT way to practice designs. I’ll leave links to a few of the products I used today in case you’re hoping to find them and make something like this for yourself. Some of these links are affiliate links (meaning if you make a purchase from Goody Beads, it benefits my blog at no extra cost to you). You can also just click to get the specs if you want to know more about a product. :) Here is what you will need:

- Bench Block and Hammer
- 6×1 inch aluminum cuff (it comes in brass and copper, too, but those are harder for use with design stamps)
- Design Stamps you love (this set is from Beaducation)
- Bracelet Bender (mine is a different brand, but this is the first place I’ve seen it online)
- Acrylic paint, sponge brush, and paper towel
- Paper Tape
- Polishing pad (optional, I didn’t use one, but if you let your paint dry too much, you are likely to need it)
- Small file for removing sharp edges
First, tape your blank to your bench block. There’s no right or wrong way to do this, you will eventually get to all the places on your bracelet blank, but you need it stead to stamp on. Then, begin stamping designs randomly. I’m going to talk a little about stamping in today’s post, but if you want more info, you can visit my Beginner’s Metal Stamping post for LOTS more info and even a video tutorial.

This design has two coordinated stamps, so I first used the big one, and then filled in my gaps with the small one. The key is to have a steady hand, because you may need to strike your stamp more than once without moving it on the blank. See, design stamps are generally larger and more detailed, so one strike may not give the impression you want – it can be a little light, and you’ll see right away if there was anywhere you may have had it even slightly tilted. After a couple years of experimenting, I’ve found two things that work well for me. The first is to stick with aluminum or another soft-strike metal. The second is holding your stamp really still, and rocking it to a slight angle left, right, up, and down and giving the stamp a tap with your hammer each direction. I do advise against more than one tap as a rule to avoid double-impressions, but if you’re very careful to hold your stamp tightly, it will often yield a better design.
My starter recommendation is to choose a smaller design stamp, and one less intricate, because you will do well with them more quickly than larger stamps (which have more area to displace). But an all-over design like this is the PERFECT way to get started, because with no set pattern, any stamps that don’t look great won’t stand out among the overall design.
Once you’re happy with your stamping, I’m going to show you the easiest way to darken your impressions over a large surface area like this. Dab a very small amount of acrylic paint (I like black, but you can use other colors!) onto a sponge brush, and rub it all over your blank. painting in more than one direction (like first vertically and then horizontally – or even in a circular pattern) generally works best to be sure it gets into every little impression. You don’t want to glob it on, it should be just a very thin coat, like below.

As soon as your impressions are darkened, wipe away the excess with a dry paper towel. If you have any paint that dried on and won’t wipe off, you’ll probably need to employ an actual polishing pad to get off, so it’s best to work quickly with the paint for the easiest cleanup.
Once you’re happy with how it looks, it’s time to bend it! I LOVE my bracelet bender, it’s one I found locally a few years back and have never found one available online, until I discovered that ImpressArt now makes one! It’s so easy – WAY easier than the bracelet pliers. Jest put one end into the notch, and bend it around the curve. Repeat the process on the other side.
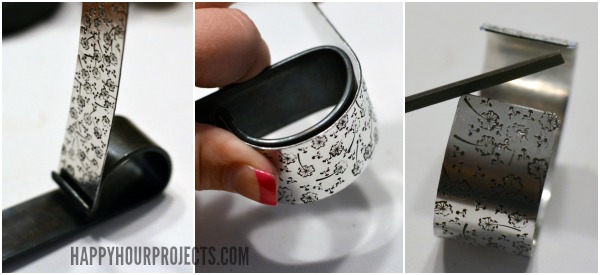
Chances are, your bracelet will probably have sharp corners, so it’s a good idea to file them down so they’re not pointy. Any small file will do.
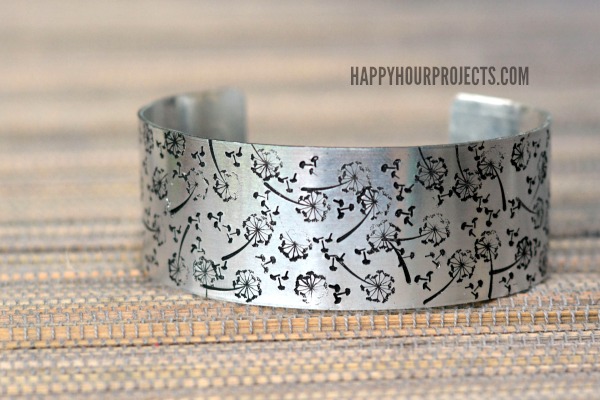
And with that – you’ve got a beautiful handmade accessory! Seriously, I love the simplicity.

What’s your stamped style, do you love florals? Stars? Tiny little stick figures? There are so many stamps out there to choose from, but the whimsy of the dandelions gets me every time!
Happy stamping!

The choice to keep it simple and uncluttered is a key component of its beauty, and I applaud your restraint in not embellishing it further.
This article is very useful for those who want to share the content of the Happy Hour Project.
This is beautiful and I think one thing that makes it so attractive is how clean and simple it is. I think you made the right decision not adding anything more to it.
Thanks for sharing.
Do you use any sealant to keep acrylic paint from wearing off?
Very cute!
Beautiful! I love the dandelions — perfect choice for this project.
You always amaze me with your beautiful jewelry!!! This has got to be one of my favorite pieces you’ve made!! I love it!! Btw…love your nails too!!
Thank you!! :D
That is simply beautiful.