
So not too long ago, I saw a mantra tacked to someone’s corkboard that I just loved. When you are your own business, you’re always chasing leads, checking messages, and when you’re in the creative business you’re even jotting ideas down straight out of the shower sometimes (ahem). So when I sat down to stamp this week, it popped into my head that I wanted to use it.

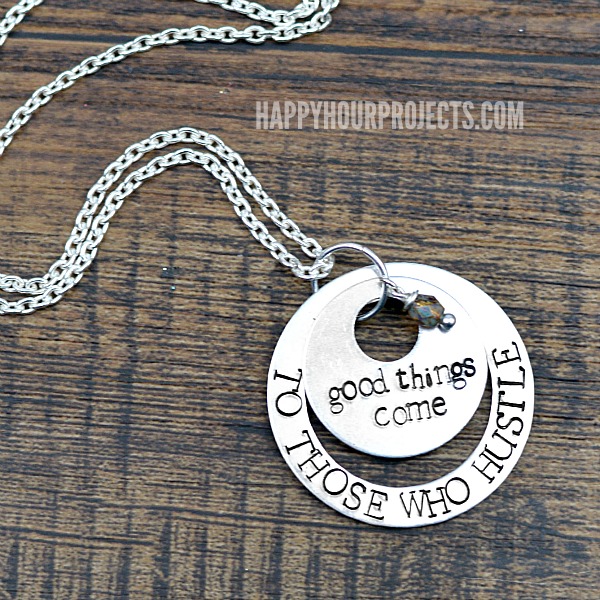
Good things come to those who hustle. Indeed. Because in business? You don’t just wait. So this is a really perfect summary of the way that I work.

You’ll need a few basic stamping supplies. If you haven’t stamped much (or at all), I’ll be sharing a few tips here for you today. I have a really comprehensive beginner’s stamping tutorial that you can explore more if you don’t see all your questions answered here today, but today I’ll be showing you a few different stamping styles in one piece. I’ll leave affiliate links below for any supplies you may still need.
- Steel bench block
- Stamping hammer
- ImpressArt Newsprint font (upper and lower case)
- ImpressArt Stamp Enamel
- 18″ cable chain
- 7/8 inch offset washer blank
- 1-1/4 washer blank
- 10mm Jump ring
- Stamp Straight Tape (or washi tape)
For an optional bead charm:

So today we’re stamping both straight, and on the round. On the round is much more difficult for me personally, but it’s something that I like to practice! (Practice makes perfect, after all, right?) But let’s start with straight! I marked off where I wanted to line up my letters with a piece of tape, and taped my blank right to my steel bench block (which both protects your surface, and gives you a better chance at clean impressions). Stamp straight tape works very well because it’s thick, but I keep washi tape right at my work station all the time, so I often just use that because it’s easy. :)
Set your stamp vertically against your blank, and drag it very gently toward the tape. When you feel the tape against the letter, you’ll know that your letters will be vertically aligned. Now note – hand stamping is never perfect! But the tape method gives you the best chance at not having your letters end up all over the place. Once you’ve placed your stamp, give the end of it one nice firm tap with your hammer.

For stamping on the round, I changed to upper case. That’s not essential! Upper case is nice because every letter is very close to the same size, and also, mixing the case on the two charms makes them distinctly different and yet emphasizes this part of my new mantra. ;)
I find that washers are much easier to stamp than standard circle blanks when you’re stamping the edge. The width of the washer helps you align your letters visually much easier, since there is both a top and bottom edge to center between.

When you’re happy with your stamping, there’s a new product I’ve been using and loving for darkening my impressions. ImpressArt’s stamp enamel is the easiest product to use that I’ve tried, because it applies easily and wipes cleanly away without buffing or without rubbing alcohol. I do tend to get it on my fingers every time I use it, so it can get a little messy – but hey! Crafting can be messy sometimes. ;)
Just apply it directly to the stamped letters, and let it dry for about 10 seconds. Wipe the excess enamel away with a paper towel, and it will remain in the impressions and come right off the top surface of your blank. If you find that it has wiped out of your letters, you can apply it again. As long as you don’t leave it on for too long to dry too completely, it will wipe right off with no polishing or buffing.

At this point, I decided that my two stamped charms needed just a little something more, so I made up a quick bead charm. To make your own charm, just string a bead onto a head pin. Wrap the top part of the pin around one side of a pair of round nosed pliers, forming a loop, and then wrap the excess “tail” around the pin between the loop you created and the bead itself. The number of wraps really just needs to be enough to fill the gap between the loop and the bead – it can be anywhere from one wrap to three to five or however much space you’ve left between.
If you’d like to see a video demonstration of how to make beaded charms, you can check out one of my videos on YouTube how to make beaded charm bracelets.

Finally, twist open a big jump ring, and add all your charms! Close it up and string it on your chain – mine is 18 inches, but you can make yours any length you prefer.
What do you think? Have you gotten into stamping at all? What are the biggest challenges you have when bringing your ideas to life?

Note: I’m an ImpressArt blogger for 2015. While this has not been a sponsored post, I do occasionally receive products to create new tutorials, and I do have an ongoing business relationship with the brand.
i like it
nice post
wow looking good
I just love that! Do you sell your creations?
Very cute necklace, you made it look so easy to make. I think I might make these as gifts for Christmas rather than buying gifts this year.
Great tutorial. I can’t wait to make some of these for Christmas! So many great projects on your blog, it’s hard to know where to start!
You made a beautiful necklace. Love it :)
Very cute, and you make it look so doable! Thanks for sharing your talent :)
One of my favorite quotes from writer Anais Nin. Stone cold truth right there! Great project!
Awesome – thanks for the source! It’s SO TRUE!
Love this necklace! Would love to have something like this, with this message, around my neck.
Wonderful exianaltpon of facts available here.
I love it – it looks like something I could do! Do you have a favorite place to get your plain chain necklaces?
I often buy at Goody Beads (there’s a link above) and also at Consumer Crafts. Both are online retailers – or just check out the jewelry section at your local craft store. Thanks for the note!