
So last time I was shopping Goody Beads (which happens wayyy more often than I care to admit, haha) I spotted some gorgeous DIY leather bracelets in their inspiration area. I had to make them! They didn’t have any instructions, but they were pretty easy to make. I decided to share them with you after a little trial and error on my end, especially because they’re sooo pretty, and they don’t require much in the way of tools and supplies. That’s not always the case when it comes to jewelry – and would you be surprised if I told you, you can make these up in just 10 minutes?

I used the same technique for both bracelets, and as you can see, they look totally different! You really have a lot of options for making your own style – you can opt for leather by itself, or add beads for a pretty mixed media look. Memory wire requires no clasps, so just wrap them on or stack them! I went for autumn colors since the end of summer is approaching, but you can use bright colors, pastels, black and white… you get the idea!

I will list the supplies I used for these two fabulous bangles below, along with affiliate links where you can find the supplies on Goody Beads. If you decide to make a purchase, that’s a great way to support my jewelry addiction my free tutorials because I get a small commission when you use these links to do your shopping – all at no extra cost to you. (This, of course, is how I afford to go shopping for whatever is new and hot to show you how to make it yourself… so it’s win-win!) ;)
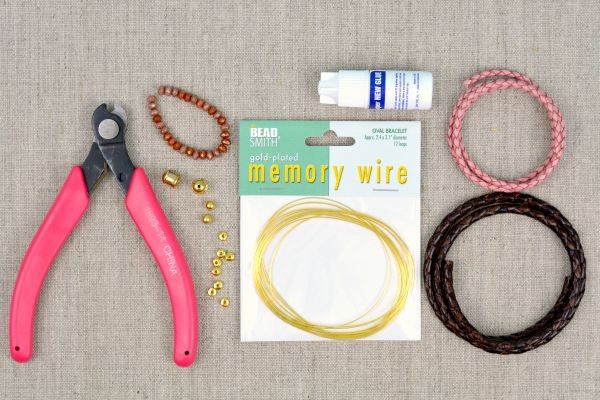
- Large bracelet memory wire (or small is fine, if you prefer)
- Memory wire shears
- Super New Glue
For the brown bangle:
- 18 inches 5mm braided brown leather
- 2 – 8mm gold plated pewter end caps
For the orange bangle:
- 8 inches 5mm orange Cancun round leather
- 30 – 5mm x 3mm pink Czech rondelle beads
- 6 – 5mm gold nugget spacer beads
- 15 – 6mm fire polish rose Czech round beads
- 2 – 8mm antique brass finish pewter end caps
- 5mm gold wire end caps
Now, before we get started I want to mention that if you’re looking for some other colors and textures, you can browse a whole collection and see more of what inspired me at Goody Beads. Just note this:
You can only use braided or stitched 5mm leather cord for this project to work. Stitched cord is more difficult to string, so I would not recommend attempting to string a length any longer than 10 or 12 inches. The longer the length, the more difficult it will be to feed the wire through.
I learned this by trial and error. More errors than I would have expected, actually, for such a simple design. But there you have it. :)

You can make these bracelets any length! I’d recommend at least 10 inches so that you have one full wrap and a bit of overlap, but I love the 18-inch length (probably more like 16 inches if you’re using the small sized wire). It gives you two wraps at that length, with enough overlap that it looks like three on one side.
Cut about 3 wraps off your coil of memory wire (and they make specialty shears for memory wire, because it’s hardened) and feed it through the center. The braided leather has a small hole that’s quite easy to string, and the stitched leather (and cork – you can use cork cord, too) has a cord center but you can slip the wire between the core and the stitched casing.

When you have the length you want, cut the wire as close to the ends of the leather as you can, and glue on end caps. The caps I recommended have a hole in the bottom, which makes them really versatile! You can use them in the middle of your design if you’re mixing beads, too, or you can just glue it on the end. If you do glue it on the end, you have to be careful not to drip any out the bottom, so hold it sideways, and then twist it around the leather.

Now, I broke up the beaded sections and did a small section on one end of the leather, and a longer section on the other end. You can see I capped off the leather so that it looked more finished, and then added a few beads. I finished the beaded bangle off with a glue-on end cap, and to do that, add a tiny dot of glue directly to the end of the wire. Then, glue the ball cap on. It’s fine if you glue the ending bead to the end cap! In fact, it will help strengthen your design if the two are glued together.
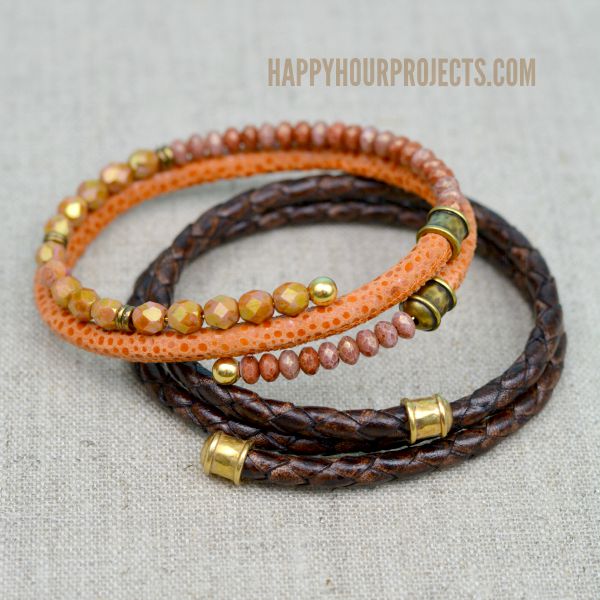
You can follow the pattern that I used, or dream up your own! Mixing colors and finishes within the same family – offset with gold – was exactly what I envisioned, and I love it when a project turns out like that. :)

Thanks for joining me today! Hope you have a great weekend. It’s my BIRTHDAY this weekend, so don’t be sad if you don’t see me early next week. It’s always tough to find time to sit down to make and write when you have great friends around to wish you well, and I’m lucky to have that. But I will see you next week with some great things to share!

I just read this post, even though I have had it saved on a board for the longest time. I am impressed with your friendly delivery and knowledge of the project. I really appreciate the information that you have shared. THANKS
Where can I purchase the leather and memory wire
wow i like it
wow nice post
wow looking good
nice post
looking good
I also would like to know how you feed the wire through the leather. I have both leather with a center and without a center. Thank you,
This is impossible to do. !
I wish i would have read the other posts before I bought everything.
It sure would be nice of you to get back to us on how to get the memory wire through the leather. I have spent a small fortune on leather that was bought for this project that I can not get the wire through. May I also add, getting the wire poked in my thumb and fingers.
So please get back to us on how to do this.
Thank you,
Cathleen
Me too. How did she do it.and where did she get it
I ordered several colors of this braided and smooth 5 mm leather cord from Goody beads to make this project
But there were no holes in any of the leather
I could not put the memorary wire through it
I was so bummed
Hi I saw this project on Goody and thought it would be great for a class I was teaching
Ordered several colors of 5. Mm braided and smooth round leather
However I found that there was NO WHOLE to put in the memory wire !
I was so disappointed !
You have to pull the cotton center out of them with pliers to allow for the memory wire to go thru.
Thank you so much for this post which I stumbled upon on Pinterest. For a long time now, I have been trying to understand how to approach this style of bracelet but could find no tutorial. I even went to one of my local bead and findings store to see if he had a special leather but found nothing. This diy is perfect! I will go back to the stores and see what I can find, if of the kinds of leather you mentioned. Thanks so much!!
Looks like I’m a year late, but LOVE the idea of working with leather! I just set up an account at Goody Beads.
I love these bracelets but cannot get memory wire to fit my wrist, which is slightly over 5.5 inches. I tried the small oval,. Any suggestions? Thank you!
How on earth do you get the wire through the leather cord?….is the cord supposed to be hollow because mine is not…I really love your project but am feeling quite frustrated
What kind of braided leather did you use? I could not make the memory wire go through the 5mm braided leather cord that I tried to use with either method you describe.
LOVE these 2 bracelets. I’ve always enjoyed working with and wearing memory wire jewelry since I have bad arthritis in my hands and wrists making it difficult to operate almost all kinds of clasps. Love this unusual way of using leather cording and memory wire together. Wrap bracelets made easy to wear. Thanks so much for sharing!
I really wish this was as easy as you say. I cannot get the memory wire more than an inch into the leather. It just stops and no matter what I do it won’t move. I am using everything according to your instructions. Any help?
I have tried to string braided leather as you have pictured onto memory wire without any luck. You mention a hole and I have yet to find it!!! Please help in anyway you can. I love this concept and wish to make my own!
Why 8mm end cap if leather is 5mm?
They are 8mm long. 5mm is the inner diameter. :)
Beautiful. I don’t have the patients to make my own, so I reply on the talents of people like you. This bracelet looks stunning.
Happy birthday! Great tutorial for these leather bracelets.
So cute! I love that they can fit any sized wrist as I have a hard time with bangles.
How cute!! This looks like something even I could manage to do ;-) and definitely something I’m going try!
Awesomely lovely bracelets. Love this. Thanks for sharing this post.
Gorgeous! You’re making me really want some new bracelets!
I don’t have a creative bone in my body, but this post makes me want to try making these bracelets. They’re so cute.
Great tutorial. Real slick way to advertise your work also. I’m gong to have to try this. I’ve never worked with 5mm leather before. Thanks for sharing. ~Ms. Rose
Brilliant idea to use up scraps of thick leather! (Will share on my blog). When you mentioned stitched leather cord, you mean the ones with the cotton core?
thanks again Adrianne for these absolutely wonderful projects. One question what i s the best glue to use and how do you prevent it seeping out of the fittings. I want to ensure its adheres strongly. II noted use a tiny dop of glue
Hi Adrianne! Love this “new to me” use of leather with memory wire. I like how it gives the memory wire a certain edge and texture – not just stringing beads on it (although I like that look too). I’m posting this on truebluemeandyou.tumblr.com.
Thanks so much! You are so talented. How do you think of all your projects! I also look forward to all your projects!
Oh, I totally can’t take credit for this one! I saw the idea on the Goody Beads site, it just didn’t have a tutorial attached, just photos, and a collection of supplies you could potentially combine.. So I figured it out for myself, and shared my tips for anyone else who saw it (or didn’t see it!) and needed a little more info about how to make it. Goody Beads has a designer on staff who has fantastic ideas.
As far as the ideas that ARE my own, it usually starts with one thing – some beads, or a charm, or a nature motif – that I fall in love with, and then design a whole piece around. This bracelet was a perfect example: http://happyhourprojects.com/beaded-button-clasp-bracelet/ All I wanted to do was figure out a way to use that darn button, and I ended up with a really pretty bracelet by the end!
Love this ! I’m going to try it for sure, really like how the leather makes the memory wire look. Thanks for making it clear for me
Diane
Oh, I’m so excited that you posted this particular blog entry! I absolutely love Goody Beads too. But I have been a little afraid as of yet to work with leather in my creations. I’m just very unfamiliar with it. But this tutorial looks like a great starting point. I will definitely be trying it out soon. Thanks so much for your awesome blog. I look forward to it every day! : ) And Happy Birthday!
Love,
Virginia
Thanks! I struggle with great ways to use beads sometimes, so I know what you mean about not branching out sometimes.
Eat some cake this weekend! If anyone asks, just tell them I told you to. ;)