• Skip to primary navigation
  • Skip to main content
  • Skip to primary sidebar

  • home
  • about adrianne
  • buy the books
    • DIY T-Shirt Crafts (2015)
    • DIY Stamped Metal Jewelry (2016)
    • Rock Painting for Beginners (2019)
  • videos
  • crafts
    • diy beauty projects
    • kids’ crafts
    • paper craft projects
    • polymer clay
    • sewing projects
  • jewelry
    • bracelet projects
    • earring projects
    • necklace projects
    • jewelry tools & supplies
  • metal stamping
    • beginners’ tutorial
    • video tutorial
    • project ideas
    • metal stamping supplies
  • recipes
    • cocktail recipes
    • appetizers
    • main and side dishes
    • sweets and treats
  • by season
    • birthdays
    • new year
    • valentine’s day
    • st. patrick’s day
    • easter and spring
    • mother’s day
    • patriotic
    • fall
    • halloween
    • christmas
    • thanksgiving
  • privacy

Happy Hour Projects logo

03/19/2015

DIY Spring Charm Lockets

One of my favorite things to give when I make jewelry gifts are charm lockets.  People LOVE them because they’re so personal, and they’re a beautiful way of expressing yourself!  New charms can be added, they can be changed for the season or for the occasion, and I’m going to show you today how to add a stamped disc to a locket to personalize it even more.  And because spring is here in just a few days, I’m sharing some ideas for spring accessories – including Mother’s Day gift ideas!

Spring Stamped Charm Lockets at www.happyhourprojects.com

You can get these DIY charm lockets in a few different styles and colors and finishes.  For a more traditional look, you can go with classic metal finishes, or enameled or acrylic colors for bright spring themes.  Give a starter locket with a charm (or a couple), and stamp a message or a name for a great gift – your mom (or any friend, of course!) can wear it just as it is, or she can fill it with more charms to make it her own!  The disc is totally removable, so stamping a message for a specific occasion won’t limit your gift.

Spring Stamped Charm Lockets at www.happyhourprojects.com

I found my DIY locket supplies at Goody Beads, and I’ll leave links below to the supplies I used in case you’re excited about this idea and want to make a purchase today!  These are affiliate links, which means if you decide to click and buy, it supports my blog (and thanks, by the way!) and there’s no extra cost to you.

Spring Stamped Charm Lockets at www.happyhourprojects.com

  • 30mm locket – I picked up silver and pink stainless steel hinged glass lockets, and also the more economical acrylic purple and orange screw-lid lockets.
  • Locket charms
  • Bench block and hammer
  • Metal stamps – I used ImpressArt’s upper case Lollipop font, and also the lower case Newsprint font
  • Permanent marker and polishing pad
  • 7/8 inch aluminum round stamping blanks
  • 28-36 inches of chain of your choice (I especially like the 28″ adjustable cable chain necklace for these lockets)

Spring Stamped Charm Lockets at www.happyhourprojects.com

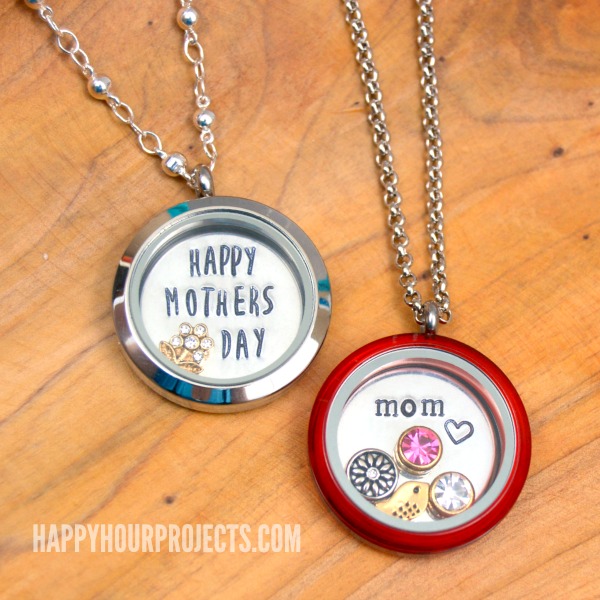
I stamped messages primarily on the upper part of a few discs.  Aluminum is a nice soft metal and takes an impression well!  I darkened my impressions with permanent marker, and polished the disc clean.  If you haven’t stamped jewelry before, I have dozens of posts about it!  You can learn more by starting with the beginner’s stamping tutorial for tips on how to get started with photos and video.

Stamping along the edge like I did above is something I find to be quite challenging.  You may find it easier to stamp straight across.  The goal is to keep the stamping at the top of the disc, because the lower half will get filled up with charms.

Spring Stamped Charm Lockets at www.happyhourprojects.com

Just pop the disc and a few charms into the locket to assemble it.  A quick note – if you buy any of the 6mm bezel-set crystal charms from Goody Beads, they don’t *quite* fit in the locket if you also add a disc.  The disc adds just slightly too much thickness.  I didn’t have trouble with any other charm, though!

Spring Stamped Charm Lockets at www.happyhourprojects.com

The acrylic lockets have a screw-on/screw-off lid, and with those, you can use the crystal charms with a disc.  Once you assemble the locket, just string it on a chain.  Another tip – if the end of your chain won’t fit through the bail of your locket, you may have to remove the clasp end temporarily to string it on.  While it’s an extra step, you actually have a more secure design, knowing you can’t lose the locket off the chain when you take it off.

Spring Stamped Charm Lockets at www.happyhourprojects.com

To can also add other springy charms to the necklace – get excited about spring break, say happy birthday, thank your bridesmaids, say I Love You – there are so many different possibilities to personalize these lockets.  You can see why I love giving them as gifts!

Spring Stamped Charm Lockets at www.happyhourprojects.com

For what occasions do you love giving jewelry gifts?

adrianne signature

Filed Under: Birthday, Easter, Fashion, Featured, Jewelry, Metal Stamping, Mother's Day, Necklaces, Tutorials Tagged With: accessories, birthday, charm, DIY, gifts, jewelry, locket, metal, metal stamping, Mother's Day, necklace, personalize, spring, Spring Break

copyright policy and terms of use

I love it when you love my work! All tutorials and photos published at Happy Hour Projects are copyrighted. If you would like to feature my tutorial on your website or share it on your social media you may use one photo to feature, as long as you provide a link back to the original post.

If you feature a photo, it may not be accompanied by the project tutorial or recipe, whether in my own words as it originally appears or paraphrased by you. This also includes personal sharing on social media and Pinterest. Publishing multiple photos from a project, or including instructions with an accompanying photo are not permitted and you will be asked to remove them.

I love to share my projects, and my tutorials, recipes, and e-books are ALL free for your personal use. However, photos and ideas that are published to this site are my protected intellectual property. You may print them at home, but please do not copy or distribute them. I also allow all designs to be made and sold at fundraisers, craft fairs, etc. If you are selling a piece made from one or more of my free tutorials in your online shop, I require that you use your own, original photography, and include a link back to my website to credit me as the designer.

I hope you enjoy what you read here, and please be fair when you share!

Reader Interactions

Comments

  1. shari k says

    04/09/2015 at 5:48 pm

    OMG you are awesome! I just found your site and I’m loving all your great ideas! Thank you for sharing!

    Reply
  2. Tonya says

    03/30/2015 at 3:10 am

    These are so cute – nice to see a tutorial to make your own – thanks!

    Reply

Trackbacks

  1. 20 DIY Mother's Day Gifts - The Binder Ladies says:
    05/04/2015 at 11:56 am

    […] Mother’s Day Charm Lockets […]

    Reply
  2. DIY Charm Lockets Tutorial | My Craft Assistant says:
    05/01/2015 at 8:59 am

    […] beautiful DIY Charm Locket is the perfect customizable presents for your mother this Mother’s Day, for anybody you love, […]

    Reply
  3. DIY Charm Lockets says:
    03/29/2015 at 1:00 pm

    […] Full Tutorial Here. […]

    Reply
  4. CraftCrave | DigiFree | CraftCrave says:
    03/20/2015 at 10:29 am

    […] DIY Spring Charm Lockets – 1 freebie(s)? […]

    Reply

Leave a Reply Cancel reply

Your email address will not be published. Required fields are marked *

Primary Sidebar

Hello, and welcome! I'm Adrianne, an artist, author, designer, and blogger in mid Michigan. I work from home, chase my two kids, and this once-city-girl is learning how to care for chickens and adjusting to life out in the country. I have a compulsion for daily creativity... sometimes it's jewelry-making, paper crafting, metal stamping, mixing and baking, or giving new life to recycled items. But with 2 young kids, time is short! My goal here at Happy Hour Projects is to share projects and tips that you can do in an hour or less. The ideas you find here are designed to add a little creativity in your day, no matter how much (or how little) time you have!

BUY MY BOOKS!

Copyright © 2023 Happy Hour Projects on the Brunch Pro Theme