
Today’s 10-minute bracelet project is sponsored by Consumer Crafts.
Do you love accessories you can make in 10 minutes or less? Do you love bracelets that sparkle and shine? Do you want to learn how to make a glittering tube bead bracelet today? Oh my goodness, please say yes! Hehe.

I really love how this design came together, and I’m teaming up with the Crafty Hangouts ladies as part of a 10-minute-or-less quick craft series, brought to you on video. (Be sure to check out the CraftyHangouts.com site this month to see all the fabulous video tutorials!) Consumer Crafts has sponsored this series, which is a company I LOVE for basic craft supplies of all kinds. I’ll leave links to the products I picked up on their site below, to help you shop so that you can make this quick bracelet at home!

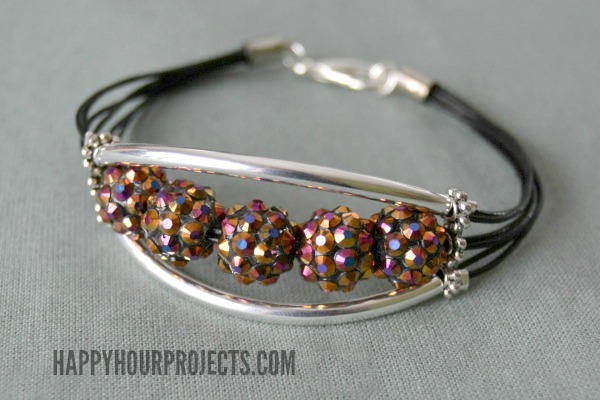
- 1mm leather cord (I used 2 yards here)
- Two silver or gold tube beads
- Five 12mm acrylic glitter beads (I used brown and silver for these bracelets, but any color would be pretty!)
- Two 3-hole spacer beads
- 5mm glue-on end caps
- Two 7mm jump rings
- 12mm lobster clasp
- Four 1.3mm crimp beads
- Super New Glue
- Jewelry pliers
- Scissors
I’ll give you a quick description, and then leave you the video below to walk you through it! For this project, you’ll be working with 6 cords about 7 inches long (I always cut mine longer as I’m working, but if you’re running short on cord, it’s okay to work with shorter cord since we’re not doing much beading). You’ll be separating these 6 cords into 6 parts, and stringing tube beads onto the outer parts and glitter beads on the center part. The 3-hole spacers and the crimp beads secure your work onto the top of the bracelet, and you glue on the ends. Let me show you more!
Aside from a minute or so for letting your glue dry, you can see this whole bracelet was assembled in under 10 minutes… which leave you time to make MORE, if you want! Or, check out my other quick craft video from last week: the 2-Minute Easter Jellybean Lamp.
Thanks for joining me today!

I know this was done a year ago but am having the same problem as others not getting the leather to go threw the spacers.. Will it look as good and the 2 strands ? I want to make these so bad.. Please help.
Thanks
I just read to try one stand I’ll give it a try. Thanks for sharing all the great ideas
I just watched the 10 minute glitter bracelet video. I have been waiting for the # hole spacer bars to arrive. Now they are here & I can not put both strands of 1mm wire through them. Are there different size spacer bars that are specially needed for this?
I have had a couple people comment that what they ordered doesn’t match what I used – it looks like they’ve changed stock since I made this bracelet last March. :( All I can recommend is to try adding just one strand through, and see if it’s enough to fill up your end caps. There’s no reason you would need the extra strand except I was trying to fill up the end caps I had on-hand.
Thank you so much for posting this, and so many of your other tutorials that I’ve saved. I’m almost hesitant to say this, but am I the only one who would, for instance, want the tube beads in different colors? I have a tendance to buy glittery nail polish – and not for my nails. Let’s say for making these for Christmas, I might paint the tube beads with red or green glitter polish, followed by a spray-coat of clear acrylic sealer, then use the white or gold glittery beads, or… whatever. Thanks Adrianne, for the inspirations you provide. Greetings from Texas.
Thank You for this beautifull project.
Have been looking for a pattern which used tubes and Leather.
This is Fabulous.
Halina in Australia
Trying to learn how to make dog collars.Do you have any idea’s ? Thanx for your time
I bought everything to makes these but the 3 hole spacer is too small to take 2 of the 1mm cord. Do all spacers have the same size hole? It didn’t say what mm is was on the package.
Loretta, there are always variations from one product to the next (the brand, the design, the exact diameters – that sort of thing). I know others have ordered the supplies from my list and had some variations in product, so I am betting it’s just a change in what they have in stock. I’m sorry you’re having trouble! I would recommend trying just one strand instead of 2 if you can’t get 2 to fit. You can also try using another type of cord, maybe that will make just enough difference?
LOVE this! This is such an amazing design! I love it! Can’t wait to make and wear this bracelet!
Guess what?! We made these!! :) I bought all the colors of beads by accident (seriously), but I’m glad I did bc some were prettier in person than others. I definitely wouldn’t have bought the teal, but it was my favorite one by far! THANK YOU for the instructions on this one! Consumer Crafts definitely got their money’s worth out of you. :) (Especially when your readers over-order :) )
P.S. One thing I will say that is weird about Consumer Crafts, though, is that what is pictured is often not what you actually get. For instance, I used all of your links, and I GOT some 3-hole spacer beads, but they weren’t the ones pictured. Same with the long tube beads (although I liked the ones that came even better). Same with a set of pliers that i ordered. I only ordered them bc they were purple and matched my sister’s craft room. But I got skinny hot pink ones. When I emailed them about it, they refunded my money for the pliers. Which was very nice. But you do have to be flexible when you’re buying from them.
Hmmm, I’ve been ordering from them for a long time and I haven’t run into getting something not pictured. I’m sorry that happened to you, because I recommend them to everyone!
The 3-hole spacers they had in stock were different when I went to put the links into this post. See, I’ve been buying stuff from them for over 2 years now. So I picked these up one one of my shopping trips, and I see they’ve changed since I bought them. :( That’s my fault. Same with the tube beads. Fortunately they still have equivalent products, but there are some slight differences. That’s what I get when I work from my stash, even if it is from the same company. :)
Oh, P.S. Both my sister and I have a TON of serious and horribly painful health problems. She was in the hospital all last week, and she brought wire and pliers with her and made a bunch of jewelry for people while she was there. It was the perfect portable craft to keep her from going insane from another prolonged hospital stay.
I’m sorry to hear about the hospital stay, but I definitely agree about the portability of jewelry. So glad you enjoy the jewelry posts! Sometimes I worry that I’m sharing too much jewelry and not enough other stuff… and then I decide it’s my blog and I can make whatever I want, haha. Thanks for the nice note!
Too much jewelry?! Ha! That’s adorable. That’s like too much chocolate. Too many unicorns. Too many hairs on Patrick Dempsey’s head!
Touche.
I was absolutely DROOLING over this one when I saw your video post of it on youtube. I was hoping you’d put up a blog tutorial, as well! Thank you!!! :) This is one of your most gorgeous creations yet.
May I just tell you, Adrienne, that YOU got my sister & I into jewelry? I showed her the blog and a few of my favorites. I was too scared to try, but Allison (my sister) made the rose ring out of wire. The first couple times were difficult, but once she got the hang of sizing it correctly, she really got into it! Now she & I actually host craft days, and we’ll have a myriad of ideas from your blog and we let the guests pick which tutorial they want to try. It’s really fun! I love that someone from Canada can influence time spent in Houston, Texas. :) Thank you! :)
your video was so refreshing. I really enjoyed it. I too am from Michigan. Thanks for the inspiration.
Unbelievable that you can make something so charming in such a short space of time. Great blog by the way , thanks for sharing.
I have been “collecting” your designs for a couple years now. You approach is fresh and wondrously creative. If I find time to make a third of your design,m I will be overjoyed.
It is only recently that I discovered that you live in Michigan – as do I.
I love the glitter beads you used! Such a pretty bracelet.
I love this, as I do love many of your simple projects. My life is way to busy right now, but I can assure you that when things get back to a more normal pace, I will be making these and learning how to do the metal stamping that you do so beautifully. Making jewelry is my blood pressure reducer. It is my way to unwind and be creative. Can’t wait to get back to my fun! =)