• Skip to primary navigation
  • Skip to main content
  • Skip to primary sidebar

  • home
  • about adrianne
  • buy the books
    • DIY T-Shirt Crafts (2015)
    • DIY Stamped Metal Jewelry (2016)
    • Rock Painting for Beginners (2019)
  • videos
  • crafts
    • diy beauty projects
    • kids’ crafts
    • paper craft projects
    • polymer clay
    • sewing projects
  • jewelry
    • bracelet projects
    • earring projects
    • necklace projects
    • jewelry tools & supplies
  • metal stamping
    • beginners’ tutorial
    • video tutorial
    • project ideas
    • metal stamping supplies
  • recipes
    • cocktail recipes
    • appetizers
    • main and side dishes
    • sweets and treats
  • by season
    • birthdays
    • new year
    • valentine’s day
    • st. patrick’s day
    • easter and spring
    • mother’s day
    • patriotic
    • fall
    • halloween
    • christmas
    • thanksgiving
  • privacy

Happy Hour Projects logo

03/24/2015

DIY Gold Glitter Looped Bracelet

If you caught my post yesterday about how to make a glitter wrap bracelet from plastic tubing, then you are expecting more glittery goodness today – and I’m here to deliver!  Today’s bracelet is just as easy, and only takes a few supplies.  I made mine up in sparkling gold glitter, but you can take this design wherever your imagination goes by adding other colors or tiny components.  I got to thinking after making this one that this would be a really fascinating beach piece, by adding sand from your favorite vacation spot!  (I still have extra plastic tubing – maybe I’ll try it myself!)

DIY Gold Glitter Looped Bracelet Made From Plastic Tubing at www.happyhourprojects.com

I made a few styles of bracelets that I’m sharing with you this week, because once I got going… who can quit, right?  It’s glitter and glue – and mess-free when you wear it!  A win on every front. :)  I had quite a challenge finding all the right components, though, but now that I finally did, I will share with you exactly where you can shop to get the look – in case you see this idea, and start obsessing the way I did, haha!  These links are affiliate links, which means if you do decide to jump in and make a purchase, then it supports my blog at no extra cost to you (and thank you, by the way!)

Beaded Glitter Wrap Bracelet Using Plastic Tubing at www.happyhourprojects.com

Pictured above are the components I used for a few different projects, but here’s what you’ll need to make today’s looped glitter bracelet from plastic tubing:

  • 3/16″ OD Clear plastic tubing with a 1/32″ wall (sold in 10-foot lengths)
  • Extra fine glitter
  • Round gold clasp (available in other finishes, too)
  • Scissors
  • Jewelry glue – I used Super New Glue for this project, but I also tested out Gutermann glue and liked it a little bit better. Either will work.
  • Funnel – you can use a tiny craft funnel, or just do what I did and roll up a scrap of paper and tape it shut

DIY Gold Glitter Looped Bracelet Made From Plastic Tubing at www.happyhourprojects.com

Cut a length of tubing 14.5 inches long – or if your wrist is larger, then 15 or 15.5 inches.  14.5 will make up a 7.5 inch bracelet which is a comfortable size for most women.

Fill the tube carefully with glitter through the funnel.  (It’s okay if you giggle at the thought of a tiny glitter bong.  I did.)  Tape the other end closed, or plug it with your finger so that you don’t lose the glitter out the other end!  You’ll be filling it all the way with two open ends, so just be careful as you add glitter.  Holding your tube like a U-shape is probably the easiest way to accomplish this, so that you have both open ends in your hand and gravity can work for you as you fill the tube.

DIY Gold Glitter Looped Bracelet Made From Plastic Tubing at www.happyhourprojects.com

Now, I put a few glues to the test when making up these bracelet styles.  The pros to Gutermann glue are that it’s got a pretty high viscosity.  It’s gooey.  So when you add it to your clasp, it won’t drip out and it helps hold the tubing in place while it dries – which is quickly.  I also used Super New Glue on another piece to experiment, and found that if the tubing is a very snug fit in the end clasp, the Superglue-style liquid glue worked fine, but if there is any looseness at all, the Gutermann glue was a much better choice.  I’d recommend Gutermann for this project, though you can get the other type to work too.

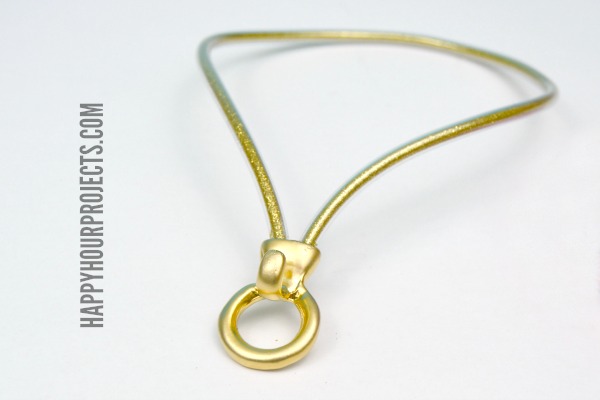
Add glue to the round clasp, and keeping the tube in that U-shape, glue the two open ends of your tube into the clasp, as shown above.  Give it about 3o minutes to dry thoroughly.

DIY Gold Glitter Looped Bracelet Made From Plastic Tubing at www.happyhourprojects.com

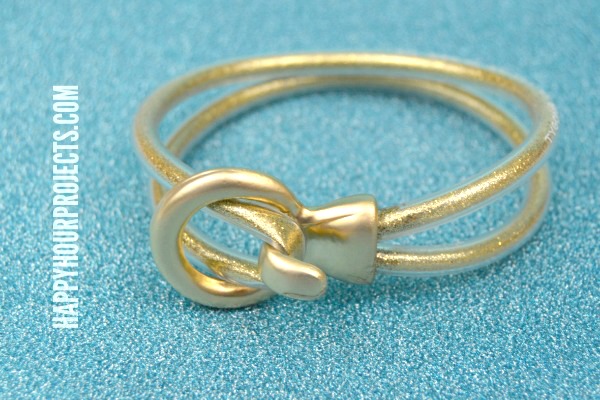
To wear it, feed the looped end through the round clasp, and hook it around the clasp’s hook.  It’s such a simple design – and it makes a big impact!  I’ve made this same style bracelet with round leather cord in the past, and it’s really one of my favorite styles.

I’ll have another glittery idea for you tomorrow, with a new set of matching components, so come on back if you’re looking for ideas how to use up all 10 feet of your plastic tubing.  I’ve got you covered!

adrianne signature

Filed Under: Bracelets, Fashion, Featured, Jewelry, Tutorials Tagged With: accessories, bracelet, fashion, glitter, gold, plastic tubing

copyright policy and terms of use

I love it when you love my work! All tutorials and photos published at Happy Hour Projects are copyrighted. If you would like to feature my tutorial on your website or share it on your social media you may use one photo to feature, as long as you provide a link back to the original post.

If you feature a photo, it may not be accompanied by the project tutorial or recipe, whether in my own words as it originally appears or paraphrased by you. This also includes personal sharing on social media and Pinterest. Publishing multiple photos from a project, or including instructions with an accompanying photo are not permitted and you will be asked to remove them.

I love to share my projects, and my tutorials, recipes, and e-books are ALL free for your personal use. However, photos and ideas that are published to this site are my protected intellectual property. You may print them at home, but please do not copy or distribute them. I also allow all designs to be made and sold at fundraisers, craft fairs, etc. If you are selling a piece made from one or more of my free tutorials in your online shop, I require that you use your own, original photography, and include a link back to my website to credit me as the designer.

I hope you enjoy what you read here, and please be fair when you share!

Reader Interactions

Comments

  1. Chris Tapalaga says

    03/23/2025 at 12:19 am

    Hello, where can I find the hook you used in this project? Thank you!

    Reply
  2. rice purity test says

    06/16/2024 at 10:03 pm

    I love the design and use of simple materials to create an impressive accessory. The article provides all the necessary information for workers, from choosing materials to implementation steps. This will help readers easily follow along and create unique bracelets.

    Reply
  3. Susan LeRoy says

    03/25/2015 at 2:09 pm

    Thanks for all your sharing! Great idea about the Beach Sand – Looking forward to seeing your finished project!

    Susan L.
    Evansville IN

    Reply

Trackbacks

  1. CraftCrave | DigiFree | CraftCrave says:
    03/25/2015 at 7:16 am

    […] DIY Gold Glitter Looped Bracelet – 1 freebie(s)? […]

    Reply

Leave a Reply Cancel reply

Your email address will not be published. Required fields are marked *

Primary Sidebar

Hello, and welcome! I'm Adrianne, an artist, author, designer, and blogger in mid Michigan. I work from home, chase my two kids, and this once-city-girl is learning how to care for chickens and adjusting to life out in the country. I have a compulsion for daily creativity... sometimes it's jewelry-making, paper crafting, metal stamping, mixing and baking, or giving new life to recycled items. But with 2 young kids, time is short! My goal here at Happy Hour Projects is to share projects and tips that you can do in an hour or less. The ideas you find here are designed to add a little creativity in your day, no matter how much (or how little) time you have!

BUY MY BOOKS!

Copyright © 2026 Happy Hour Projects on the Brunch Pro Theme