• Skip to primary navigation
  • Skip to main content
  • Skip to primary sidebar

  • home
  • about adrianne
  • buy the books
    • DIY T-Shirt Crafts (2015)
    • DIY Stamped Metal Jewelry (2016)
    • Rock Painting for Beginners (2019)
  • videos
  • crafts
    • diy beauty projects
    • kids’ crafts
    • paper craft projects
    • polymer clay
    • sewing projects
  • jewelry
    • bracelet projects
    • earring projects
    • necklace projects
    • jewelry tools & supplies
  • metal stamping
    • beginners’ tutorial
    • video tutorial
    • project ideas
    • metal stamping supplies
  • recipes
    • cocktail recipes
    • appetizers
    • main and side dishes
    • sweets and treats
  • by season
    • birthdays
    • new year
    • valentine’s day
    • st. patrick’s day
    • easter and spring
    • mother’s day
    • patriotic
    • fall
    • halloween
    • christmas
    • thanksgiving
  • privacy

Happy Hour Projects logo

05/27/2013

Grapevine Earrings

So I know you are used to seeing lots of bracelets from me (I confess, I’m a bit of an addict!) but I do like to mix it up everyone once in a while. ;)  I’ve had my eye on a pair of grapevine earrings and thought I’d try my hand at making a pair.  I love how they turned out – and even more, I love that they were easy!  I shared this project last month over at Crafts Unleashed, and today I’m going to show you here how to make a pair of grapevine earrings of your own.

Grapevine Earrings Tutorial

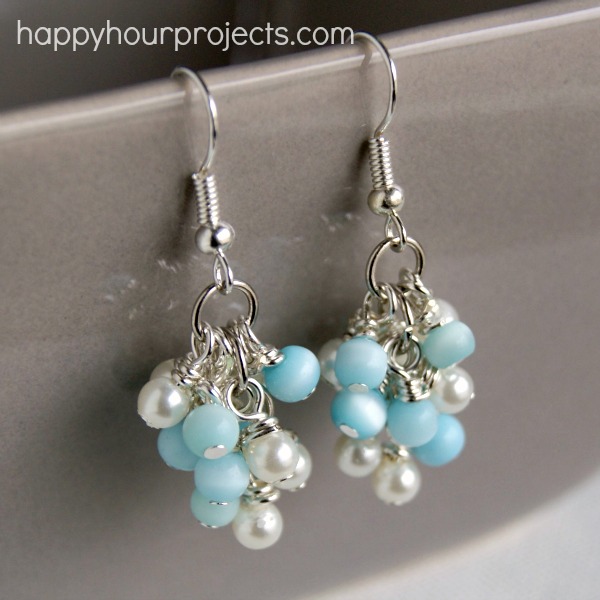
Just like any good jewelry project, feel free to put your own spin on the design and choose other colors or even other sizes of beads!  Personally, I am loving turquoise lately… if you can’t tell already.

What you will need:

Grapevine Earrings Tutorial

  • 4 mm beads – you will need 13 beads for each earring.  I recommend 2 coordinating colors, but get creative!  The beads I used are 4mm white glass pearl beads, and 4mm Turquoise Shell Twister Beads.
  • (26) 2 inch Jewelry Head Pins
  • A pair of Earring Wires
  • Jump Rings – I used (26) 4mm jump rings and (6) 7mm jump rings for this project
  • Round-Nosed Pliers
  • Wire Cutters

The first step is to make your beads into charms.  Charm-making is something I have shown you before when I shared the design for a Spring Buds Charm Bracelet and a few other designs, and once you master it, there are so many possibilities in jewelry making.  (Side note – it was pointed out to me that while I make it look easy, and I say it’s a simple process, it still might take a few tries to get really comfortable with making charms easily.  So you may want to try a charm or two first and see if you really want to commit to making 26 of them.  I will assure you that once you’ve made a couple, you can make the others in just a minute or two – I finshed this whole project in about 45 minutes, but them again, I make a lot of charms.)

But on to the charms themselves!  To create a beaded charm, you just thread a bead onto a head pin.  Then, using your round-nosed pliers, loop the pin over the pliers, wrap the pin around the “neck” of the loop you just created, and cut the excess wire off with your wire cutters.  The process is shown below:

Grapevine Earrings Tutorial

If you find that the little tail you cut off is still poking out slightly, just use your pliers to wrap it more snugly.

Then, repeat the process until you have enough charms.  In my case, that was 26 charms.

Grapevine Earrings Tutorial

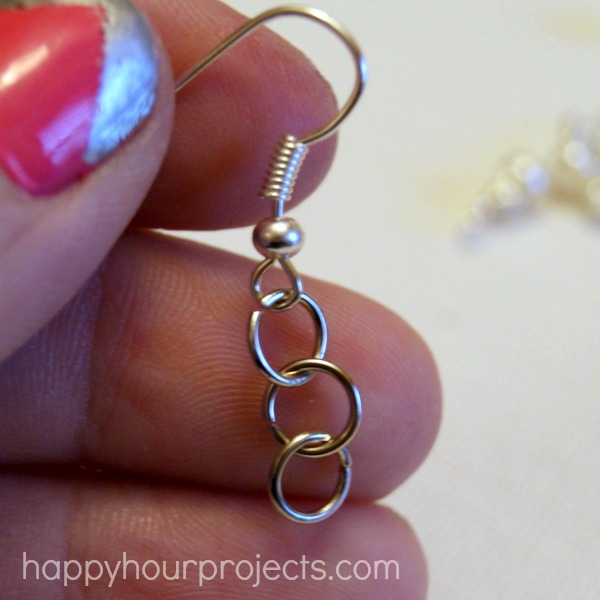
The rest of the project goes much more quickly, though!  Next, chain three 7mm jump rings together, and attach them to an earring wire.

Grapevine Earrings Tutorial

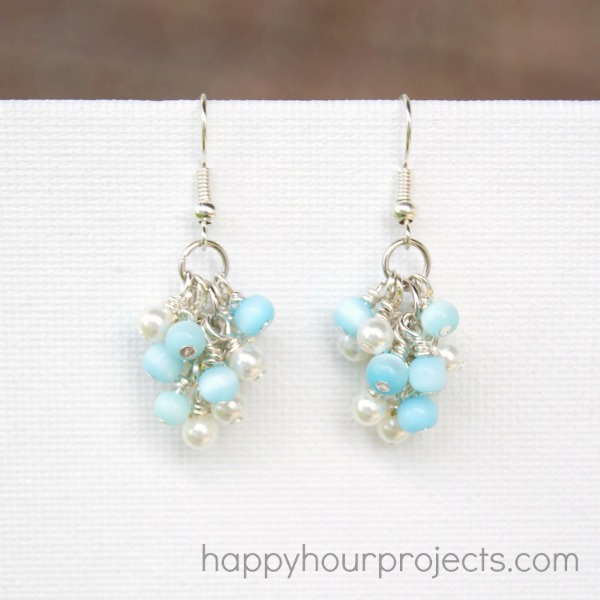
You can now begin adding your charms to the earring.  This works best if you start at the bottom.  Open a 4mm jump ring, and use it to attach a charm to the lowest ring.  On the bottom ring, you will be attaching 3 charms.

Grapevine Earrings Tutorial

After you have added 3 charms to the lowest ring, then add 6 charms to the center ring (3 charms on each side of the lowest ring), and then 4 charms to the top ring (2 charms to either side of the center ring).  This will give you that full “bunch” look!  I alternated colors so that my charms were pretty evenly mixed.  Of course, feel free to experiment, adding more or fewer charms to suit your own style!  You could also rock a bolder look by using some 6mm or even 8mm beads instead.  I like the delicate look of the 4mm beads, personally, but we all have a little different style – so go with what feels right for you!

Grapevine Earrings at happyhourprojects.com

What color combinations are you loving this summer?

Adrianne

Filed Under: Earrings, Fashion, Jewelry, Tutorials Tagged With: beads, charms, earrings

copyright policy and terms of use

I love it when you love my work! All tutorials and photos published at Happy Hour Projects are copyrighted. If you would like to feature my tutorial on your website or share it on your social media you may use one photo to feature, as long as you provide a link back to the original post.

If you feature a photo, it may not be accompanied by the project tutorial or recipe, whether in my own words as it originally appears or paraphrased by you. This also includes personal sharing on social media and Pinterest. Publishing multiple photos from a project, or including instructions with an accompanying photo are not permitted and you will be asked to remove them.

I love to share my projects, and my tutorials, recipes, and e-books are ALL free for your personal use. However, photos and ideas that are published to this site are my protected intellectual property. You may print them at home, but please do not copy or distribute them. I also allow all designs to be made and sold at fundraisers, craft fairs, etc. If you are selling a piece made from one or more of my free tutorials in your online shop, I require that you use your own, original photography, and include a link back to my website to credit me as the designer.

I hope you enjoy what you read here, and please be fair when you share!

Reader Interactions

Comments

  1. Shery Hendricks says

    09/29/2015 at 6:23 pm

    Just as I love all of your post, I love these and want to make them. Question: You state that the jump rings are 4mm and 7mm; is that OD or ID or if that is not known where do you get them and I can go from there. I just finished making my 26 (28 for mistakes, which I have been known to make) sterling headpins with my trusty butane torch and cannot wait to try these.. I will make the jump rings as soon as I get a reply from you. I am stingy with my sterling wire! Thanks, Shery

    Reply
    • Adrianne says

      10/01/2015 at 10:19 am

      That’s the OD but quite honestly you could get away with going a little bit smaller, especially on the 7mm ones. I don’t use sterling for tutorials (not much point in using the good stuff when I’m experimenting, after all!) so I just use whatever I have on-hand – which happened to be 4mm and 7mm this time around. I think 6mm would be totally safe for the larger size!

      Reply
      • kara says

        02/26/2018 at 10:37 pm

        I loved these earrings,,,,I am a newbie to this craft but I thought what is the worst that could happen,,,so I gathered up my “stuff” and then realized that I did not have the flat head pins or any to be precise,,so I did have lots of 24 gauge wire so I made head pins,,,lol,,of course they are not flat,,just finished the first one and it does not look too bad,,they are a gift for my best friend,,I used 4 mm pearls,,I was afraid that they might be too long for her but the length is perfect!!!! Thank you very much for the tutorial,,it explained everything so even I could understand,,,I will be browsing for more of your ideas,,,again thank you very much,,I do realize that this is an old post but it still rocks!!!!!!!

        Reply
  2. Doreen says

    07/27/2014 at 8:20 pm

    I love these earrings and the colors. Where did you get your beads? I’ve been looking for them and haven’t seen anything as pretty.

    Reply
    • Adrianne says

      07/29/2014 at 9:31 am

      I got them at ConsumerCrafts.com last year, but I don’t see them still available on their site. :( You can check out the category here, though – http://www.consumercrafts.com/store/browse/catalog/jewelry-twister-beads anything in a 4mm size is perfect for this design.

      Reply
  3. Sharon Kenny Didden says

    06/25/2014 at 7:41 pm

    I love your ideas. Is it okay to pin them with a note in the comment listing your website?

    Reply
    • Adrianne says

      06/25/2014 at 8:55 pm

      Absolutely! Thanks!

      Reply
  4. Mary says

    06/12/2014 at 6:43 pm

    Thank you for the excellent tutorial. You are a great wrapper and designer!

    Reply
  5. Kara says

    05/30/2013 at 8:55 pm

    So pretty! Love the colors :)

    Reply
  6. Crystal says

    05/30/2013 at 3:44 pm

    So pretty!! I am loving all your jewelry tutorials!! Thanks so much!!

    Reply
  7. Cindy {crazylou} says

    05/30/2013 at 2:43 pm

    You make it look so easy! I really need to get my jewelry supplies out and make this!! I’m featuring this on my PINASTIC Friday post, tomorrow, May 31…stop over and say hello!
    Cindy @ crazyloucreations.blogspot.com

    Reply
  8. Marilyn says

    05/28/2013 at 5:54 pm

    Adrianne, these are breathtaking! Simply stunning! Pinned!

    Reply
  9. Kadie says

    05/28/2013 at 5:22 pm

    These are so pretty!! I love the colors! Totally pinning.:)

    Reply
  10. SharonP says

    05/27/2013 at 10:47 pm

    These are so cute. You do really great loops! I’ll have to make these for my next earring project.

    Reply
  11. Rhondda Mol says

    05/27/2013 at 3:50 pm

    These are so pretty! I love how you make the ‘charms’ – thank you for sharing this technique.
    Rhondda

    Reply
  12. Rebecca, Soap Deli News says

    05/27/2013 at 12:38 pm

    These are so pretty!

    Reply
  13. carolanne says

    05/27/2013 at 7:42 am

    Thankyou! Everything you make is beautiful x

    Reply

Trackbacks

  1. Happy Hour Projects | Pearltrees says:
    05/17/2017 at 3:38 pm

    […] Grapevine Earrings – Happy Hour Projects. 45 Patriotic Project Ideas – Happy Hour Projects. 22 DIY Necklace Projects – Happy Hour Projects. 10-Minute Hemp Bracelet – Happy Hour Projects. Wire-Wrapped Pendant for Beginners – Happy Hour Projects. Quick and Easy Leather Wrap Bracelet – Happy Hour Projects. Barrel Bead Bracelet – Happy Hour Projects. Over 50 Furniture Makeover Projects – Happy Hour Projects. 25 Creative Organization Solutions – Happy Hour Projects. Easy Cascade Dangle Earrings – Happy Hour Projects. Friday Finds: 12 Great Blogs for Jewelry Projects – Happy Hour Projects. Friday Finds: 10 Blogs That Rock Paint Projects – Happy Hour Projects. Using Jewelry Connectors To Make Easy Earrings – Happy Hour Projects. […]

    Reply
  2. 5 ideas de aros únicos que puedes hacer para sentirte la reina de la fiesta - UpSocial says:
    05/06/2015 at 6:44 am

    […] Imagen: Happy hour projects. […]

    Reply
  3. Earrings | Pearltrees says:
    03/10/2015 at 6:20 am

    […] Grapevine Earrings. DIY Hex Nut Bracelet – Henry Happened. Spiral and Gemstone Chip Earring Tutorial | Emerging Creatively Jewelry Tutorials. How to Make Hammered Wire Earrings | Emerging Creatively Jewelry Tutorials. Joanne Tinley Jewellery: Tutorial Tuesday – Hammered drop earrings. Craft Tutorial: Chan Luu knockoff Earrings. […]

    Reply
  4. 9 Cluster Earring Tutorials says:
    02/05/2015 at 10:56 am

    […] Grapevine Earrings from Happy Hour […]

    Reply
  5. DIY Grapevine Clustered Earrings | CRAFTSOLOGY says:
    08/17/2014 at 10:39 pm

    […] Click to view complete step by step tutorial of Grapevine Clustered Earrings. […]

    Reply
  6. How To Make Grapevine Cluster Earrings says:
    01/06/2014 at 7:01 am

    […] was inspired by these gorgeous earrings from Happy Hour […]

    Reply
  7. The Lady Thing DIY Earrings Ideas. Cool and Easy - The Lady Thing says:
    11/05/2013 at 1:32 pm

    […] & Photo Credit to: HappyHourProjects […]

    Reply

Leave a Reply Cancel reply

Your email address will not be published. Required fields are marked *

Primary Sidebar

Hello, and welcome! I'm Adrianne, an artist, author, designer, and blogger in mid Michigan. I work from home, chase my two kids, and this once-city-girl is learning how to care for chickens and adjusting to life out in the country. I have a compulsion for daily creativity... sometimes it's jewelry-making, paper crafting, metal stamping, mixing and baking, or giving new life to recycled items. But with 2 young kids, time is short! My goal here at Happy Hour Projects is to share projects and tips that you can do in an hour or less. The ideas you find here are designed to add a little creativity in your day, no matter how much (or how little) time you have!

BUY MY BOOKS!

Copyright © 2023 Happy Hour Projects on the Brunch Pro Theme