• Skip to primary navigation
  • Skip to main content
  • Skip to primary sidebar

  • home
  • about adrianne
  • buy the books
    • DIY T-Shirt Crafts (2015)
    • DIY Stamped Metal Jewelry (2016)
    • Rock Painting for Beginners (2019)
  • videos
  • crafts
    • diy beauty projects
    • kids’ crafts
    • paper craft projects
    • polymer clay
    • sewing projects
  • jewelry
    • bracelet projects
    • earring projects
    • necklace projects
    • jewelry tools & supplies
  • metal stamping
    • beginners’ tutorial
    • video tutorial
    • project ideas
    • metal stamping supplies
  • recipes
    • cocktail recipes
    • appetizers
    • main and side dishes
    • sweets and treats
  • by season
    • birthdays
    • new year
    • valentine’s day
    • st. patrick’s day
    • easter and spring
    • mother’s day
    • patriotic
    • fall
    • halloween
    • christmas
    • thanksgiving
  • privacy

Happy Hour Projects logo

03/25/2013

Spring Bling Week – Woven Ankle Bracelet

Good morning, friends!  This week I’m working with some other bloggers who love DIY jewelry projects as much as I do for Spring Bling Week – a week of tutorials and resources on jewelry!  We’ll be wrapping up on Friday with an awesome giveaway, so be sure to come back all week!

Today I have a tutorial for a woven ankle bracelet.  I love working with hemp for jewelry, it creates such an earthy look.

Woven Ankle Bracelet

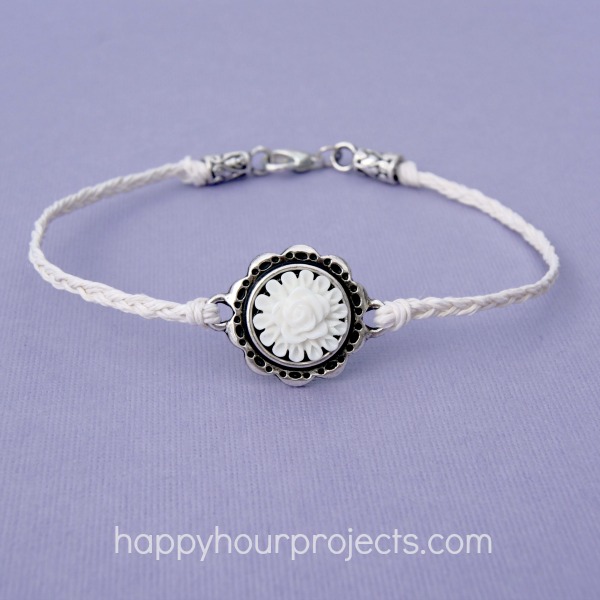
This one is removable – mainly because of the cabochon I added.  While it will certainly stand up to a lot, making this a tie-on ankle bracelet is a lot of wear for spring and summer.  Being able to remove it for showers, swimming, wear under socks, etc. will certainly extend its life. :)

Like everything I show you – feel free to put your own spin on this design!  I’ll show you what I used and how I made it, but half the fun of DIY is coming to a design that’s all your own.  Let me show you how you can put one together for yourself!

This is a pretty quick project – 20-30 minutes.  You will need:

Woven Ankle Bracelet

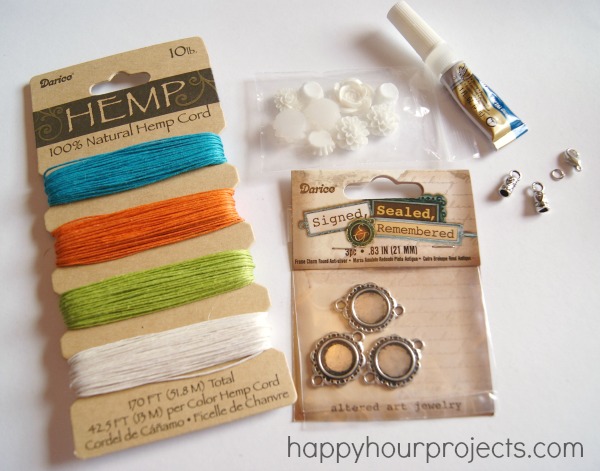
  • Hemp cord – cotton would work well too.  I used the small stuff, 10lb.
  • A bezel for your cabochon that has a link on each side.  I loved these ones from Consumer Crafts, but if you see something similar, give it a try!
  • A cabochon to fit your bezel – totally optional.
  • Glue-on end caps and jewelry glue.

First – attach cut off 6 strands of hemp about 12 inches long.  If you are running low on hemp, you could probably get away with making these as short as 10 inches, but having the extra length at the ends makes it much easier to work with.

Take 3 strands and double them, so you have 3 loops with 6 inch tails.

Woven Ankle Bracelet

Now, you’re going to make a Lark’s Head knot  onto your bezel connector.  I talk about this a lot when I’m showing you jewelry made with hemp or twine.  You just feed your loop through one ring of the connector –

Woven Ankle Bracelet

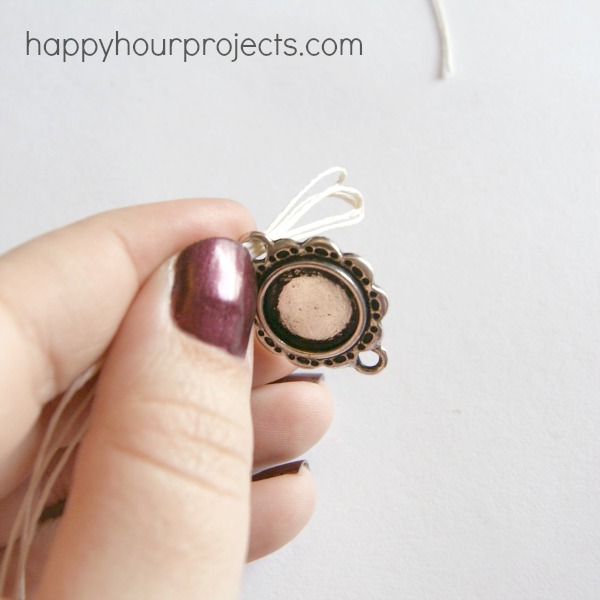
And feed the tails through your loops.

Woven Ankle Bracelet
(It’s a two-handed job, I’m just showing you with one hand so I could show you a photo, haha.)  Now, tighten it up, and you’ll have a nice knot.  Do the same thing with your remaining three strands on the other side.

Woven Ankle Bracelet

Now, you’ll want to braid these cords to create your bracelet.  If you love making six-stranded braids, they are lovely.  They aren’t as easy for me as three-stranded braids, though, so I take the faster route and braid a three-stranded braid with two cords in each strand.

The length you will need to braid will vary based on a couple things – the length of your center connector, and the length of your clasp.  For an ankle bracelet, you want a total length of 9-10 inches.  My connector is about and inch, and my clasp adds about an inch.  So that is 7-8 inches I need to braid – only 3 1/2 to 4 inches on each side.  At the end of each of those braids, make an overhand knot to close it off.

Woven Ankle Bracelet

Now, you could leave this as a tie-on bracelet at this point if you prefer!  But I’m going to add a clasp so that it’s removable.

To do that, trim up your excess cords evenly.

Woven Ankle Bracelet

Add a dot of glue on the inside of your end caps, and glue them onto each end of your bracelet.  Now, you will just need to attach a clasp!  I like the security of a lobster clasp, but use what you like.

Woven Ankle Bracelet
Now, I just need to add my cabochon.  A bit more jewelry glue on my bezel connector, and I can add a little flower to dress it up!

Woven Ankle Bracelet

There are so many different ways you could make one of these, this is just my design for the day. :) Hope you enjoyed it! I will have more jewelry coming up this week – and so do some other fabulous bloggers!  Be sure to check out the other blogs and get inspired!

spring_bling_button
Holly from 504 Main
Kate from Cheap Crafty Mama
Kara from Happy Go Lucky 
Adrianne from Happy Hour Projects
Rebecca from My Girlish Whims
Natalie from North Shore Days
Amy from One Artsy Mama

Adrianne

Filed Under: Bracelets, Jewelry, Tutorials Tagged With: bracelet, cabochon, hemp, twine, woven

copyright policy and terms of use

I love it when you love my work! All tutorials and photos published at Happy Hour Projects are copyrighted. If you would like to feature my tutorial on your website or share it on your social media you may use one photo to feature, as long as you provide a link back to the original post.

If you feature a photo, it may not be accompanied by the project tutorial or recipe, whether in my own words as it originally appears or paraphrased by you. This also includes personal sharing on social media and Pinterest. Publishing multiple photos from a project, or including instructions with an accompanying photo are not permitted and you will be asked to remove them.

I love to share my projects, and my tutorials, recipes, and e-books are ALL free for your personal use. However, photos and ideas that are published to this site are my protected intellectual property. You may print them at home, but please do not copy or distribute them. I also allow all designs to be made and sold at fundraisers, craft fairs, etc. If you are selling a piece made from one or more of my free tutorials in your online shop, I require that you use your own, original photography, and include a link back to my website to credit me as the designer.

I hope you enjoy what you read here, and please be fair when you share!

Reader Interactions

Comments

  1. blog content writing says

    08/21/2018 at 9:07 am

    I ne??ed to thank you fo? this ?r?at read!! I ?efinitely ?oved every little bit of it.
    I have got you save? as a favorite t? look at ne? th?ngs you post…

    Reply
  2. Search Engine traffic says

    08/20/2018 at 7:17 pm

    ?hznks for sharing your thoughts about buy website traffic.
    Regards

    Reply
  3. fernita says

    11/09/2013 at 7:34 am

    hi adrianne,i love all your project..and i’d like to know too do you sell all the materials especially the cord where can i get it…thx for your information..lucky me if you sell that cord..

    best regards
    Nita

    Reply
    • Adrianne says

      11/09/2013 at 7:42 am

      Hi Nita,

      I do not sell it but I get most of my supplies from Consumer Crafts, here is the link to their hemp cord category – you should find this same hemp, it’s 10-lb weight and there are several colors to choose from! http://www.consumercrafts.com/store/browse/catalog/jewelry-making-and-stringing-cord/1/40?o=0&ss=ProductType%2CHemp%20and%20Jute

      Reply
  4. Chanin says

    04/01/2013 at 6:34 pm

    I love this! It looks great! I cannot wait to make one! I think I am gonna try to put a breast cancer awareness spin on it for my sister who is battling breast cancer right now! Thanks for the great idea!

    Reply
  5. Kara says

    03/29/2013 at 9:21 am

    So pretty! Love the white too :)

    Reply
  6. Barbara says

    03/25/2013 at 11:59 pm

    Adorable. Would be cute as a bracelet as well. very light & summery (if that’s a word)

    Reply
  7. Crystal says

    03/25/2013 at 11:42 pm

    OMG!!! I love it!! It is so pretty yet fun!! Pinning it!

    Reply
  8. Tara DK says

    03/25/2013 at 11:38 pm

    I love this idea :D Next time I splurge on crafty goodies, this is on my list of “Must Try!”

    Reply
  9. cece cole says

    03/25/2013 at 9:11 pm

    Love this piece. I don’t do jewelry that much and was wondering if aileen’s jewelry glue will hold the end caps and clasps well.

    Reply
  10. Natalie says

    03/25/2013 at 5:50 pm

    I love this ankle bracelet Adrianne, so pretty!. I have that exact hemp thread!!!! I was struggling with it and never thought to braid it – that’s what I’m going to do! So glad to be joining you for Spring Bling week xxx

    Reply
  11. Marilyn says

    03/25/2013 at 4:36 pm

    Adrianne, this is simply elegant! I LOVE it!

    Reply
  12. mindie says

    03/25/2013 at 2:35 pm

    Very pretty pinned it to!

    Reply
  13. Kathy Penney says

    03/25/2013 at 11:30 am

    Really cute! I love the “antique” charm! I love your jewelry that you do. Keep meaning to attempt some. :-)

    Reply
  14. Kristy says

    03/25/2013 at 9:56 am

    love this! hemp cording is my favorite and I love the shabby chic of it paired with your chosen accents.

    Reply

Trackbacks

  1. Spring Bling Week - Pearl Cluster Earrings - Kara Creates says:
    03/26/2022 at 10:13 pm

    […] work tomorrow!! Have you checked out all the other fabulous tutorials from our Spring Bling Week? Woven Ankle Bracelet by Adrianne, Color Block Earrings by me, DIY Amber & Gold Dangle Necklace, Simple Statement […]

    Reply
  2. Cute DIY Anklets To Show Off On The Beach says:
    07/07/2016 at 10:25 am

    […] pendants can make an anklet look eye carching and fancy without getting complicated. Check out how Happy Hour Projects made this one just by weaving thick embroidery […]

    Reply
  3. 15 Adorable DIY Anklets To Show Off On The Beach says:
    06/03/2016 at 2:46 am

    […] pendants can make an anklet look eye carching and fancy without getting complicated. Check out how Happy Hour Projects made this one just by weaving thick embroidery […]

    Reply
  4. Color Block Beaded Earrings says:
    11/03/2013 at 9:43 am

    […] a beautiful pair of color block earrings to wear. Don’t forget to visit Adrianne over at Happy Hour Projects to see her jewelry tutorial and my other fabulous co-hosts throughout the week to see more spring […]

    Reply
  5. Spring Bling Week - Pearl Cluster Earrings - Happy-Go-Lucky says:
    11/02/2013 at 5:31 pm

    […] work tomorrow!! Have you checked out all the other fabulous tutorials from our Spring Bling Week? Woven Ankle Bracelet by Adrianne, Color Block Earrings by me, DIY Amber & Gold Dangle Necklace, Simple Statement […]

    Reply
  6. Handstamped Ring says:
    10/09/2013 at 1:13 pm

    […] my friends and check out the fabulous jewelry tutorials they’ve been sharing all week long! Woven Ankle Bracelet by Adrianne, Color Block Earrings by Kara, DIY Amber & Gold Dangle Necklace,Simple Statement […]

    Reply
  7. Easy Woven Wrap Bracelet says:
    04/09/2013 at 6:55 am

    […] you’re not sure how to do this, I use them in most of my woven bracelets.  You can check out this tutorial to see what I […]

    Reply
  8. Spring Bling GIVEAWAY! says:
    03/29/2013 at 2:55 pm

    […] by Kara from Happy Go Lucky / Stamped Washer Necklace by Adrianne from Happy Hour Projects / Woven Ankle Bracelet by Adrianne from Happy Hour Projects / Handstamped Ring by Amy from One Artsy Mama / Amber Dangle […]

    Reply
  9. Cute DIY Woven Ankle Bracelet says:
    03/28/2013 at 9:04 am

    […] strands on the other side and make good knots. Now braid the cords, the rest of the tutorial is here. Read to the end and make your cool ankle […]

    Reply
  10. Spring Bling Week – Druzy-Style Resin Necklace says:
    03/27/2013 at 6:01 am

    […] you a few different styles and techniques this week for Spring Bling Week  – Monday I showed you a woven ankle bracelet made from hemp and a cabochon, and yesterday I made a mixed media bracelet with turquoise chips).  Today I want […]

    Reply

Leave a Reply Cancel reply

Your email address will not be published. Required fields are marked *

Primary Sidebar

Hello, and welcome! I'm Adrianne, an artist, author, designer, and blogger in mid Michigan. I work from home, chase my two kids, and this once-city-girl is learning how to care for chickens and adjusting to life out in the country. I have a compulsion for daily creativity... sometimes it's jewelry-making, paper crafting, metal stamping, mixing and baking, or giving new life to recycled items. But with 2 young kids, time is short! My goal here at Happy Hour Projects is to share projects and tips that you can do in an hour or less. The ideas you find here are designed to add a little creativity in your day, no matter how much (or how little) time you have!

BUY MY BOOKS!

Copyright © 2023 Happy Hour Projects on the Brunch Pro Theme