
If you love the look of stamped metal and riveting, but find it too intimidating to get started, I’ve got the perfect project for beginners today. Really! I made this 8-minute video tutorial for you guys to show you how to stamp jewelry and how to rivet jewelry to make a beautiful and unique pair of earrings. Ready to DIY a fabulous new accessory? I thought so – let’s get started!

Here’s what you’ll need for this stamped earring tutorial – I’ll leave links to the products I used below so you can buy them if you’re looking for this exact look. You can click the affiliate links below to learn more, or support my blog by making a purchase – but don’t forget, half the fun of DIY is making your own unique accessories, so get creative with any items you like!

- Bench block and hammer
- ImpressArt 6mm Whimsy Flower design stamp
and ImpressArt 3mm Whimsy Flower design stamp
- Drop shaped pewter stamping blanks
- Permanent marker and polishing pad
- 2-Hole Punch (3/32″)
- Rivetable flowers
- 5.3 mm eyelets
- Eyelet setter
- Earring wires
- Jewelry pliers
I did my best to keep things short in the video, so if you’re looking for more detail on stamping that what I cover, you should jump over to my beginner’s metal stamping tutorial for a comprehensive overview. But if you think you’re ready to get started, or you just want to see it up-close this time around, then let me show you with this YouTube tutorial.
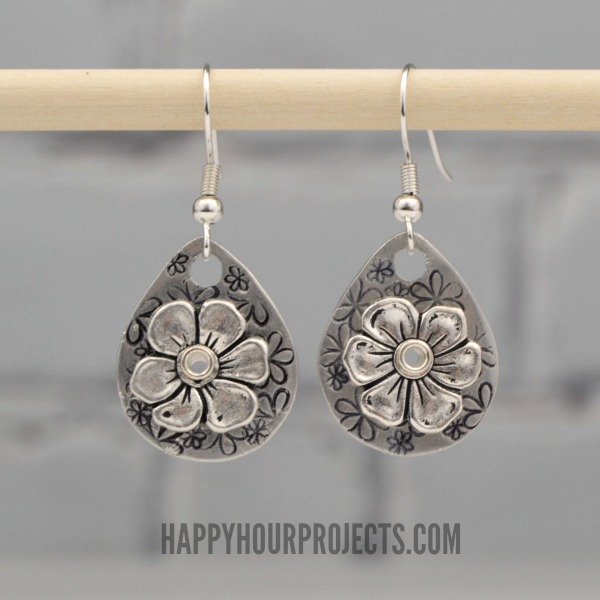
To get the look, it’s an all-over floral patterned stamped design with a hole punched in the center, and a floral accent riveted on top of the teardrop shape. The only findings that need to be added are a pair of earring wires – making this a really fast project with a lot of room for forgiveness if your work isn’t exactly perfect.

These are so cute and I’m motivated to try it! Thanks so much!!
Where did you get the flower eyelets? What brand are they etc.
You can click to purchase anything in the supply list up above! I got them at Goody Beads, they are Tierracast brand. https://www.goodybeads.com/store/products/TC01672.htm
Thanks for the information, I have seen rivets that have a colored gem in the center, that may look nice in the center of the flower too for a different look. I assume that you set those the same way and the gem will not crack?? You will have to come up with some more projects using those blanks since we have to buy in such a large qty. :-)
Thanks!
I already am, haha! Today’s post is a matching necklace: http://happyhourprojects.com/floral-layered-necklace/
And if you’d like to see the crystal rivets in action, here’s my most recent project with them: http://happyhourprojects.com/diy-riveted-leather-bracelet/
What size (mm) of the crystal rivets would you use for this particular earring project?,I know nothing about rivets and where would I get that riveting setting tool?? I just checked out the bracelet and it is great. I would imagine it is easier to set the rivet in leather then in the metal piece. I assume that they have to be a certain length to go through both pieces (flower and the teardrop).?? Where do you recommend ordering the crystal ones from?? Also, where did you get the sizzix bracelet blank, that is pretty neat too!! Sorry for all of the questions!! I ordered most of the supplies for the earrings, waititng to place the goody order.
Questions are great! If you wonder, chances are you’re not the only one. I’m happy to talk about it.
I have 2 places I’ve picked up crystal rivets from. The ImpressArt brand are the nicest and easiest to use, and Goody sells those: https://www.goodybeads.com/store/products/A018943.htm HOWEVER… I don’t think they can accommodate both a thick pewter blank and also those rivetable flowers. I think it would work fine for a normal aluminum (or nickel, or copper, or brass) blank. But part of what makes pewter so wonderful to stamp is its thickness.
I also have used the Tandy rivets, those come in several sizes… but I still think they might not be thick enough? http://www.amazon.com/gp/product/B002PI8Y0I/ref=as_li_tl?ie=UTF8&camp=1789&creative=390957&creativeASIN=B002PI8Y0I&linkCode=as2&tag=haphoupro-20&linkId=5SLWDKO7GAMW37YO
These don’t have crystals but I think they’d be just big enough: https://www.goodybeads.com/store/products/TC01447.htm
And I did just update the leather bracelet to add a link, but I’ll leave it here too since you asked: http://shrsl.com/?~7r0o
:)
Hi there, I love the earrings. I looked up where to order the supplies, do you happen to know if a smaller amount of the pewter tear drops are available?? Also- what is the difference between the eyelets and riveting?? You said that you chose to do eyelets. I have done those im scrapbooking but never tried rivets.
Thanks!!
Hi Carla,
Eyelets are hollow with a hole through the middle, and rivets typically aren’t. You would set them in a very similar way, though. When I use the word “riveting” though, I use it interchangeably whether I’m using rivets or eyelets… I’m not sure if “eyeleting” is a word but it just doesn’t seem right to say, haha.
I haven’t found the drops in a smaller quantity *yet*. They are a brand new shape, so they aren’t stocked in a lot of places yet, but stay tuned because they are sure to be soon!
These are SO PRETTY! I have yet to try riveting metal (or anything), but this makes me want to give it a try. Thanks for a great video tutorial!
Can you use a shorter eyelet? these seem so long for the thickness of the project….Or do you really need the length of the 5.3 eyelets. Love these earrings!
Hi Jeannie,
I started with a 6.8mm size (in the video) and ultimately opted for the 5.3 size. The rivetable flowers and pewter blanks are both quite thick – just over 2mm each. So if you are using other elements or blanks, then you will want to use a shorter eyelet, but the 3.7mm won’t reach all the way through if you’re using these exact blanks and embellishments. Great question!
Awesome video – I’ve been thinking of trying stamping – Your video encouraged me even more. You make it look so easy.
Hi Adrianne! Thank you SO MUCH for this video. I enjoy making jewelry but have never been interested in metal stamping….until now. Can’t wait to try making these earrings :o)!!
Very cute!! Thanks for the great video!