
I was recently reminded that despite the snow, wedding season is fast approaching this year! I’ve had a few people ask me about handmade wedding gift ideas already. I actually have a really sweet gift idea for the bride-to-be (or perhaps a bridesmaid gift from the crafty bride) in this mixed media bracelet.

I’m not getting married, but you know, my husband and I are my favorite couple, haha. Insert gratuitous wedding photo here:

I know I’ve been doing quite a few stamped projects lately, and this post is going to get awfully long if I talk about my personal tips for metal stamping again in this post. So the stamping will be the short version, and I’m going to focus instead on how to make the bracelet itself. See, once you start stamping, you will be looking for all kinds of ways to personalize different pieces, so hopefully I can give a little inspiration here. If you haven’t done any metal stamping yet and you are looking to start, I have a whole post dedicated to jewelry stamping. The tutorial includes how to do it and even what you need to buy to get started, so feel free to check out that post for a lot more detail.
I will tell you that these blanks are made of aluminum (technically I believe they are ring blanks), I found them at Michaels, and they are just under 2 inches long. The font I used is called Corsiva and it’s a 3mm size font. Aluminum is a great metal for stamping, especially if you’re a beginner. It’s soft so it takes impressions really well, and it’s also a great metal for anyone with sensitive skin. It makes up into great bracelets and components for bracelets because you’re able to bend it, and it’s sturdy enough to hold that shape well. The downside to people who are stamping “purists” is that aluminum will not oxidize. So that lovely darkened look to the letters is artificial. I use a Sharpie marker to darken my letters, though I know a lot of stampers also like acrylic paint. You will not be able to use liver of sulfur and a polishing cloth for that more vintage feel when you work with aluminum. If you’ve got more questions than what that tutorial can answer, alwasy feel free to ask a question in the comments or drop me a note!
Skipping ahead to once you’ve got your stamped blank, here’s what else you will need to make it into a fabulous mixed media bracelet.
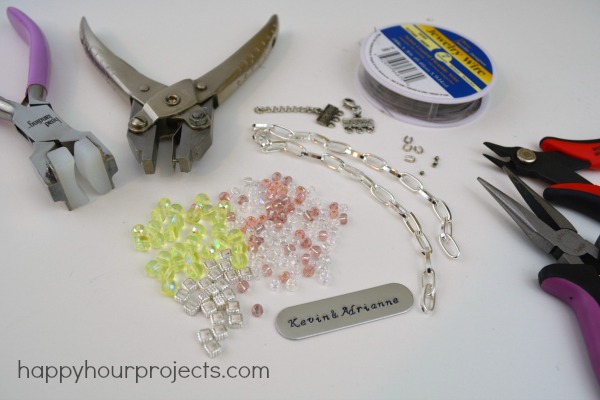
- Bracelet-bending pliers
- Metal hole punch (you can use the screw-down or hand punch)
- Beads you love
- Chain (I used about 18 inches of chain)
- Clasp – mine has three holes to space out your bead and chain strands
- Beading wire, wire guards and crimps
- Wire cutters and Jewelry pliers
- Jump rings
Start out by marking your holes on your stamped bracelet blank, and punch them. Then, use your handy-dandy bracelet bender to bend the blank – this will help it to better fit your wrist.

Use jump rings to attach about a 2-1/2 inch length of chain to each side. Since this will vary if you’re using a different sized blank, you want your finished length to be approximately 6-1/2 inches, so go by that more so than my chain measurement suggestion.
Use jump rings to attach your new chain to the bracelet. I put mine right in the middle. You may want to add more chain, like I did – I measured an equal length of chain and added two more pieces. Because more is better, to me. ;) You may want to use more beads instead – it’s your design and your bracelet, so feel free to change it up!
Next, I added beads. I opted for just two strands. I like to mix the colors, shapes, and patterns – mixing in a metal spacer bead helps tie the beads and chain together. To add bead strands, first cut a length of beading wire about 10-12 inches. It’s more than you will need, but you will have much better luck working with a few extra inches.
Add a crimp bead, and feed the wire through the wire guard like in the photo below. Hook the wire guard onto the hole in the clasp, and feed the wire around, and through the other hole. Now, tuck the tail end of the wire into the crimp bead enclosing both ends of the wire – and crimp it shut with crimpers or jewelry pliers.

Now, you can string your beads. Just feed the small end of the wire into the holes in your beads. Bead a length of wire equal to your chains – and add a wire guard on the opposite end of the bracelet just as you did the first end. Trim your excess wire to about an inch, and you can use your pliers to tuck the wire end into the beads. Add as many bead strands as you like the looks of. I added a clear strand and a light green one.

You can make the piece extra special by incorporating the wedding colors into the bracelet! This is a classic personalized gift that can either be worn on the special day, or kept as a memento and worn anytime.
Do you have any weddings coming up this year? Are you making any gifts? What’s your favorite handmade gift to give new couples?

Hi Adrianne,
Love your blog posts!!!!
Can you tell me what would be the best alphabet size to start with for metal stamping?
Any suggestions on where to purchase the metal pieces?
Thanks,
Orin
Hi Orin,
I usually buy the metal blanks at Goody Beads: http://store.goodybeads.com/store/beads-and-supplies/Beads-Supplies-Metal-Stamping-Blanks.html
And I prefer 3mm sized stamps (1/8 inch). I do have some 2mm and 2.5mm stamps that I enjoy too, but most often I use 3mm.
This is pretty. I love projects that come together relatively quickly.
This is gorgeous, Adrianne! And hellllllooooo…. what is this bracelet bender thingy? That is so cool!
I’m putting this on my jewelry-making to-tackle list!
Adrianne, I absolutely LOVE this bracelet! Gorgeous!!!
Beautiful!! What a sweet and great gift for a wedding couple. Love your jewelry!! Thanks for the tutorial :)
I absolutely love your jewelry tutorials! You should get a kick back from Goody Bead for all I spend there! THANKS for beautiful and simple designs
Haha, Darlene! Maybe I should look into that?? Thank you for the note!