
I’m playing a round of Craft Lightning today, with a 15-minute-or-less teacher appreciation-themed project! If you haven’t heard of Craft Lightning before, it’s a themed collection of quick crafts that my friends at The Country Chic Cottage and 30 Minute Crafts organize, so be sure to stop by this week to get LOTS of great teacher appreciation gift ideas that you can make in 15 just minutes! It probably won’t surprise you that I stamped today’s teacher gift. I LOVE stamping – once you get started and get your technique down, you can crank out special personalized gifts in hardly any time at all. This set of 2 spoons took me under 10 minutes (which was of course, less than that trip into the store to buy a box of tea to go along with it)!

I’m going to give you some tips for stamping spoons today, if it’s not something you’re already addicted to. If you would like more information on how to get started, I have a great post about metal and jewelry stamping for beginners to check out, too.
What you will need:
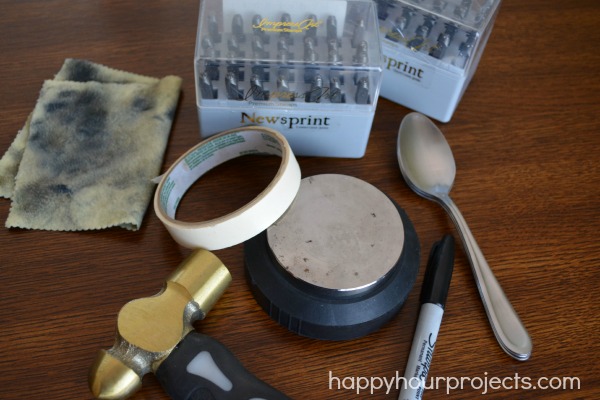
- Basic Stainless Steel Spoons (from any housewares section)
- Premium Hardened Metal Stamps (mine are the Newsprint font from ImpressArt)
- Steel Bench Block and Hammer
- Masking Tape
- Sharpie Marker or other NONTOXIC permanent marker and a Polishing Cloth
- And of course, some tea and/or coffee to complete your gift set
First things first: let’s talk metal and stamps. Because choosing right makes all the difference. My stance is that it’s a more cost-effective investment in the long run to invest in a premium hardened stamp set, so that you can stamp on any kind of spoon. Most average spoons are stainless steel, and brand-new are often $1 or less. My spoons are a 6-pack for $5.99, but you can even find sets of spoons at the dollar store for practice. Alternately, you can buy silver or silver plated vintage spoons, and use a basic stamp set on the softer metal. But given the room for error when you’re practicing (especially at first) and the long-term cost of stamping spoons (say you do 20, that’s $100 just in spoons!) spending the money on your tools pays off if you plan to do quite a bit of stamping.
I mention all of this so that there’s no confusion if you buy a basic stamp set (which works awesome for jewelry) and you can’t get it to work on hardened metals like spoons, washers, or anything steel.
All right, now let’s get down to business. I’m going to tell you what works best for me when I stamp. This isn’t the only “right” way, but it’s how I learned by trial and error to space and align my letters well.
First, I always run a line of tape so that I have a straight line for vertical alignment. I realize I just said “line” a whole bunch right there, but the straighter the line, the better the final piece will look.
Next, I mark off the spacing for my letters. Then, I tape my piece to my steel bench block. Spoons aren’t flat, and you’ll get the best results when your spoon is in direct contact with your bench block. So, you’ll need to adjust and tilt it as you work. For me, masking tap works well to rotate it around and move it as I work.
Then, I stamp. Keep your stamps light, and you’ll be able to feel the edge of the tape. You can see below that it came out pretty even – much better than if I just eyeballed it. You want one firm strike for each letter – hitting it more than once will often cause your stamp to shift, and you’ll get a double-stamp.
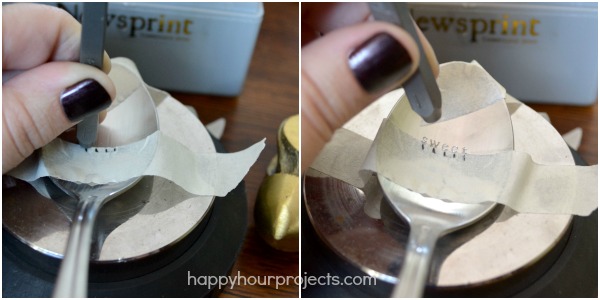
I stamped two messages: “one sweet tea-cher” (playing off sweet tea) and also “Carpe Diem” which I think would go really well with a breakfast blend coffee. :)
Now, the tape works great for letters that don’t have descenders (g, j, p, q, and y). So for “Carpe Diem”, I skip over the “p”, remove the tape, and replace it above the letters, and line it up at the top instead – filling it in last. Let me show you:

Finally, to darken the letters (and this step is optional). It’s important that you use a non-toxic marker for this, because it may be coming into contact with food. My personal feeling is that it’s such a minute amount of ink darkening the grooves that it’s probably okay, but I know there are some out there who would prefer to avoid any ink at all – and that’s totally fine too! This step is your choice based on your comfort level. But if you plan to darken your letters, you’ll need a non-toxic permanent marker and a polishing cloth (and yes, mine is well-used, haha. It used to be yellow…)
Darken down into all the grooves of your letters with your marker, and then use the polishing cloth to remove all the ink from the raised parts (which is the main surface of the spoon). If you see you’ve missed any spots, re-darken and re-polish.

Cute, right? My husband has run our spoons through the dishwasher about a half dozen times, and they are still inked, so it will hold up for quite a while.

The options are wide open for what you can stamp, it can be your teacher’s name, or anything clever you’d use a spoon for! I paired mine with herbal tea, but you can use soup for a “souper teacher”, something themed for cereal or ice cream, or something inspiring!

Happy stamping!


This post will help the internet visitors for creating new web site or even a blog from
start to end.
This is way better than a brick & mortar eshttlisbmena.
What a lovely gift idea and tutorial! So easy & practical…I’d love a gift like that any day :) In saying that, I was wondering if you could suggest a good quality food-safe permanent marker suitable for cutlery that is actually being used. I read that although Sharpies are AP non-toxic approved they are not recommended for consumption (ie. on spoons, mugs, etc in areas where the lips touch). Do you have any recommendations?
Hi Esta – I don’t think there is one. On this post there’s a bit more detail on the pros and cons of using markers: http://happyhourprojects.com/hand-stamped-spoons/
Here’s my personal opinion, and I know not everyone’s comfort level will be the same as mine. Darkening the imprints is optional, but I don’t know of any marker that’s totally food safe in a way that’s recommended to eat from.
There is SO little marker left in the grooves after darkening and removing the excess. It’s less than even drawing one small line. I’ve run my spoons through the dishwasher quite a few times, and they letters stay darkened. So even in heat and water, there’s very little coming off the spoon. If they can survive the dishwasher, my feeling is that a second to stir a beverage would allow even less marker to come off.
I know there will be people out there who aren’t comfortable with any possible marker bleed at all, even if the category is non-toxic. For those people, this could be decorative, or you can leave the imprints as they are after stamping. But the exposure is less than eating off the spoon, and is minimal to start with. Ultimately, it’s up to you to decide if you’re comfortable with it or not.
Thanks for bringing the point up, though – anytime you add decorative touches there’s the potential to introduce toxins. Everyone should consider what they’re adding to any type of food-related pieces!
Such a fun idea! So simple, but lots of charm!
I’ve been dying to do a stamped metal project for over a year and I never seem to make time for it. This is a brilliant teacher gift idea… one that the receiver is sure to enjoy for many years!
Adorable my friend!!
Any teacher would love to get this!
I taught school for 11 years and I would have loved this Teacher Gift!
Not only is it beautiful, it’s fun, practical, and different too. great idea :)
Not to mention, it goes great with the ever-popular coffee mug gift. ;)
I’ve always wanted to try metal stamping. This looks like a great beginner project, thanks for the easy tutorial! Great project idea
I’ve always loved the look of stamped spoons, but never knew how it was done. I learned so much from reading your tutorial on stamping. Of course, I always learn a lot from you! Thanks. I’m pinning so I don’t forget!