
Hey friends! I have a practical project today that you can use year-round for DIY birthday cards, DIY Christmas cards, DIY thank you cards, and SO MUCH MORE! These watercolor DIY greeting cards use stamps as an outline, so painting them is just like coloring in a coloring book.

I mentioned in my last project, the decoupage painted rocks, that I used watercolors to create my pineapple images. Today, I’m going to expand on that process a bit, and show you how easy it can be to create watercolor images even if you don’t have any artistic flair. Many people enjoy adult coloring books as a calming activity, which is a bandwagon I never quite jumped on. However – I do enjoy being able to blend my colors with a brush, using pre-sketched images. For today’s watercolor cards for beginners, I’m not actually using watercolor paints (although you can)! I’m using water-based inks, and if you’ve ever been curious how you can use ink in your projects – here’s one way.
How to use inks to make watercolor DIY greeting cards:
The following list contains affiliate links for your convenience when shopping for supplies or viewing more detail about the products I use. I do earn a small commission when you make a purchase through these links, and I thank you for supporting Happy Hour Projects! I only link to products I genuinely recommend.
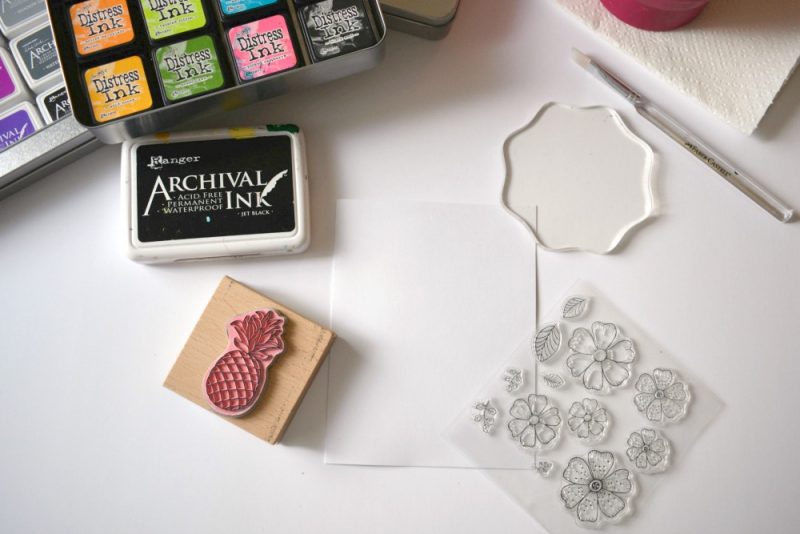
- Waterproof archival ink (I’m using Ranger Archival ink in black)
- Water-based ink (I’m using Ranger Distress ink in Peacock Feathers, Seedless Preserves, Mustard Seed, Twisted Citron, and Mowed Lawn)
- Angled flat paintbrush, around a size 10
- Any size blank greeting cards (I’m using A2 size white cardstock)
- Clear unmounted stamps (Mine are an inexpensive Amazon find!)
- Acrylic stamp block, large enough to mount your stamp(s)
- Water
- Paper towel
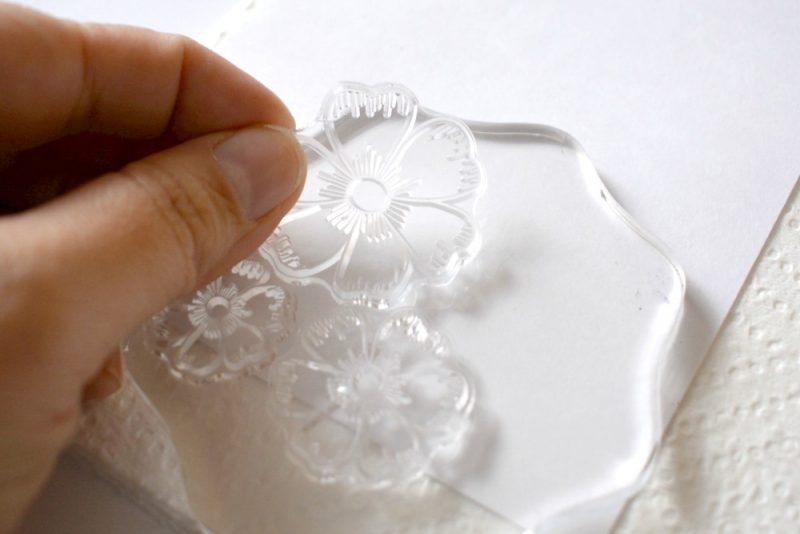
Begin by mounting your cling stamps to the acrylic block. As long as both surfaces are clean, it will stick right to the surface, and you can easily peel it off to adjust it or to move stamps around. (If you haven’t used unmounted stamps before, you’re going to love them! They save SO much space. I keep mine in a binder and they cling to plastic pages.)

Apply the waterproof archival ink to the stamps, and create your pattern. You can use several flowers, and when you get to the point of filling in, just one at a time. You can see through the block to know the EXACT placement of where the stamps will go, so there’s no worry about whether you have them lined up well. A tip: if you’re going for an all-over pattern like I am, be sure that your stamps extend past the edge. You can stamp on paper towel or another protective surface to make sure you don’t get permanent ink on your work surface.

The archival ink needs very little time to dry, so clean up your stamps and put them away. You’ll use your acrylic block for a different purpose now: to hold your water-based ink. I have the small ink pads, and I just press them directly onto the surface of the acrylic block. Add a few drops of water to the edge of the ink colors to create a tinted water solution that you will use to paint.

You can easily blend colors together, and go lighter or darker on each color depending on how much ink you add to your drop of water. If your color is too light, you can blot some of the water out by touching the brush to a paper towel, and re-blending your ink and water solution. If you find it’s too dark, just add more water.
You can use your brush flat to color larger areas, and use the point of the angled brush for smaller areas.

When I finish coloring in my images, coloring-book style, I like to lightly paint around them. In this case, because flowers grow in grass and among greenery, I’m filling in a very light green color. Try to limit the amount of water you are brushing onto your card, though, because it’s still paper, and too much water will warp your paper or cause it to pill slightly.
I blended the green background back to blue closer to the top of the card to fill it entirely with color, although how you paint it is entirely up to you! You will have a slightly warped card when you are finished, so if you set a heavy book on top of it, it should flatten it most of the way out.

This is a great technique for personalized DIY greeting cards, but if you check out my previous post about my Pineapple Decoupage Painted Rocks, you’ll see that there is a lot of room for how to use your watercolor images!
Thanks for joining me for this easy, stress relieving project, and I’ll see you all again soon!

I love the idea of using stamps as an outline for watercolor DIY greeting cards.
The watercolor-by-coloring-book approach makes the birthday and thank you card designs feel very approachable.
Using water-based inks for beginners is a clever tip.
These DIY watercolor greeting cards are a beautiful and simple craft idea! Using stamps as guides makes them beginner-friendly while still creating thoughtful, handmade cards for any occasion.
Thanks for the informative post!?
Thanks for the informative post!
Thanks For Informative post!
Thanks for an very informative post!
Thanks for an informative post!
Thanks you so much for sharing
This was incredibly helpful. Thank you!
This is such a nice, down-to-earth tutorial. I like how the author breaks it down step by step — even someone with zero experience could follow. The ink-based watercolor trick is smart. Thanks for sharing!
super cute ! love this idea
These watercolor cards are absolutely adorable! I love how approachable you’ve made the process even for those of us who aren’t naturally artistic. Using stamps as outlines is such a clever idea, and the ink blending tips are super helpful. Can’t wait to try this for my next batch of birthday cards!
I will learn this idea of ??yours to make Christmas cards.
This tip can be used to make key chains. Thanks
Not fussy. Quite simple but very eye-catching.
Thanks for sharing