• Skip to primary navigation
  • Skip to main content
  • Skip to primary sidebar

  • home
  • about adrianne
  • buy the books
    • DIY T-Shirt Crafts (2015)
    • DIY Stamped Metal Jewelry (2016)
    • Rock Painting for Beginners (2019)
  • videos
  • crafts
    • diy beauty projects
    • kids’ crafts
    • paper craft projects
    • polymer clay
    • sewing projects
  • jewelry
    • bracelet projects
    • earring projects
    • necklace projects
    • jewelry tools & supplies
  • metal stamping
    • beginners’ tutorial
    • video tutorial
    • project ideas
    • metal stamping supplies
  • recipes
    • cocktail recipes
    • appetizers
    • main and side dishes
    • sweets and treats
  • by season
    • birthdays
    • new year
    • valentine’s day
    • st. patrick’s day
    • easter and spring
    • mother’s day
    • patriotic
    • fall
    • halloween
    • christmas
    • thanksgiving
  • privacy

Happy Hour Projects logo

10/03/2014

Simple Pearls: Wire Wrapped Frame Pendant

I’ve got a very simple design to share with you today that’s a good one to try if you’re a beginner when it comes to wire wrapping.  I’m on a new kick of wrapping within wire frames – it’s been a lot of fun to think of a wire frame as space to fill.  I went for a very minimalist look with this design, just some abstract pearls:

Simple Pearls: Wire Wrapped Frame Pendant at www.happyhourprojects.com

If you read here often then you know when I say, I’m on a new kick… it means everything is the same style for 2-3 weeks and then I’ll become obsessed with another idea.  Haha.  I’d apologize but I’m not really sorry at all, I’m having fun.  So join me on the wire wrapping ride for a little while!

This all started because as I was going through my stash, I found a few round wire frames I had made up back when I made the Tree of Life necklace a few years ago.  This it the same design philosophy, make a wire frame, and fill it.  Here’s what you’ll need to make it happen.

Simple Pearls: Wire Wrapped Frame Pendant at www.happyhourprojects.com

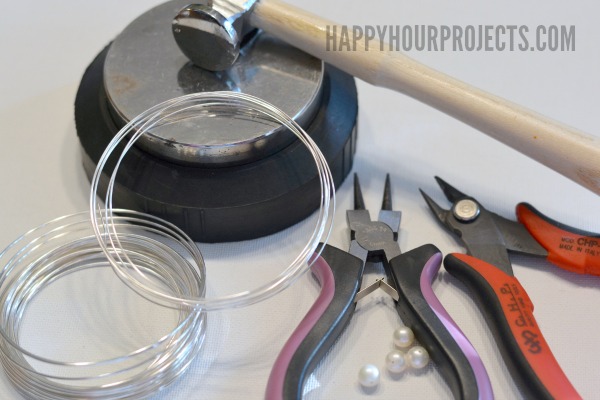
  • 22 gauge silver plated copper wire – you will only need a few inches (maybe 5-6)
  • 18-20 gauge wire for the frame (both work fine, it just depends whether you want a lighter or heavier look) – you’ll need 8-10 inches of this
  • Bench block and texturing hammer (the hammer is optional)
  • Round nosed pliers
  • Wire cutters
  • A few pearls (I used 4 cultured pearls around 10mm, but anything in that general size range or smaller would be lovely)
  • 18″ chain

First, you’ll need to create your frame.  This may take a little practice – I’m a little on the rusty side so my wrap ended up slightly messy.  But here’s what you will do, and wire is inexpensive and plentiful so you can be sure to get plenty of practice. :)

Cut a length of 18-20 gauge wire at about 8-10 inches.  This will be on the long side, but it’s easier to work with the tails of the wire when they’re longer, and how much you need will also depend on what size you want to make it.  Wrap your wire around a round object.  The cap to something, a medication bottle – or hey, the end of your hammer if it’s lying nearby.  There’s no rule for size, that’s all a matter of preference.  Pull it tight, and give both ends a twist to “lock” them into place at that size and shape.

Slide your form off, and form one of the wire ends into a loop (for your chain) with your round nosed pliers.

Simple Pearls: Wire Wrapped Frame Pendant at www.happyhourprojects.com

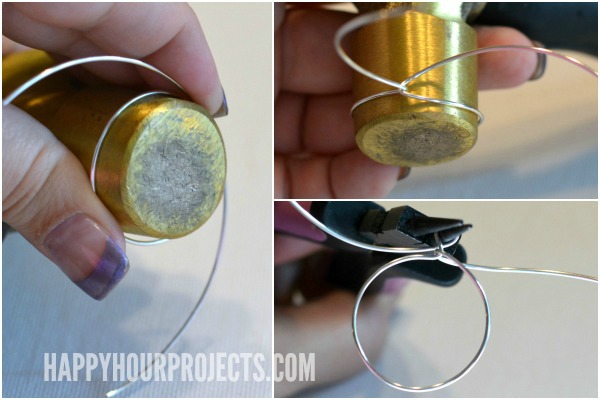
You will have formed a piece that’s your round frame, a top loop, and a little “neck” in between.  Wrap the tail ends of your wires around that neck part 2-3 times, and cut off the excess with wire cutters.  That will give you a finished loop.

I then hammered mine to help harden it – this will help you when you do your wrapping.  The harder the wire, the more easily it will hold its original shape.

Next, take a few inches (about 6 inches) of 22 gauge wire, and wrap it 3-4 times around your round frame where you’d like to connect your string of pearls (which for me was at the 3:00/9:00 position of the circle – depending which way you turn it).  Add a few pearls on, and then wrap the other end of your wire around the frame in another position (6:00 for mine).

Simple Pearls: Wire Wrapped Frame Pendant at www.happyhourprojects.com

The key to wire wrapping is to get your wraps even and close together,  Mine is not perfect… yet.  Haha.  But nice snug, straight wraps are ideal.

Now – just add a coordinating chain (like this 2mm curb chain) and enjoy your new piece!  Wire is really inexpensive and a design like this takes so few beads that this is a great budget-friendly choice – and makes a great gift!

Simple Pearls: Wire Wrapped Frame Pendant at www.happyhourprojects.com

Stay tuned, because I’m cooking up a few more ideas that fill wire frames!  Got any suggestions of something you would like to see?  No promises (my skill only goes so far, after all) but I’m always on the hunt for new inspiration!

adrianne signature

Filed Under: Fashion, Featured, Jewelry, Necklaces Tagged With: beads, gifts, hammered, metal, necklace, pearls, pendant, wire wrapping

copyright policy and terms of use

I love it when you love my work! All tutorials and photos published at Happy Hour Projects are copyrighted. If you would like to feature my tutorial on your website or share it on your social media you may use one photo to feature, as long as you provide a link back to the original post.

If you feature a photo, it may not be accompanied by the project tutorial or recipe, whether in my own words as it originally appears or paraphrased by you. This also includes personal sharing on social media and Pinterest. Publishing multiple photos from a project, or including instructions with an accompanying photo are not permitted and you will be asked to remove them.

I love to share my projects, and my tutorials, recipes, and e-books are ALL free for your personal use. However, photos and ideas that are published to this site are my protected intellectual property. You may print them at home, but please do not copy or distribute them. I also allow all designs to be made and sold at fundraisers, craft fairs, etc. If you are selling a piece made from one or more of my free tutorials in your online shop, I require that you use your own, original photography, and include a link back to my website to credit me as the designer.

I hope you enjoy what you read here, and please be fair when you share!

Reader Interactions

Comments

  1. Donna says

    01/15/2018 at 12:16 pm

    So many easy jewelry ideas look boring. I really like this – it’s simple, yet interesting looking.

    I, like you, do something for a few weeks, get bored, and then try something else. I may come back to it in a few months (or years). I may not get really good as something (a Jack of all trades and master of none) but I have a great time.

    Reply
  2. Lisa Kaye says

    06/13/2017 at 2:13 pm

    I have a friend whose birthday is later this month and I was trying to think of something pearl I could make for her. This is just perfect. I can’t wait to get started on it.

    Reply
  3. P Rountree says

    04/25/2017 at 9:42 pm

    Do you make wire wrapped bracelets ? I have 5 pearls I would like in a bracelet I found a pic .. I have the pic .. do you make jewelry for people ?

    Reply
  4. cocoliso says

    10/12/2014 at 3:58 pm

    Lovely! I’wil try mine. Thank you for sharing your art!

    Sol

    Reply
  5. Marilyn says

    10/04/2014 at 8:38 am

    The simplicity of this piece is truly elegant! Your jewelry projects always amaze me!

    Reply
  6. Crystal says

    10/03/2014 at 5:06 pm

    I love it! It’s so different. Love that the way you strung the pearls. Thanks :)

    Reply
  7. Bethany says

    10/03/2014 at 4:06 pm

    Stunning! Love it!

    Reply

Trackbacks

  1. 3 Ideas for Using Large Hole Pearls – sofinejewelrys says:
    05/27/2021 at 9:07 am

    […] beginners, a wire-wrapped frame pendant is an easy project to start with. You can use heavier gauge wire to create a frame in any shape you like and then use finger wire to […]

    Reply
  2. Happy Hour Projects | Pearltrees says:
    05/17/2017 at 12:52 pm

    […] Hour Projects. Stamped Charm Bangle, and How to Add Eyelets to Metal Blanks – Happy Hour Projects. Simple Pearls: Wire Wrapped Frame Pendant – Happy Hour Projects. Leaf-Imprinted Polymer Clay Jewelry Dish – Happy Hour Projects. Easy Beaded Dangle Earrings – […]

    Reply
  3. Mommy Free-Time Crafts says:
    10/20/2014 at 2:26 pm

    […] Simple Pearls ~ Happy Hour Projects […]

    Reply
  4. “Bloom” Wire Wrapped Floral Scene Pendant says:
    10/07/2014 at 10:22 am

    […] got more detail about exactly how to create a frame in my post from last week, which was a simple pearl pendant design in a round […]

    Reply

Leave a Reply Cancel reply

Your email address will not be published. Required fields are marked *

Primary Sidebar

Hello, and welcome! I'm Adrianne, an artist, author, designer, and blogger in mid Michigan. I work from home, chase my two kids, and this once-city-girl is learning how to care for chickens and adjusting to life out in the country. I have a compulsion for daily creativity... sometimes it's jewelry-making, paper crafting, metal stamping, mixing and baking, or giving new life to recycled items. But with 2 young kids, time is short! My goal here at Happy Hour Projects is to share projects and tips that you can do in an hour or less. The ideas you find here are designed to add a little creativity in your day, no matter how much (or how little) time you have!

BUY MY BOOKS!

Copyright © 2023 Happy Hour Projects on the Brunch Pro Theme