
I am happy to say that while I didn’t win this round overall (the competition was pretty impressive!) I am advancing to round 2. The theme is Mod Podge, so stay tuned next week!

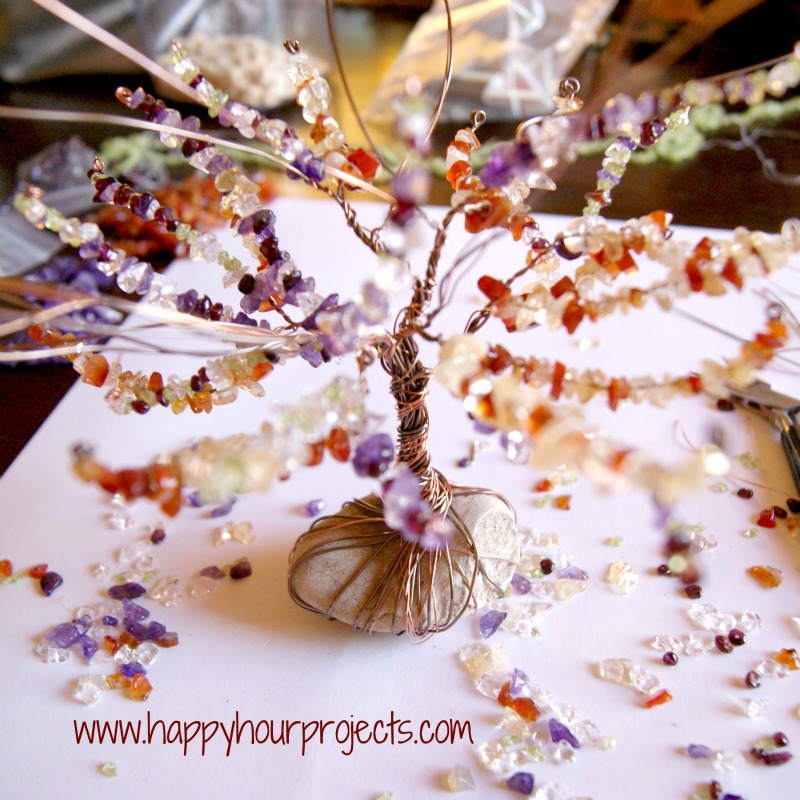
This was a very fun project for me. I have a friend getting married this October in the desert. I had been thinking I wanted to make a little family tree for her, and with the contest theme being “beads” – I was hit with inspiration. Why not make an actual tree, with birthstone beads representing their families? The end result is something that embodies both roots and growth, which is the perfect message for the beginning of a new life together!

This is a bit more time-intensive than what I usually show you, but I wanted something special not just for the contest, but also for my friend’s gift. I would estimate I have about 5 hours into it, because beading and wire wrapping, while not difficult, can be pretty time-intensive. I did work on it about an hour at a time, so it is something that you can easily put away and come back to later. I’m also not going to go into a lot of detail here, because this is one of those things where there is no right or wrong, you just have to go with it however it shapes up for you. I’ll just give you a few pointers. If you try it, use plenty of wire and do what you like the looks of, and you can’t go wrong. :)
I started with a rock from my yard. If you attempt this, I have some suggestions. You definitely want something flat and stable on the bottom, and after putting this together, I was surprised at how heavy the beads were after adding so many. So I would say, as a general rule, decide how far you want your branches to reach on all sides, and choose a rock that’s an equal diameter. Mine was slightly more top-heavy than I would have preferred. It doesn’t just tip over or anything, but I want it to be really safe from getting bumped into. I will probably mount it on a small wooden base before giving it for added stability (which will also protect any surfaces from that wire under the rock).
First, I cut about 2 dozen lengths of copper and brass wire about 24″ long for a tree about 8″ or 9″ tall. I used 24 gauge copper and 22 gauge brass… and if I were to do it differently, I would use 24 gauge for the whole thing. While I love the looks of the two thicknesses, the 22 gauge was too big in diameter for my smaller beads! Fortunately the larger beads were fine, so I stuck with it, but if you’re shopping – shop for 24 gauge for the whole thing. So test out your beads and make sure they will work – then, wrap the “roots” around the rock base.

Once you have your roots started, twist your wire to create your trunk. You’ll want to wrap a few additional times closer to the bottom before moving up to make it thicker at the bottom – more like a natural tree trunk.

Once you’re satisfied with the height, start sorting your wires back out to form branches. This was my favorite part. Consider starting each main branch with anywhere between 4-8 strands of wire, give it a twist, and continue separating them and branching them out until you are down to just individual wires.

The beads here represent the people in my friend’s and her fiance’s families. I did a little research on birthstones, and found that most months are already represented by easily obtainable semi-precious stones. I was able to find genuine garnet (for January), amethyst (February), peridot (August), and citrine (November). Diamonds and rubies were of course out of my budget, but with a little more digging I found that carnelian alternatively represents July, and white quartz represents April. So with everyone finally represented, I got to work beading each branch.

Now, I found it most helpful to work from the lower branches and go upward, but there’s no rule.

As you go, just look at your proportions and arrange the beads and branches in a random and natural-looking way. When I got to the end of each branch, I just coiled up the wire on round-nose pliers, but you could finish it any way that appeals to you.
Thanks for dropping by to let me show off! :)

I link up to these great parties!
~ Adrianne
I absolutely love the wire wrapped tree project! The colors you chose are so vibrant, and the details in the design really bring it to life. I can’t wait to try this at home. Thanks for the clear instructions!
I absolutely love this wire wrapped tree project! The combination of colors you chose is beautiful, and I can’t wait to try making one myself. Thanks for the clear instructions and inspiration!
I absolutely love the wire wrapped tree project! The details you shared make it seem so doable, and I can’t wait to try it myself. Thanks for the inspiration!
What a beautiful project! I love how versatile wire wrapping can be, and this tree looks amazing. Can’t wait to try it out myself! Thanks for sharing the tutorial!
I absolutely love the wire wrapped tree project! The instructions are so clear and the photos are super helpful. I can’t wait to try this out; it looks like such a fun and creative way to make unique decor. Thanks for sharing!
I absolutely love this wire wrapped tree project! The detailed instructions and pictures make it so approachable, even for beginners like me. Can’t wait to try it out during my next craft night! Thanks for sharing such a creative idea!
I absolutely love the idea of wire wrapping a tree! The step-by-step instructions are super helpful, and your tips on choosing colors for the beads are such a great touch. Can’t wait to try this out for my home decor! Thank you for sharing this lovely project!
I absolutely love the wire wrapped tree project! The instructions were clear, and I found the tips on choosing the right wire really helpful. I can’t wait to try this out for myself. Thank you for sharing such a creative and inspiring idea!
I absolutely love the wire wrapped tree project! The combination of colors and the intricate details you shared is truly inspiring. Can’t wait to try my hand at this! Thank you for the clear instructions and beautiful photos!
I absolutely love the wire wrapped tree project! The details and techniques you shared are so helpful. Can’t wait to try this out for myself! Thanks for the inspiration!
I absolutely love the design of your wire wrapped tree! The colors are so vibrant and the technique looks fun to try. Thanks for sharing such an inspiring project!
I absolutely loved the Wire Wrapped Tree project! The step-by-step instructions were super easy to follow, and I can’t wait to try this with my own color scheme. Thank you for such an inspiring post!
Can you use 20 gauge wire to make a sturdier tree, or would it be to thick? I’m using copper wire.
I use mostly 20 gauge for my trees. Smaller won’t stand good and when you go much larger its hard to work with for me.
Thanks a bunch for sharing this with all folks you really understand what you are talking
about! Bookmarked. Please also discuss with my site =).
We could have a hyperlink alternate contract
among us
Is it possible to download this awesome pattern.
Hi Diana! There’s no pattern… I just jumped in and started twisting – I used 24 pieces, 24 inches long each, of 24 gauge wire. (I used some 22 gauge also but I wouldn’t recommend it, as it was a little too large for some of the beads). It made a 8-9″ tree.
Sorry I’m not more help there, though I did try to describe how I constructed it!
How many strings (inches)of beads would you say?
Hi Adrianne! I have searched high and low for birthstone beads. Could you please tell me where you got yours? My daughter’s blended family symbol is a tree and I would love to make this for her for Christmas. Thank you!!!
Hobby Lobby usually has some, though not all the months. Another great source to check would be Happy Mango Beads (online) or check on Etsy for suppliers.
I think I’ll try to make one in my style. Its gorgeous!
this is stunning. I am drooling! awesome!
what kind of beads are those and where could I get some? please thank you
Jtk, ive improved my trees (5)..having 5 married daughters with kids …I made each one for their families…they really turned out great…now these are shelf worthy…
Thanks for a wonderful craft…
This is such a gorgeous project, Adrianne! You have such a great eye for color and form!
Haha! I found your tree on 4 You With Love’s Best of 2012. Saw it, loved it and clicked on it. I didn’t realize it was one of your posts. Glad you shared it :)
this is pretty fine I love it so much
Wow, this is GORGEOUS!!! I am definitely making this soon!
I would really love to make this for my mother for Christmas :D
But I am unsure how to start… and also a little of the rest.
Do you make video tutorials? Or maybe you can give some extra tips for a newbie? :)
hi from the gfc hop!
visit nichollvincent.blogspot.com
have a good night!
I just love this! Its perfect for my project I am doing!! I am a new follower over from One Artsy Mama. I hope you stop by my blog http://www.pandoras-craftbox.com.
That's great! It is like the 3D version of the Tree of Life necklaces. I always love every chance I get to showcase my family.= so that's perfect.
I am featuring your amazing tree at todays link party! Wahoo!!
http://twoyellowbirdsdecor.blogspot.com/2012/05/thursdays-temptation-19-fabulous.html
Jill
Thanks for linking to Take-A-Look Tuesday – – you were featured today!!
–Mandy, http://www.SugarBeeCrafts.com
The tree came out awesome! I am not sure I would have the patience! Thank for linkin up
Kim@madeinaday
This looks amazing! You did an awesome job and are so creative!
Thank you so much for this project! I also made one and blogged about it here:
http://variform-christina.blogspot.com/
I am so happy you brought your tree to my Freedom Fridays! I love this tree:) Thank you for sharing:)
This is so amazing! This gives me inspiration to make a tree to hang my jewelry on. Great job!
That is gorgeous! Please stop by my blog hop to showcase it! “Show Off Friday” http://what-about.co
That looks so cool!! I love what you did! Amazing! Thanks so much for sharing at Thursday's Temptation.
Jill
Wow, this looks so very beautiful! Seems a lot of work, too. Really lovely! Liz
This is just amazing! Birthstone covered family tree…what a brilliant idea! I hope to make this one day!
Lovely project!
New follower from http://www.bookliaison.com
Wow! What a lot of work but so awesome. I so love the way your brain creates:) Just dropping by for a visit and to invite you to TWO parties. I will be co-hosting at Katherine's Corner Thursday's Favorite Things Blog Hop and hosting my Freedom Fridays Blog Hop. Hope to see you at both:)
This is incredible! I love the crazy, off kilter twisty trunk the most
Love this!
That is so neat! Such a great idea. :-)
Erin
takingtimetocreate.blogspot.com
That is beautiful!
I totally like the rock from your yard…and the bead work too :)
I KNEW this one had to be you! I just love this tree! Turned out darling! (obviously I voted for it too!). Awesome job!
Jill @ Create.Craft.Love.
I love that wired wrapped tree!!! What a work of art!!! I Love Your Blog!!! Saw it on Welcome Wednesday. Please follow me back at http://www.simplyheavenlyfood.com/
I love, love, love, this!! You have some very lucky friends that's for sure! I am glad you moved on to the next round, can't wait to see what you come up with.:)
Just posted this on my blog and a reader had a really nice comment and suggestion (although you'd have to have lots of crafty creative patient people to do this!): “Is it just me or would customizing the colors of the beads and the stone base made these kind of fabulous centerpieces for a wedding? They wouldn’t be wasteful like flowers because you could use them again, use them as decor in the couple’s home, or gift them to the wedding guests. I just don’t get into wedding flowers. So much money for something that wilts halfway through the reception. So I love seeing cute, creative alternatives.”
Wow that looks like a lot of work, but well worth it. I like the idea of putting pictures of the family in-between to make it more personal. Nice.
That is awesome…….
OMG I love that, I want one!
This turned out spectacular. I thought it was funny that you mentioned the base rock should be about the diameter of the upper branches, because I believe that's how real trees are in nature. I guess it's that way for a reason huh. Truly beautiful, Adrianne, and congratulations on advancing to the next round. Can't wait to see what you come up with for the mod podge theme
New follower from http://www.caveprincess.com :)Thank you for hosting! I really enjoyed looking through your page… very fun yet filled with some great information and ideas! Please stop by Cave Princess sometime!