
So I’m really excited to share today’s project with you, because it’s a blend of everything I love to make. It’s a woven bracelet tutorial that’s tool-free (aside from scissors and glue). It’s got stone chip beads. And it looks SO much more fussy than it really is. If you can braid and string beads, you can make this, my new favorite accessory. In fact, if ever there was a tutorial that was inherently me, you’re reading it now. (Reading here for the first time? Hi. I’m Adrianne. And I’m kind of a DIY bracelet fiend. It’s nice to meet you.)

Here’s what you’ll need to make this easier-than-it-looks woven bracelet: surprisingly few supplies. I got most of this from consumercrafts.com, and I will leave links so that you can find the supplies, too. I’m not an affiliate and I don’t make any money if you buy these items, but I know it’s tough when you’re looking for something specific and you can’t find it anywhere. :)

- Stone chip beads – I’m using unakite. I don’t remember where I got these, but you can find stone chip beads at most craft stores with a jewelry section.
- Glue-on end caps and Super New Glue (or the jewelry glue of your choice)
- Seed beads or other accent beads (a metal nugget spacer would be really cute)
- Waxed linen cord
- Something to secure your work – I generally use a clipboard
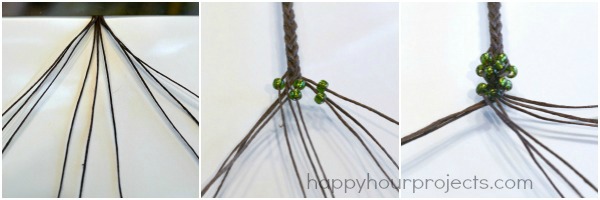
This is a surprisingly simple technique. It’s just braided. Nothing fancy. All those strands? Just a braid. I started out with 9 strands (I cut them extra long at 12 inches each, you’ll want a bit of extra length), and separated them into 3 segments, just like any 3-part braid. I didn’t bother to knot the end, I just clipped it under my clipboard. Waxed linen is perfect for projects like this – the wax keeps it stiff and a little bit sticky, so you don’t have to worry that it’s going to unravel.
After I had braided down a few inches, I began adding beads. (I braided about 3 inches and cut off excess length, but I wanted a little extra just to make sure I had enough. You can always cut some off. You can’t add more at the end.) All I did was add a seed bead on 2 of the strands, and braided them in. Once I had about 1/2 inch in beaded length, I switched the type of beads I was adding, and began adding stone chip beads.
If this is a new technique for you, I talk in more detail about it in my wish bracelet tutorial, seed bead and hemp bracelet tutorial, and my beaded hemp wrap bracelet tutorial. You can view any of those to get more comfortable with braiding with beads.
When I began adding the stone chips, I added one to every strand to fill it out as much as possible. When I had about 2 inches, I switched back to the seed beads on just 2 strands again. Then, I finished off the braid in the same way as I began it, just braiding it to the end.

If you find that your cords are looking messy or they are covering the beads, I do tend to push the beads up and adjust tension on the strands as I work. Some beads will be larger than others and will need more or less tension on the strand to look full. So if anything doesn’t look quite right as you braid, if your stones are looking “trapped” rather than sitting on top of your braiding, loosen the tension on your bracelet, rearrange the beads a little if necessary, and then keep going.
Finally, I trimmed my ends, and glued the end caps on. You only need a couple drops of glue, and it will dry within 5 minutes. Depending on the length of your clasp, your finished length will vary a little. This particular clasp adds about 3/4 inch of length, so I cut my bracelet at 6 1/2 inches to fit my wrist, for a total length of 7 1/4 inches after it was done.
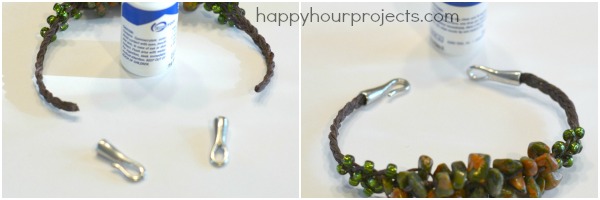
You can of course adjust this length to suit your wrist, but 7 to 7 1/2 inches is a common size. You will be able to cut the braids exactly where you need to; the wax will hold them together for gluing. Just center your beading, and cut equal lengths of braids on each side.

So what do you think? I think this is my favorite bracelet I’ve ever made. I love the natural accents, like stone beads and cotton and hemp twine anyway, and the colors are perfect for my fall wardrobe. What are you wearing this fall?

Hi! I like your tutorial so much! I made one my first bracelet and Idea I take from You. Thank You!
I’ve been trying for over a half an hour to make this bracelet and can’t for the life of me keep the cords straight. I got the beads on just fine but after I started adding the chips, the cords seem to have a mind of their own. I so wanted to make this bracelet and feel so defeatist. Suppose I need a little more practice.
So if I were to sell this design at a craft fair or fundraiser I assume you would still want to be credited, correct?
You’ll have to forgive me but this tutorial is simply not descriptive enough for me to understand what exactly it is that you’re doing. You say you only added seed beads to two strands but not how many beads, which strands, or how often. I know how to make wish bracelets, inverted wish bracelets, and the 6 strand wrap bracelets. However, none of those patterns help me to understand what you’re doing here. Now with the unakite chips, (my current favorite semi precious stone and also what inspired me to start making jewelry) do you keep braiding with three strands throughout the adding process then? It also appears as though you pulled two strands through one of the chips in the foreground of the photo displayed in this tutorial but none of the others that I can tell without looking very closely. This might sound ridiculous but I’m so confused. I have some fancy Jasper chips that I just bought and would absolutely love to use them with this pattern. Can someone please help? I really don’t want to have to try over and over again while having to take the bracelet apart in between and end up fraying my cording beyond usability in the process. I don’t have enough money to just run out and buy more cording ok a whim. Super appreciate any extra instructions you could share about this pattern. Thanks so much!
Hello,
I am trying to make a bracelet using your technique but I apparently do not understand our you bread the seed beads. You state “All I did was add a seed bead on 2 of the strands, and braided them in” but I only see 5 seed beads on your related pic. And do you bread 3 strands at once, then 3 more strands and then the 3 last strands and then breads the 3 breads you just made or simply add 2 seed beads on 2 strands of a group of 3 stands and do that 3 times and then just bread the 3×3 strands? I am lost here…
I need your help.
thanks.
Hi! Thank you for a wonderful tutorial!! I have a chip stretch bracelet that was given to me. I’d like to duplicate it, and the stone chips section of your bracelet is the closest to mine that I have seen! Would you be willing to look at it and advise me? Do you have an email address where I can send you a photo? I would bet it would also make a great piece for your blog! I love your tutorial, can’t wait to make it! Thank you so much.
I would be interested in knowing what size seed beads you used – 6/0? 4/0? I doubt you went any smaller. Also, did you have any difficulty threading the chips onto the cord? My Chips mostly have small holes. That being said, I am going to try this. Thank you!
They are size 6/0! And the waxed linen is about .5mm, the same as the holes in the stone chips. All stones seem to have slightly different holes, depending on the brand and type of stone.
These are good tutorials but I’ve noticed that the sizes of your materials are often omitted. They would be great tutorials if you could add the bead size, thread and end cap sizing (along with any other materials) and it would certainly be much appreciated! : D
Thanks!
Hi Aimsy, the past couple years I have been adding that info. I noticed at the end of 2014, around the holidays, people really started asking. I also include product links whenever possible now, but with over 1,000 posts going back to 2011… Man, it is a HUGE undertaking to update the older stuff. I do plan to set aside a few weeks later this year but it just hadn’t happened yet!! :)
This is the worst tutorial i’ve ever read. “Take this and that, a bit of magic – and we have a bracelet”. Couple of fotos and three words – that’s all. And don’t tell me there is a detailed description of the process in your another article – that is another technic.
Ok, my sister and I are getting the supplies to make this tomorrow. Just to check, when you say you added a bead to EVERY STRAND, do you mean all nine? Or all 3 sections of strands?
Each strand of linen individually, so that each time you braid, you’re adding 3 stones on each part. I hope that makes more sense?
Hello Adrianne. I have a question about the waxed linen you used for the project. Did you use 2 ply or 4 ply for this? I love your ideas. thank you. Janet
I don’t know, the cord I use is this one: http://www.amazon.com/gp/product/B003PD1SO6/ref=as_li_tl?ie=UTF8&camp=1789&creative=390957&creativeASIN=B003PD1SO6&linkCode=as2&tag=haphoupro-20&linkId=PRUWA5GYJ3ZZFSYT
I would say it’s about 1mm, though, if you can tell how thick the two sizes are? Sorry I can’t be more help than that!
love this bracelet so simple but elegant
Hi Adrianne! Came here because you were featured on The Beading Gem Journal. What a fantastic tutorial! No wonder you call it your favorite! I have so many stone chips in my stash and lots of waxed linen – guess what I have planned for my evenings now! Thank you so much!! Love it Love it Love it!!
This is so adorable! I would never have guessed it was a simple braid. I can not wait to make one.
What a great tute. Thank you
Adrianne, I love the mixed textures in this bracelet along with the earthy colors! Another work of art!
WOW!!! That is SO beautiful! It looks so complicated; I can’t believe that you made it simple enough that I might actually attempt this. That is really really cool! And thanks for the links! I’m in the US, but it’s nice to read EXACTLY what you bought so I know what to look for.
Also you made me laugh in the comments with Shirley. :)
Is there a way you could have the email notifications not have the “continue reading” link? It makes it difficult for me to read your blog posts, since I read most of them on my phone. I loved it when the whole blog post is sent in the email. Thanks!
This bracelet is beautiful. I love the colors and shapes of the beads…some of my favorites!
With your instructions, I think even I could make it.
Thank you, Adrianne!
I think if someone handed you crap you would make it beautiful. I love this but I shake a lot so I don’t see me making this. Thanks for sharing I love it.
Hahahah Shirley! This made my night. Thank you.
But seriously, no one actually hand me crap. I think that might be where my inspiration kind of ends. :P
I love working with waxed linen! It’s probably my favorite stringing material. This bracelet is awesome. I love the way the stone looks all clustered together like that.