
I have a quick and easy tutorial for you today that doesn’t take much in the way of supplies, making it perfect for camp crafts, girls’ nights, teens – well, it’s a project that’s pretty much suitable for everyone, LOL. And you can do it just about anywhere – I will show you!

If this looks familiar to you, it’s an inverted version of the Wish Bracelets I shared last spring. It just uses 2 rows of beads instead of one. It’s also quite a simple style, so I’m probably not the only one who ha a tutorial for them out there. But if you read here often, you KNOW how much I love making different styles of hemp bracelets!
What you will need:

- Hemp or cotton twine
- Size 6/0 seed beads
- Scissors, a clipboard or other way to secure your bracelet while you work, and a ruler if estimating length isn’t one of your strong suits.
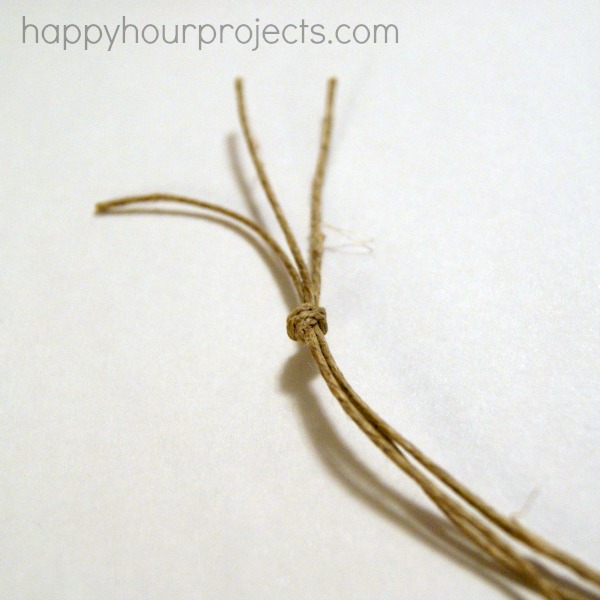
First, check your bead hole sizes against the end of your twine to make sure the bead will slide on easily. Then, cut off three strands of twine about 12 inches long. You will need enough extra length to be able to tie your bracelet on when it’s finished – like a friendship bracelet. Tie an overhand knot about 1-1/2 to 2 inches down, to create your “tails”.
Clip it onto your clipboard to secure it, unless you have another method you like to use. This works well for me, though.
Braid your bracelet about 2 inches. You can actually make this more or less, to add more or fewer beads as you like. No rules here, just do what you like!

Now, add a bead onto your outside strand. It doesn’t matter whether you are pulling from the left or right first, just whichever strand you’re about to pass to the middle. Slide it up snug with the knot, and continue your braid. This will add it to the outside of your braid.

Do the same thing on the next strand, and then the next – add a bead to the strand just before you pass it to the middle. Keep adding beads until you have enough to your liking. I like 2 rows of 7 – so, 14 beads total. (This is opposite of the Wish Bracelets – those, you add on so that the bead is placed inside the braid, rather than the outside, giving you only one row of beads.)

When you have enough to suit your tastes, it should be around 2-1/2 inches of beads, give or take, continue your braid normally (without adding beads). Braid another 2 inches – making your bracelet a total length between approximately 6 to 6-1/2 inches. This will fit an average sized wrist. You can vary it to be more or less, depending on whether your recipient is likely to be an adult or a child.

Once you are ready to finish it off, just ties another overhand knot. Cut your “tails” to even them up and match the other end – just make sure you’re leaving enough length that it can be tied onto a wrist.

Optionally – you may want your bracelet to be removable. If that’s the case, you can find glue-on jewelry end caps. Just trim the ends down to fit the cap, and use jewelry glue to adhere the cap. If you’re looking for another project to see how this would work, I recently posted a layered woven bracelet you can take a look at.

That’s it! A bracelet will take you about ten minutes – which makes it easy to whip up a few!


I loved this tutorial! The combination of beads and hemp gives such a unique and beautiful look to the bracelets. I can’t wait to try making some for myself and as gifts. Thank you for sharing such a fun project!
I absolutely love the creativity in these braided bead and hemp bracelets! The colors you chose are so vibrant and perfect for summer. I can’t wait to try making one for myself and maybe even customize it with some charms. Thanks for the inspiration!
I love this idea! The combination of beads and hemp creates such a unique and bohemian vibe. I can’t wait to try making my own bracelets. The step-by-step instructions are really helpful. Thanks for sharing!
I absolutely love the ideas you shared for braided bead and hemp bracelets! The combination of textures is gorgeous, and I can’t wait to try making some for myself and as gifts. Your instructions are clear and easy to follow. Thanks for the inspiration!
I loved this tutorial! The combination of beads and hemp adds such a unique touch to these bracelets. Can’t wait to try making my own – the step-by-step guide was super helpful. Thanks for sharing your creativity!
I absolutely loved this post! The combination of braided beads and hemp gives such a unique and trendy look to the bracelets. Your step-by-step instructions were easy to follow, and I can’t wait to try making my own. Thanks for sharing these fun ideas!
I made a 12″ version for a bookmark (my wrist wound up a little too big for this) and then cut a 1 1/2 foot version for an anklet. I cut off maybe an inch of tails after all was done. :)
informane de mi hotmail.com
Love the bracelets! Thanks
These are so cute and simple! What size hemp cord did you use with 6/0 seed beads?
This is just the cheap stuff (that doesn’t say anything, including a size). I am guessing it is around 15 lb because I have both 10 lb and 20 lb and this seems to be somewhere between. But this just originally had a dollar store label on it.
Love these. I have an overabundance of seed beads and this is a perfect project.
Finally a pretty friendship bracelet that can be made with the basic simple braid! Thanks for the inspiration. This is so cute! :D
I’m always looking for quick and beautiful projects for gifts for my sisters and this one definately fits the bill. Thanks so much!
What a great project! You say “camp craft” and I see “I could make these for myself!” Great tutorial for some springtime/summer bling! :)
What fun and I love how easy they are! :D
These are “to-die-for” cute! Abba and I wore our hemp bracelets all summer last year, I think these should be for this year. :)
Love these!! You are so talented :)
These are beautiful Adrianne! Gorgeous photos