
I hope you’re not getting tired of woven hemp bracelets – because I’m sure not! Once spring hits, I just love making new and colorful designs. I first showed how to make a simple wish bracelet last spring, it’s a simple tie-on bracelet that we used to wear when we were kids – but one of the questions that kept coming up was, how do you take it off?
Well, you don’t, not an original wish bracelet, anyway. You’re supposed to make a wish when you tie it on, and when it wears out – your wish comes true. But, if you are grown up past wishes, maybe you’d like a version that’s easily removed. Maybe even with some lovely layering… yes? ;)

This is a really versatile project once you have a few basic steps down. I will show you how I made mine, but there’s all kinds of room for making it your own.
What you will need:
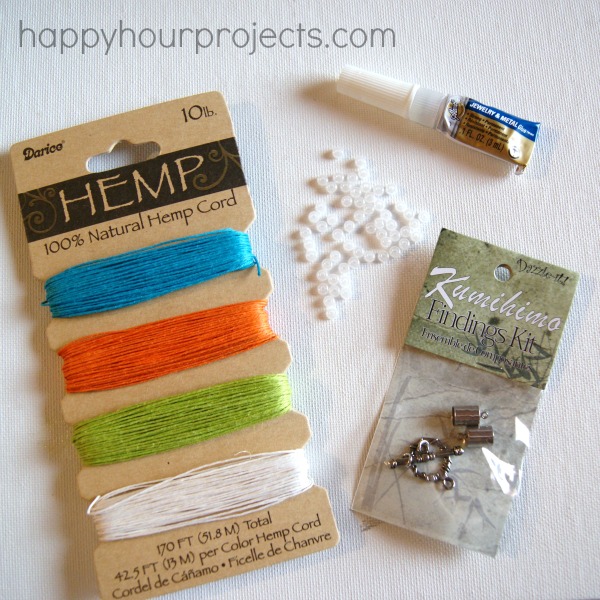
- Some 10 lb hemp and scissors. You can use other sizes but if you get too heavy, you’ll have trouble finding beads that fit.
- 6/0 Seed beads in any color you like, even lots of colors! Mix it up, if you want to! Before you get started, make sure the beads you’ve chosen fit easily onto your hemp, especially if you’re substituting a different size cord.
- Glue-on end caps, a clasp, and some jewelry or metal glue. These end caps are 7mm. You can go bigger or smalleer, but if you do, you’ll want a different number of braids.
Ready to go? Let’s do it!
First, cut a few lengths of hemp. I use 12 inch strands because that’s easy to work with even when you get down to the ends. If you have a little trouble getting a bead to fit, it allows you room to cut a little bit off the end, if you get a little fraying. But if you’re running low, 10 inch strands would probably work. I needed 12 for this bracelet. I’d start off cutting 9 (for 3 braids) and see how it fit in your end cap.
I found it easiest to tie three strands together with an overhand knot first, then trim off the excess. Test it out to see how many will fit.

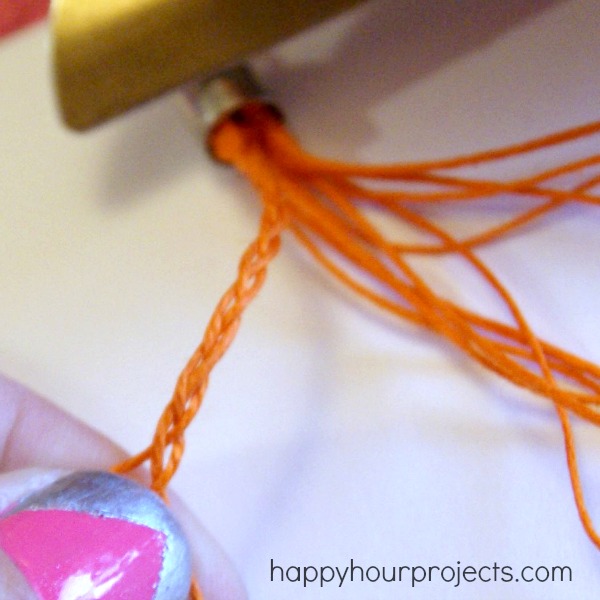
Once you have the right number of strands to fit your cap, add a bit of jewelry glue to your end cap, and glue one end of your braids in.

Jewelry glue is quick-drying, but give it a few minutes before continuing.
When you’re ready to begin, I find that braiding bracelets like this is easiest done by clipping the end to a clipboard told it firmly while you work.
Separate out your first three strands, and braid down a short way.
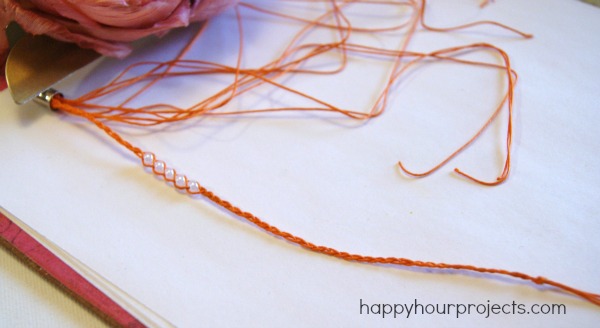
There is no exact length you should braid to. My goal was to make the beads offset from each other. You may choose to line them up together. Where you start your beads will depend on your own preference and how many beads you plan to add. I used 5 on each strand, but you could do more – you could do the whole strand, if you really wanted to!
Let me show you how to braid the beads in. I work from my left strand. It’s just habit. You can add in from the right if that makes better sense to you, though. For the sake of this tutorial, I’m going to just assume you use the left like me.

- When you pull your left strand in to braid, thread a bead onto your hemp.
- Push the bead up snugly against your braid, and then pull your right strand into the braid normally, without adding a bead.
- Pull from the left again, adding another bead. Repeat this process for however many beads you choose to add.
- As you work, the beads will line up. When you’re done adding beads, continue braiding normally.
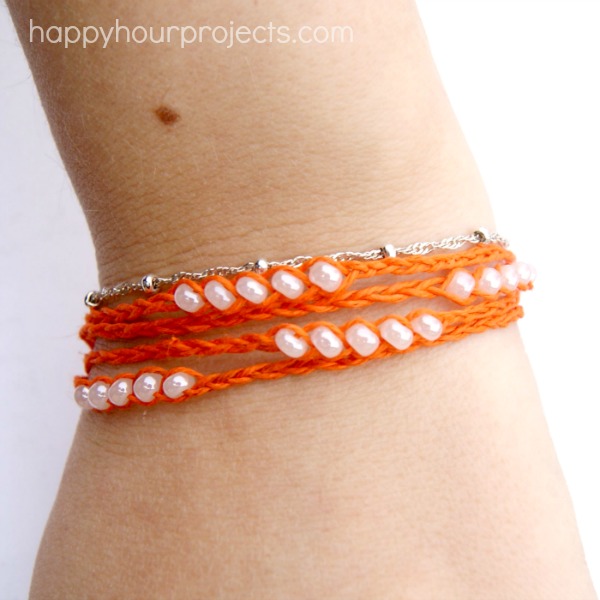
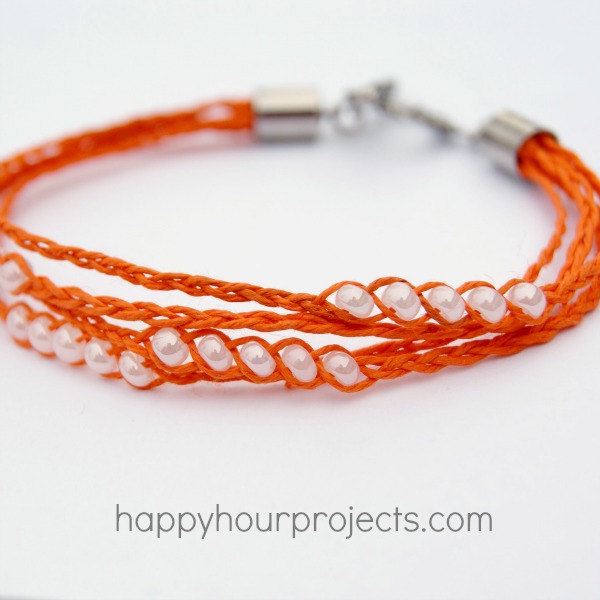
When you get to a braided length between 6 and 6 1/2 inches (depending on how much length your clasp will add to your bracelet – you are aiming for a length of approximately 7 inches for a standard adult bracelet), tie an overhand knot to keep your braid together. You can adjust this length longer or shorter, depending on the wrist it’s ending up on and how large your clasp is. My clasp and jump rings add about 1 inch of length, so I quit at 6 inches. You could also make this an ankle-length bracelet by making the length between 9-10 inches.
Now, repeat the process for your other braids. You can see I staggered the bead placement.

Finish off each braid so that it’s the same length.

When you’re done, trim off the excess, and glue on the opposite end cap.

All you have left to do is attach your clasp! The layers will make it look like multiple bracelets, stacked, when worn. Keeping this in mind, you may opt for a different pattern for your beads – it’s up to you!
If this seems more complicated than you want to create, you can of course check out the original wish bracelet or ankle-length wish bracelet tutorials to create just one tie-on bracelet (like they always had at souvenir shops when we were younger!)
What’s on your wrist this spring??
i love this bracelet! I have a question though. Where did you get the other bracelet that you’re wearing in the second to last picture? i really like it and I’ve never seen anything like it before.
so pretty and dainty!
Love it! But having hard time finding 7mm end caps. Any suggestions? Thank you!
Instead of using ready made end caps I use 1mm wire to wrap the ends of the help neatly, then use a handmade hook and clasp. Hope this helps x
Love it!! It so easy and simple. You gave me a great idea for my daughter’s birthday. She is turning 16 next month and having a party with her friends. Her theme is pink. I think I will make her one of these bracelts and even put a 16 charm on it for her to wear on her special day. Thanks for the great idea and tutorial!!
Is that glue a cement?
It’s more like a superglue. You can use any kind of glue that says
it’s quick-drying and suitable for gluing metal.
Thanks Adrianne. I just made one. What a simple and cute idea. Now I just have to check the glues I have to see if they bind to metal!
Love the project..I just started to make bracelets and this one is easy and love to add any color or beads. Thank you for the idea.. Have a great day..
OOOHHHH I love the orange! It’s so bright and cheery. I’m not a big fan of orange but right now this color screams “SPRING!” and I’m liking that!
You make this look so easy! I love your bracelets. This one is really cute :)