
I’ve got a fun bracelet project for you to try that’s a bit of a revival project. I loved making wish bracelets when I was growing up, especially in the summer. It’s cheap, it’s easy, it’s fun – all ways that it make a great camp craft or group craft idea! You only need a couple supplies for this project, and I’ll show you how to make wish bracelets today.
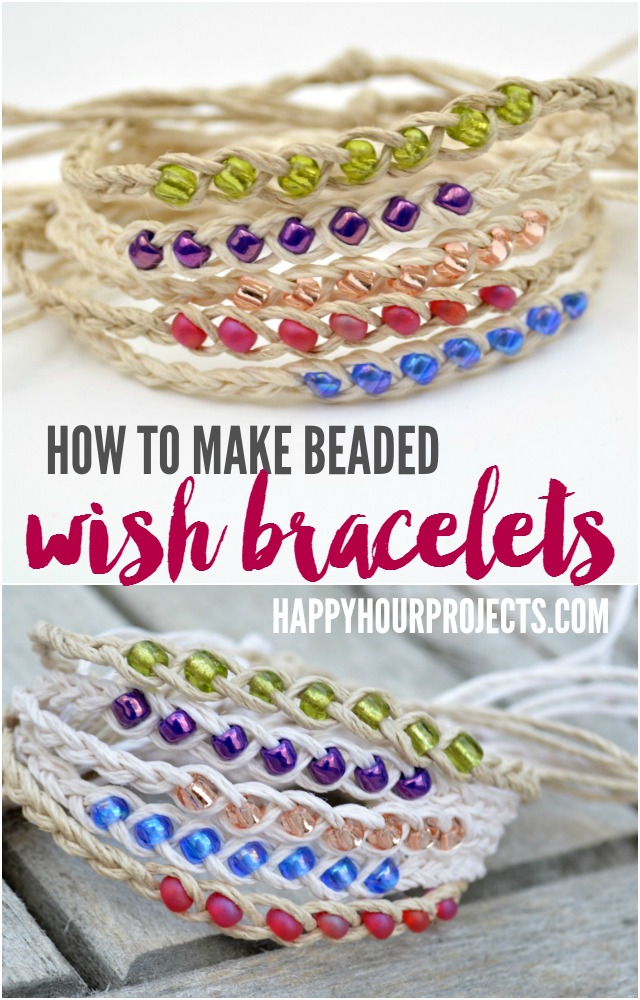
It’s been like 20 years since I used to make these, so I am just going to say, I feel they’re due for a comeback. Can I declare such a thing? It’s similar to a friendship bracelet, and makes up really quickly (I did this short stack in an hour).
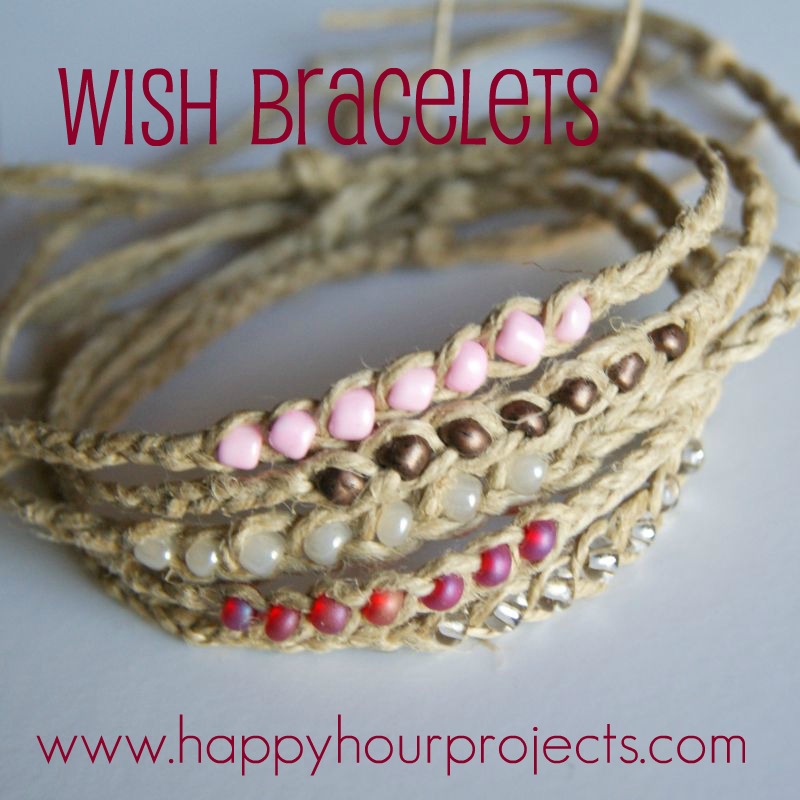
The idea behind a wish bracelet is that you make a wish, and tie it on. Eventually, the hemp wears out, and you will lose the beads. Which sounds sad, but when this happens, your wish is then “released” and is supposed to come true. And because 20 years ago I loved making wishes, I loved, loved these bracelets.

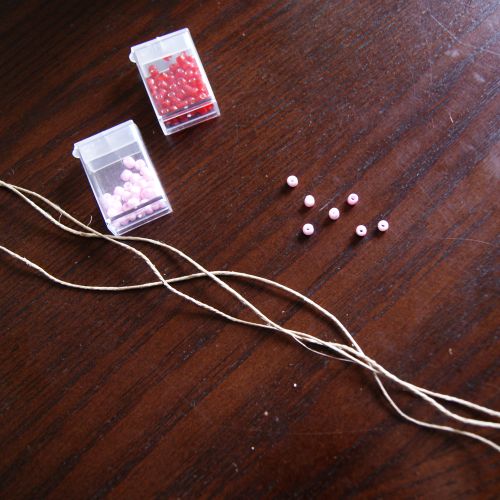
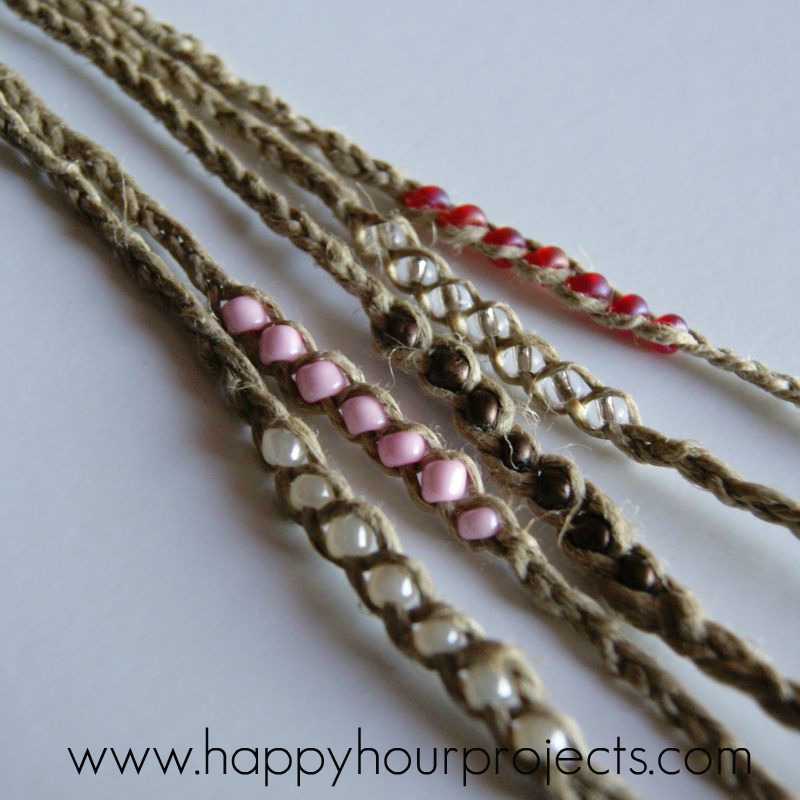
You need some hemp twine and large seed beads, making this a really inexpensive project, too. You need beads at least size 6/0.
Edit to add: some people have asked for video! So I put this YouTube tutorial together. You can view it in action (it’s under 8 minutes from start to finish), or you can scroll down for the photo step-by-step.
Tie a knot in the end. Make your ends longer than this, aim for about 2 to 2 1/2 inches (I really wasn’t sure if I had cut enough length when I started taking photos). Now, braid your three strands down about three inches. Nothing fancy, just a simple braid.

Now, because I’m right-handed, I’m going to add beads from the right. When I show you how to do this, feel free to add them from the left instead if that’s more comfortable for you. But you’ll only be adding beads on one side, and I will show you what I mean.
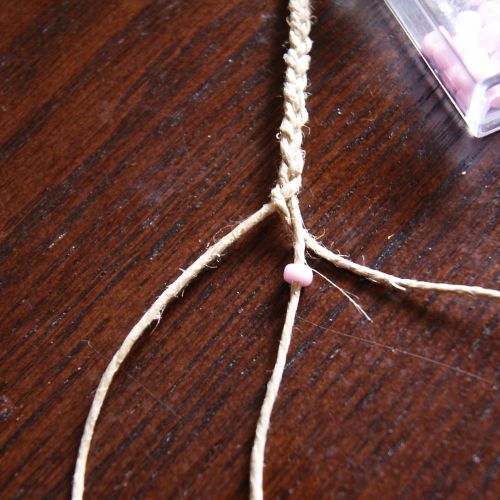
That strand I have just pulled from the right to the center, I threaded a bead onto my strand. Snug it up close to the braid, and pull your left strand to the center like normal.

Now that you’re pulling from the right again, add another bead on the strand you pull to the center.

When you pull from the left, no bead. When you pull from the right, add a bead. Add all seven of your beads. Why seven? Because that’s a “lucky” number, of course! ;) There may be a real reason I don’t know, but mine always had seven as a kid, so I made them up with seven now. You could always play with a different number of beads if you like!
Once your beads are all added, braid the rest of your strand normally, adding another 3 inches in length (give or take, depending on your wrist size, of course). Tie the end off and trim the strands up evenly.


That is great! Thanks for sharing this amazing info.
That is great! Thanks for sharing.
That is great! Thanks for sharing.
Great blog! Thanks for sharing.
Levition destaca como plataforma confiable de televisión online gratuita, ofreciendo canales en directo, contenido actualizado y facilidad de acceso, pensada para el consumo digital diario.
This sounds like such a sweet, nostalgic project. Wish bracelets are one of those simple crafts that never really go out of style easy, affordable, and perfect for groups or summer vibes.
Really loved your bracelets!
Such a lovely and meaningful DIY idea. Wish bracelets are perfect for gifting, especially when you want something simple but thoughtful. I often scan handmade project notes and printable templates to keep them organized, and tools like CamScanner Pro really help convert craft instructions into clean PDFs I can save on my phone. Thanks for sharing this creative tutorial, it’s inspiring.
H555 Game is a fantastic platform with vibrant visuals and fast performance. It’s user-friendly, entertaining, and provides an enjoyable gaming experience for everyone!
is reliable, and the gameplay is always entertaining!
H555 Game offers a perfect balance between fun and simplicity. The graphics are attractive, and the platform runs seamlessly without any lag!
Thanks for sharing. Download Bloxstrap to enhance the gaming experience on Roblox. Launch the tool.
Riversweeps 777 has been one of my favorite platforms for online sweepstakes-style games. The variety of games keeps things exciting, and the graphics are surprisingly smooth for mobile play.
Blade Ball is one of the popular Roblox multiplayer gameplay. It introduces exciting game where players join to compete against each other. In my guide you will be learn how the players survive till end to achieve victory.
Green Flame Fuel: wood pellets is a comprehensive information resource promoting the UK as a global supplier of quality, environmentally-responsible forest products from sustainably-managed forests.
Fresh poppy pods are the seed pods that are harvested from the poppy flower. Poppies are known for their beautiful flowers, but it’s their seed pods that are of the most value. These pods contain the seeds for the next crop and, when dried, they are frequently used in floral arrangements and other decorative crafts. By using fresh poppy pods, you can take your art to the next level as it gives a natural and pleasant look to your creations.
Wish bracelets are love!
Wish bracelets are more than just beautiful accessories — they carry meaning, intention, and a touch of magic.
Each bracelet is tied with a wish in your heart, meant to remind you of hope, dreams, or someone special.
Made with simple threads and charming beads or charms, they suit every style and occasion.
They’re perfect as thoughtful gifts, friendship tokens, or daily reminders of positivity.
When the bracelet naturally falls off, it’s said your wish will come true — a small symbol of faith and belief.
Beautifully designed. Thanks for this unique piece.
Loving your idea of making such bracelet to earn some intention by someone specials.
These bracelets are going to be absolutely amazing and my loved ones will love it for sure, and all the thanks to you, literally hates of to you.
Amazing , we can make it and can wish someone some special day, when it’s their time…
3 Patti Room is a digital slot arena of live slots, poker, card, Ludo King, chess, and several other card games. The Android-based game 3 Patti Room download is free of any premium plan to purchase. It is a license-free game to earn money in Pakistan.
Bring Your Memories to Life with Healing Thailand Template ??
Capture the beauty and calmness of Thailand with the Healing Thailand Template. Whether it’s a travel vlog or a peaceful edit, this template adds a magical, healing vibe to your videos. Perfect for TikTok and Instagram, make your moments unforgettable with soothing transitions and dreamy effects. ??
Fun, cheap and also very nostalgic! Perfect for summer adventures
wow very beatifull bracelets!I’m gonna buy them by playing Mega spin 777.
very nice post
very brilliantly described the method in the videos………..Great Work
Wow! So cool. Thank you for this :)
I love this DIY wish bracelet idea! Such a fun, meaningful craft that’s perfect for gifting or personal inspiration. Thanks for the clear instructions!
Good job
That is a very nice post. I loved it thanks for sharing with us…
This application is very nice and the graphics of games are nice
Amazing
“Thank you for sharing this informative piece! I found your insights so enlightening. Your clear explanation and practical examples really helped me grasp the concepts better. Looking forward to more posts like this!”
Fun, affordable, and nostalgic! Perfect for summer crafting adventures
What size of hemp cord do you use? Not the length but the wideness of the cord. Love this idea
1 used 55 cm
Useful information like this should be shared widely
Wow! I really like this idea, it’s so beautiful! I’ll try to make one. Thank you!
Thanks for sharing such amazing content with us. Keep up the good work and also, i really appreciate your other articles. All of your articles are informative and entertaining at the same time.
wow. I love this idea,
I have so many sea beads and this will be a nice way to use them up. My granddaughter is in a dance group and it be nice for her to be able to give all of her dance teammates a friendship bracelet thanks for the great idea
I love the idea. I will try to make one
My girls would love to make these.
I just got to know about theses wish bracelets and I searched for them online and found your blog it’s really amazing. I’ll make one for myself for sure after reading this. Thankyou.
The article you have shared here very good. This is really interesting information for me. Thanks for sharing!
This is really a great stuff for sharing. Keep it up. Thanks for sharing
So fun and easy…so I thought. Until I tried to teach it to 12 year old girls. :) They struggled a bit. It is kind of tricky to keep the beads in place. But, if you’re careful, it works.
Those are so cute!! I love the look of the twine. So pretty! Thanks so much for sharing at Thursday’s Temptation.
Jill
thanks for sharing such a amazing content with us. Keep doing this amazing job
Thanks sharing this article about the wish bracelets
Ya it’s really awesome but I can’t find the right thing’s.
Then you live on Mars hemp and seed beads (not sea beeds are everywhere. @ AKA NANA)
Nice easy to follow post. I love the bracelet Easy and quick to create and lovely result. THANK YOU!!
Can you use any kind of beads.
LOve wish bracelets! Made these for Baby shower, Birthday parties. Always nice to see fresh ideas. ?
Wow! Such a beautiful and colourful bracelets. I really impressed with your creativity. This bracelet is very easy to make by following your steps. I am so excited to try this. Thanks for sharing.
To obtain batch acount kindly e-mail us at assist@.
I see you don’t monetize your site, don’t waste your traffic, you can earn additional bucks every month.
You can use the best adsense alternative for any type
of website (they approve all websites), for more info simply search in gooogle: boorfe’s tips monetize your
website
I just got to know about theses wish bracelets and i searched for them online and found your blog it’s really I’ll make one for myself for sure after reading this. Thankyou.
I have read so many articles or reviews regarding the
blogger lovers but this piece of writing is in fact a good post,
keep it up.
Easy to follow, readable…heck I needed to leave a commment!
thancks
This is the bracelet that has cost me the most to do what I tried to do and I did it again and never came to the same result as in the video?
How do you adjust for a smaller wrist or larger one?
Thank you! It was great help. What I most loved about it was how you presented the information. Brilliant and helpful
Could you use Pony beads instead??
Pony beads are a bit big but they would work
I have noticed you don’t monetize your blog, don’t
waste your traffic, you can earn extra cash every month because you’ve got hi quality content.
If you want to know how to make extra $$$, search for:
Ercannou’s essential adsense alternative
Please let me know if you’re looking for a article writer for your blog.
You have some really great articles and I feel I would be a good
asset. If you ever want to take some of the load off, I’d really like to write some content for your blog in exchange for a
link back to mine. Please blast me an e-mail if interested.
Thanks!
Thank you for e?ery ot?e? fantastic article.
Where else ?ould anyone get that kind ?f information in such an ideal manner of writing?
I have a presentation sub?eq?ent week, and I am on the searc? for such info.
I visit each day a few web sites and information sites to read content, but this weblog gives quality based posts.
Your video is off center so your braiding is barely visible. Darling idea. I will try to follow uyou still photos since the video doesn’t clearly show the braiding.
This is the perfect web site for anyone who would
like to find out about this topic. You realize so much
its almost hard to argue with you (not that I actually would want to…HaHa).
You certainly put a new spin on a topic that’s been written about for ages.
Excellent stuff, just great!
Thanks for finally talking about >Wish Bracelets – Happy Hour Projects <Loved it!
I really do like your bracelet really beautiful.
Hey Adrienne. I tried making two bracelets, but I’m assuming I braided too loose, because the beads slip out of it’s twine hold. Would packing tape work to hold down the bracelet while I braid?
I use a clipboard to hold the twine tight and then adjust the clip farther down the braid as necessary.
Thanks for the good writeup. It in truth was a entertainment account it.
Look complex to far introduced agreeable from you!
However, how can we be in contact?
Well done Adrienne!!., such good fun!…. and to Haadia., Yes!…. you can use yarn. : ))
Veronica
Hi,
Thanks for the tutorial. I have one question, though-can I use yarn instead of hemp? Anybody can reply, because I need to make these ASAP.
Thanks,
Haadia
Awesome blog! Do you have any hints for aspiring writers?
I’m planning to start my own site soon but I’m a little lost
on everything. Would you recommend starting with a free platform like WordPress or go for a paid option? There are so many
choices out there that I’m totally confused .. Any recommendations?
Thanks!
Are these meant to just fall off when it wears out?
Can you make a twine rope without beads for men?
Why seven beads ? That is Jesus number and like said before seven days in a week .About how long will these last before they fall apart ? As I am allergic to metal these will make the perfect bracelet for me. Thank you so much for posting good instructions
Hi Sally,
The writer mentioned it before; she chose 7 because it is a lucky number! You can do as many beads as you like-but try to stay between 5-7. You don’t want the bracelet getting too big!
I can’t wait til my granddaughters sees these. Simple but elegant. I envy your creating these patterns. I always have to copy some one else’s ideas. I have only been doing macrame about a year. I am almost 86 years old and having eye problems but I love it. More seniors should try it. I’m never lonely and I live alone. Thank you.
Finally instructions that are understandable.
Agree – great instructions for beginners!! Thank you! :-)
Hello. I loved your video and bracelets, but how do you keep the beads from popping out of place?
Keep the cord as tight as you can, comfortably. It still happens on occasion that a bead will come out of place after it’s finished, but that happened to me on the souvenir ones I used to buy back in my teen years too, sometimes. Mostly, though, they should stay in place.
What lovely simple idea. So relaxing. Some verses for wishing bracelets would complete this project. Thankyou for sharing.
Thank you so much for sharing your bracelets. Very pretty! And your
right easy to make and great gifts.
Hello, thank you very much for putting the pattern in picture form as well as video. I keep having to stop it, re-wind and start again and so it goes on. When one is getting into their “Waiting for God Period” it takes us slightly longer to do things which has come to me as a bang as I have always been over active so now I have to find things I can do sirtting in a hospital bed in my sitting room in order not to go round the bend. So as I have always sewn and knitted I have decided to do Macrame and you will surely be pleased that you are on of my sites I WISH to follow. Thank you for being so conciderate.
Happy New Year from a newcomer.
Thank you for posting all of these tutorials. I’m learning so much and will be making three of these today. :Let me know if you’d like to see pictures of them. :)
I’m sure the author would, but I bet the rest of us would like to see them also. Thanks in advance.
nice bracelet blog. Look very nice .I am trying to wear tt
A wonderful job. Super helpful infomration.
Thanks Rita, I love this idea!! I couldn't remember how to get my icons to stay put – but I knew you would have it on your site!! I can always count on you for these kinds of issues.Thanks for all that you do.Cindy
Thanks for the great instructions! Where did you purchase your supplies?
Just the dollar store! But you can find seed beads and hemp in pretty much any craft store or craft section of a superstore.
I may have missed this detail, what gauge twine do you recommend?
You know, when I wrote this, I was just using dollar-store hemp and beads, which are never labeled well for size (and never consistent, either). But, this is thicker than a 10-lb hemp and thinner than 20lb. The quality of your beads will make the biggest difference on the weight of your twine, size 6/0 in an economy brand isn’t going to have as uniform holes as something name-brand.
If you’re using a good quality bead (which is pretty much anything with a name brand: Miyuki, Toho, Matsuno) it will have a consistently larger hole, and 20-lb hemp will work great for size 6/0. If you are using a Chinese non-branded bead, that’s still fine! But you’ll want something thinner like 10-lb hemp.
Hope that helps!
Super cute! I used to do macrame back in the day so am pretty sure I can make these and rock them too! Great tutorial!
Wow, looks so simple and so cute. I’ll try to make one too. Thanks for sharing! :)
thanks
Lindo por partida doble. lindo por que lo es y lindo por que lo compartiste.
Lindo, por partida doble. primero por compartirlo y segundo por que es lindo y sencillo.
Those are so adorable… and so simple! I think I’m going to make some right this moment with my daughter! :) Lisa
Nice to meet your blog ! I’m from Barcelona. Thanks for sharing this cute tutorial !!! I love this bracelets.
Silvi
How do you keep the beads from ‘popping’ out of the braiding?
Two things – practice creating a tight braid, and also using seed beads that are a snug fit to the twine. If they do pop out, you can push them back in. Hope that helps!
I used to LOVE these! Clicked over here from your non-wearing-out-wish-bracelets. Although I am thinking this could be a really fun thing for me to make in my wedding colors & then as we are on the plane for our honeymoon, my (then husband) and I make a wish & tie them on together (since we are doing an adventure-honeymoon in Central America, chances are they won’t last till we come home – so then while we are on our honeymoon, our “dreams can come true together”
:-)
I love this idea. Thanks for sharing this tutorial. I want to try it. So cute!
Those are really cute! I havent seen them before. these are so nice and easy to make it. thank you so very much for sharing this.
Yey, I was 'stumbling' and there you were! Love these bracelets Adrianne!
I really don't know what mm they would be, I pulled them from my stash that has been accumulating over the past 10-15 years (wow, that's sort of sad, LOL) but they are the biggest size seed beads. Some of mine also didn't fit, even though all the beads looked the same size. One thing you can try if it's close is to use a bead reamer and open up the hole just a little bit more. I also had better luck when I made more by buying hemp twine that was smaller in diameter, as well (which I found at Michael's).
I stumbled across your blog today, by way of Pinterest! Love, love, love this!
What size mm beads did you use? I can't seem to find any at my local Joann's or Michaels that have a large enough hole. :(
We have called these prayer bracelets. Each bead (7) reminds us to say a prayer each day.
Great instructions and pictures. So simple to make and simply beautiful! Thank you for taking the time to post pics and instructions. I can't wait to make these with my daughter.
Certainly sounds just as zany as WarioWare, but I found Smooth Moves irksome, so this isn’t for me.Shame the multiplayer got du30#d-down&e82mb; Especially since multiplayer funtimes are a shared strength of many music games, mini-game compilations, and Nintendo overall.
Loved this post, so sharing this on my site. Thanks Mango mom :)
I love them! So simple and so cute! And had instantly made one for me – I could´t resist!
Thank you for showing!
Susana.
So simple and cute! I made one for my daughter and a month later she still has it on (and waiting so patiently for it to fall off so her wished come true)! Thank you for sharing!
I LOVE these! My daughter has recently been into making beaded bracelets and necklaces, and I think these would be right at her level! I'm going to share them on my PreschoolPowolPackets Facebook page too!
I would love to make these with my daughter, but haven't the funds to buy supplies just now. What about using yarn and pony beads, would that work? :)
Very cool. Thanks for sharing!!
IJWTS wow! Why can’t I think of thgins like that?
Congrats on winning The Readers Choice Award from Live.Laugh.Rowe. Obviously we liked this a lot because we voted it our fav project! I look forward to more inspiring ideas from you.
Have a great night,
Maureen
Your story was really inmavfotire, thanks!
You could definitely see your enthusiasm in the work you write. The world hopes for more passionate writers like you who aren’t afraid to say how they believe. Always go after your heart.
Awesome! Thanks for sharing.
I want to let you know that I found it on pinterest, but it was linked to a spam site. You should report the pin for your intellectual property.
http://pinterest.com/pin/198580664789536788/
Good thing your photo was detailed and I still found you. Best of luck. :)
Love these bracelets! Featuring them today on Thursday's Top Ten! Thanks for sharing at Shine on Friday!!
I feel sasitfied after reading that one.
I am lucky enough to live near a Melkite Seminary and can join the Priests, brothers and a Bishop for Othros (Matins) and Divine Liturgy.What a blessing!
I know I have commented on this before, but I just wanted to let you know that I am featuring your cute bracelets at today's link party! Wahoo!!!
http://twoyellowbirdsdecor.blogspot.com/2012/04/thursdays-temptation-link-party-13.html
Jill
Featured these lovelies at the LLL Thursday par-tay :)
xo,
Kelly
http://www.livelaughrowe.com
I love this bracelet! I want to make a couple for me and my girls! Thanks for sharing on Blog Stalking Thursday!
thecraftyblogstalker.blogspot.com
adrianne-
yup. totally made these in junior high. which was 20 years ago. gah. we are old, lol… takes me back… i could use a few wishes coming true about now…
i'm featuring you today from last week's creative juice party. i'm also sharing this at pinterest and facebook. thanks for linking up and have a lovely week!
very pretty! i would love for you to link this post or any other posts you want up to my weekly link party called spread the love. it's a weekend wrap up party where you can share anything and everything you want! there is also a really awesome vinyl giveaway going on there right now too, so go check it out! http://www.lovenotesbylauryn.blogspot.com/2012/04/spread-love-5-decallove-giveaway.html
have a wonderful weekend!
{love} lauryn @ lovenotesbylauryn.blogspot.com
I don't have any of this in my stash but I plan to buy it and make some anyway because they are so darn cute and remind me of my teenage years as well. Also, I am on high doses of steroids and I can't wear a lot of my regular bracelets right now due to swelling, this I can make to fit me., Thanks for sharing! I too am now subscribed to your blog.
Those are so cute!! I love the look of the twine. So pretty! Thanks so much for sharing at Thursday's Temptation.
Jill
I love this!!! I kind of like the idea of the hemp wearing down and the wish being released too. Thanks so much for linking up at LLL Thursday. Have a Happy and Blessed Easter.
I am bookmarking this for a fun summer project with my kids. Thanks for the step by step.
This is a perfect project for our upcoming girl scout meeting. And I bet I have everything in my craft stash too(is that scary?) Quick and easy, I love it!
These are so cool! I work with special needs high school kids and I think I may have them do this. :o)
I use to make things like that all the time, but I have not dun it in such a long time thanks for the reminder. I love your Blog and the pictures are wonderful. I'm following you on GFC, I would love it if you could come and visit me @ http://www.arosiesweethome.com/
I have a Sunday link party it is still open if you would like to share.
Thanks
Rose
Super cute by the way, and I never knew all that fun stuff about wishes and 7 lucky beads. Love it.
This is probably a dumb question, but how do you fasten it on to wear?
I LOVE these :) I have been browsing the internet trying to find a fun project for my niece when she comes over, because any one person can only take so much of Netflix — and this is perfecttt. Thanks for sharing lovie :) I'm your newest follower from the hop by the way. Please follow my blog at the happily ever after project
Yes, just tie them on! That's why you'll want “tails” that are a little longer than what's pictured above. They are much like a friendship bracelet. :)
Do you just tie these onto your wrist? No hooks or any kind of clasp? Going to make some tonight. Have to keep my hands busy to justify sitting and watching tv. Haha Thanks. Excellent tutorial.
Yeah the idea is not to take them off so they wear away so your wish can get released. ??
Cool! I have everything on hand to make these already. My girls will love them, great spring break project this weekend.
These are so fun! I love the colors!
Link this one up, too!
http://crafting-cousins.blogspot.com/2012/03/what-i-wore-sunday-week-10.html
~Natalie @ Crafty Cousins
Those are really cute! I havent seen them before. It does seem kinda sad that they wear out, but like the idea of the wish being released :) Need to add these to the to-make list with my girls!
can yousnsnsn
My 7 year old is going to love this!! I can't wait to make some with her. Thanks for the great tutorial.
I've never heard of these (I think I was much older than you 20 years ago,..well now too I guess huh, lol). They are adorable and I am definitely making these with stash stuff. Yay.
They are so cool! I've never made them before. I'm going to get some twine so I can make them for some friends :) thanks for sharing.
This post actually made my day. I admire her creativity.