
Today’s project is mainly for the jewelry fans. I mean, all jewelry posts are for the jewelry fans, but when I sat down to design a piece last night, I wasn’t entirely sure what I was going to make, and some of the components I used (while not at all difficult) are not as beginner-friendly as I like to show you around here. A simple substitution on the clasp would fix that, but I used what I had on-hand, and you’ll do better with this one if you have some basic jewelry-making skills under your belt if you decide to try it this way. All that said – I LOVE this bracelet. I am already dreaming of a few similar versions (and I’ll make those much simpler)!

What you will need:

- Some 20-lb. hemp. I used about 15 feet.
- A clasp you love – I like the security of an extra large lobster clasp, but a toggle would look nice here too. The ring can be just about anything – this is the last bit of textured links I have left from a chain I’ve been dissecting.
- An end cap (or end cone as they are sometimes called) to finish your piece (and this is where you could simplify – if you can find some, definitely buy glue-on end caps. They’re kind of tough to find, though, and I was out, so I used a more common end cap that I already had.)
- If you are using a tube end cap like me, you’ll also need a few inches of some heavy-gauge wire (like 16 ga), wire cutters, and some round-nosed pliers. You will also likely want some craft or jewelry glue too.
- A way to secure your bracelet while you work. You can pin it to a pillow or your pants while you braid, or I like to use a clipboard to secure my cords.
First up – the hemp. It doesn’t have to be 20 lb. That’s just what I used to give the bracelet some bulk. Feel free to substitute as you like as you make this piece, but I’m going to tell you how I made mine. Cut three, 5-foot strands. Yes, I do seriously mean 60 inches. This will give you three wraps. If you want it to be longer, just add another 20 inches to EACH of your three strands you cut off.
Find the halfway point to those three strands, and double them up. You want six 30-inch strands with loops in the middle. You are going to make a lark’s head knot through your end ring. If you don’t know how to do that already – you just feed the loops in your hemp through the ring.

Now, take the tails of your hemp and feed them through the loops. Tighten them up. If I’m not explaining that well – pop over to youu tube and search for Lark’s Head Knot, or just Google it. :) It’s an easy knot – explaining it is more difficult than doing it! Anyway – this is what you will have.
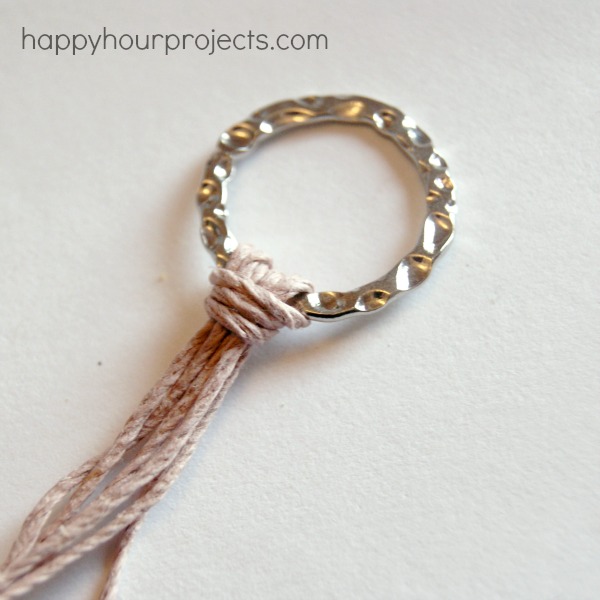
This will be your end ring, with six 30-inch strands coming down. Now, secure your end ring somewhere, and all you need to do to weave your bracelet is a simple braid with two strands in each part.
You can absolutely go fancier than that and make a six-strand braid. Six-strand braids are beautiful. But three strand braids take me like ten minutes. So I made mine three strand.
Braid for about 20-22 inches. Check the length against your wrist to know exactly how long you want it. It will depend on the size of your wrist, and also the length of both your ring and your clasp. My clasp is big, so I only wanted about 20 inches braided. If your clasp is smaller, you’ll want a slightly longer braid.
Now, here’s where I’d rather tell you to cut off the ends of your braid, and glue on an end cap. But I didn’t have a glue-on end cap. I have a more common end cap. So I am going to show you how you can use one of those. If you are already familiar with jewelry-making, you won’t have much trouble at all. If you are a newbie – I will explain it the best I can.

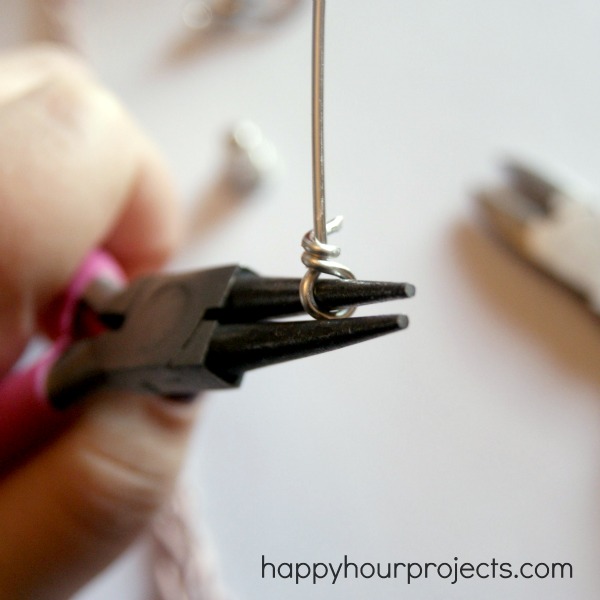
There are two parts to the end cap tube like this. The cap itself, and a bit of heavy wire to make connecting rings. First, form your wire.
You’ll want to cut off about 3 inches and bend the end around a pair of round-nosed pliers. The loop you make will need to be big enough for your hemp, but small enough to fit within your cap. Once you’ve made your loop, wrap the tail around the “neck” of your loop.
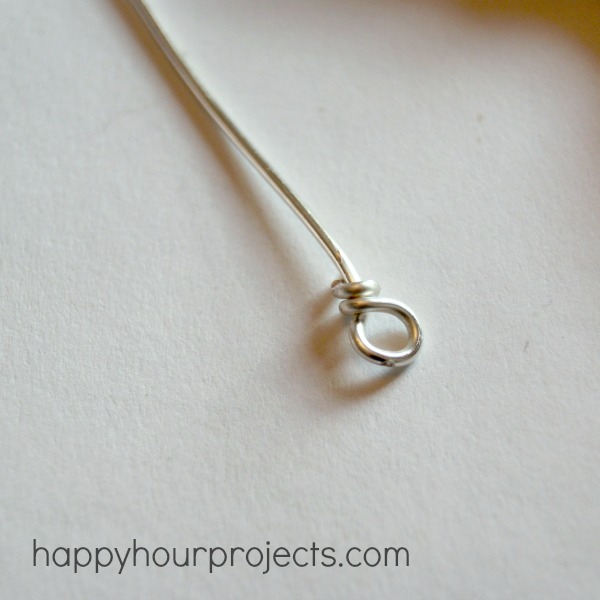
This is what it will look like:
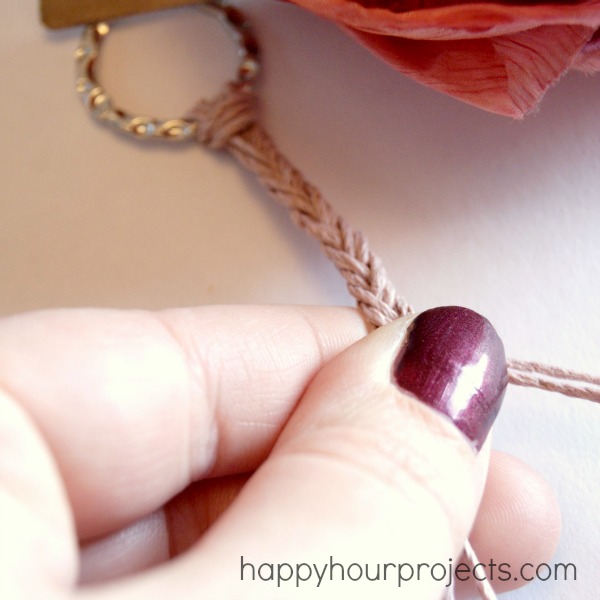
Now, tie your hemp onto the loop. I just split my strands three and three, and double knotted them. To be safe, I also added some craft glue onto the knot to make sure it was secure.

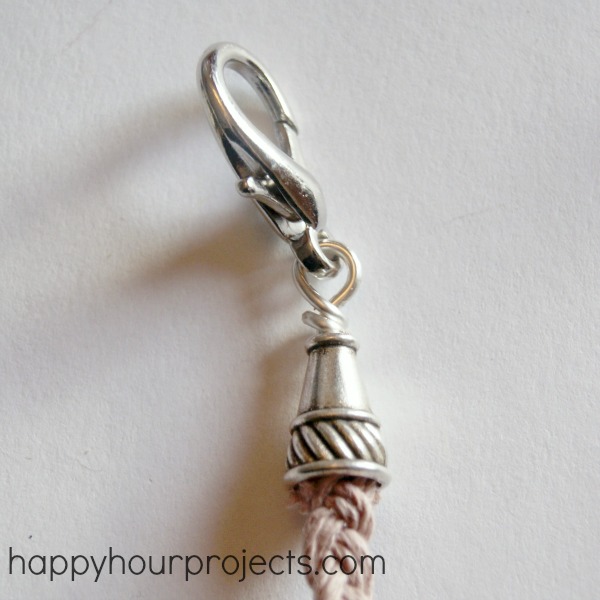
Then, I cut off my ends, and I added the end cap. The end cap itself doesn’t really *do* anything. The wire loop is doing all the work, but a wire loop with a knot on it is ugly. I mean – look at what we have so far. You don’t want that to show. The end cap just covers it up and gives it a pretty, finished look.

Now, you will need to close off the other end of the wire. I added my clasp on at this point, before looping it off so that it’s a nice closed loop. If you have trouble handling both, though, you can just do the closing loop and add your clasp on with a separate jump ring.
You’re just going to make another loop, exactly the same as the first one you made. Loop the wire over your round nosed pliers and wrap the tail end around the little neck part.

When it’s done, you should have something like this:
A little trickier than my normal tutorials, I know. Sorry!! But hey – it sure looks nice, doesn’t it?
Now, it’s finished! you just wrap it around your wrist and clasp it. The clasp becomes your focal point.

It looks so springy – perfect for spring making its appearance today! I love wrap bracelets, I can’t wait to make a few other designs!
I think your tutorial was easy. I am a seasoned jewelry maker?? but you explained it all perfectly. Signed up with my email looking forward to more projects. Thank you!
What size end caps did you use? I can’t find ones big enough and I want to order them online but want to make sure I get the right size.
10X16mm. It was these: http://www.consumercrafts.com/store/details/catalog/jewelry-findings-end-cones/1997-79
Thank you so very much for this wonderful tutorial. I have only begun making jewelry this year and my favorite pieces are bracelets (for the same reasons you have cited). I’ve been so confused over the closures, though, and wondered how those end caps actually “held” strands together. Now I know!
As a beginner, your photos have been perfect for me to learn this closure from. And this sample using hemp opens up several other bracelet styles too. Thanks again!
Those bracelets are cute….they are just want I need to put on my site…
Adrianne this looks so nice! I’ve only dabbled in jewelry making a bit but you make me want to try more. :) Thanks so much!
I absolutely fell in love with this bracelet the minute I saw it and pinned it right away. I have never made a piece of Jewelry before but decided I HAD to have it! Short of begging Adrianne to make me one and paying her for it, I decided I could do this!! :) I followed the directions in the first tutorial and they were step by step easy and simple. I only had difficulty with the end cone and getting it to fit over the knot. It was nearly impossible to hide and I was wondering if you had any pointers on this seeing as how I am not in tune with jewelry making. Thank you for including the links to buy the items used, as I found that the local stores didn’t have the color I wanted. I placed an order and surprisingly received an email a few hours later stating my order had shipped. Very excited to make some more and give them as gifts!
Awesome! I’m so glad to hear it.
If you’re having trouble with the knot showing, the key to that is to make the wire loop a little smaller so that it fits more snugly inside the end cap.
I did re-vamp the bracelet a little as promised to make the finished end easier, and have a second tutorial using glue-on end caps. You can view that one here: http://happyhourprojects.com/easy-woven-wrap-bracelet/
Thanks so much for the comment!
Another suggestion that would work is to make your own end caps from the 16g wire.(tumble if you need to for strength) this way it would fit over the knot. Hope that helps some. you can Google it . very easy to make :0) Nice bracelet tut !
I’m so excited that someone shared this on facebook and so now I’ve found this site! I love quick projects, and I bet I can actually make this bracelet. I love it!
So beautiful tutorial and bracelet! Love the help cord, have to try your bracelet wrap some day, it’s pinned! Have a great weekend!
Love all your bracelets. Your directions are always so easy to follow. Thanks so much for sharing.
Such a subtle color! Thanks for explaining it. I am a novice bracelet maker.
It turned out so pretty! Your right that the clasp is the centerpiece! Love it!!
Very pretty! I love all those colors of hemp too!
Oh, Adrianne, I absolutely LOVE this bracelet!
i shoulda learned how to make jewelry way back then. now i am just a wannabe-but dang this bracelet is so pretty! love it :)