• Skip to primary navigation
  • Skip to main content
  • Skip to primary sidebar

  • home
  • about adrianne
  • buy the books
    • DIY T-Shirt Crafts (2015)
    • DIY Stamped Metal Jewelry (2016)
    • Rock Painting for Beginners (2019)
  • videos
  • crafts
    • diy beauty projects
    • kids’ crafts
    • paper craft projects
    • polymer clay
    • sewing projects
  • jewelry
    • bracelet projects
    • earring projects
    • necklace projects
    • jewelry tools & supplies
  • metal stamping
    • beginners’ tutorial
    • video tutorial
    • project ideas
    • metal stamping supplies
  • recipes
    • cocktail recipes
    • appetizers
    • main and side dishes
    • sweets and treats
  • by season
    • birthdays
    • new year
    • valentine’s day
    • st. patrick’s day
    • easter and spring
    • mother’s day
    • patriotic
    • fall
    • halloween
    • christmas
    • thanksgiving
  • privacy

Happy Hour Projects logo

03/25/2015

DIY Braided Glitter Bracelet

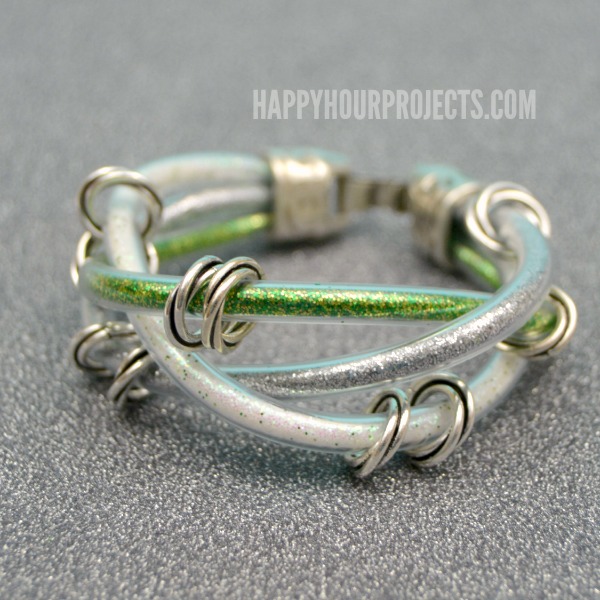
Okay so I hope you’re not getting tired of the glitter bracelets made from plastic tubing, because I have one more idea and set of components for you today.  Maybe this just gets your wheels turning (and there’s nothing wrong with that!) but I have one more way you can use plastic tubing to make a fun DIY glitter bracelet.  You can incorporate multiple colors by using multiple strands – and make up a fun piece like this this braided glitter bracelet.

DIY Braided Glitter Bracelet Made From Plastic Tubing at www.happyhourprojects.com

I had a lot of fun making and sharing these different styles of bracelets made with the same components this week.  If you missed it, be sure to check out the other two styles I shared: the Beaded Glitter Wrap Bracelet and the Gold Glitter Looped Bracelet.   It was a challenge for me to find the right supplies to make these designs work, but now that I’ve located them, I’ll sahre links below where you can find your supplies (in case you see this idea, and start obsessing the way I did, haha.)  These links are affiliate links, which means if you do decide to jump in and make a purchase, then it does support my blog at no extra cost to you (and thank you, by the way!)

DIY Braided Glitter Bracelet Made From Plastic Tubing at www.happyhourprojects.com

Pictured above are the components I used for a few different projects, but here’s what you’ll need to make today’s braided glitter bracelet from plastic tubing:

  • 3/16″ OD Clear plastic tubing with a 1/32″ wall (sold in 10-foot lengths)
  • Extra fine glitter
  • Large-hole beads (anything with at least a 5mm hole will work, I used decorative rings)
  • Glue-on bar clasp set
  • Scissors
  • Jewelry glue – I used Super New Glue for this project, though any heavy duty adhesive recommended for bonding metal and plastic would work
  • Funnel – you can use a tiny craft funnel, or just do what I did and roll up a scrap of paper and tape it shut

DIY Braided Glitter Bracelet Made From Plastic Tubing at www.happyhourprojects.com

I put a few glues to the test when making up these bracelet styles.  I thought that Super New Glue worked well for this project because of the snug fit of the tubing inside the clasp.  I also used Gutermann glue for some of the other styles, and while I thought it also was a good choice, you can get away with the less expensive (and easier to find) glue for this project.

Cut three lengths of tubing 7 inches long, and glue one end cap onto all 3 tubes.  It will take a minute or two to dry enough to stay put, so that you can continue with your design.  I had to buy a 10-foot length of this tubing, but it was only $7.  You’ll be able to make several bracelets from it – so it ends up being a pretty inexpensive component.

DIY Braided Glitter Bracelet Made From Plastic Tubing at www.happyhourprojects.com

Next, fill the tubes carefully with glitter through the funnel (my funnel was just scrap paper rolled up and taped shut with washi tape – hey, it works).

DIY Braided Glitter Bracelet Made From Plastic Tubing at www.happyhourprojects.com

I added a bit of tape to the ends of each tube as I filled them, so that I didn’t spill glitter all over while working.

DIY Braided Glitter Bracelet Made From Plastic Tubing at www.happyhourprojects.com

I also took a minute now to add some decorative rings.  Any large hole bead would look nice – or, just stick to the glitter tubes themselves!

DIY Braided Glitter Bracelet Made From Plastic Tubing at www.happyhourprojects.com

Finally, braid all the strands loosely.  Remove the tape, try not to spill any glitter, and glue on the other end cap.  Allow your piece to dry for at least 30 minutes before wearing it, but that’s all it takes!

DIY Braided Glitter Bracelet Made From Plastic Tubing at www.happyhourprojects.com

Have you enjoyed these glittery ideas?  I could keep going (after all, I do have tubing left) but I don’t want it to get old.  I did enjoy this little mini-series this week, though!  I have other ideas that would be fun to add to this tubing, like beads, or sprinkles – and I’m definitely planning out an idea using beach sand!

Hope you all have a great day ~

adrianne signature

Filed Under: Bracelets, Fashion, Jewelry, Tutorials Tagged With: accessories, beads, bracelet, braid, DIY, fashion, glitter, plastic tubing

copyright policy and terms of use

I love it when you love my work! All tutorials and photos published at Happy Hour Projects are copyrighted. If you would like to feature my tutorial on your website or share it on your social media you may use one photo to feature, as long as you provide a link back to the original post.

If you feature a photo, it may not be accompanied by the project tutorial or recipe, whether in my own words as it originally appears or paraphrased by you. This also includes personal sharing on social media and Pinterest. Publishing multiple photos from a project, or including instructions with an accompanying photo are not permitted and you will be asked to remove them.

I love to share my projects, and my tutorials, recipes, and e-books are ALL free for your personal use. However, photos and ideas that are published to this site are my protected intellectual property. You may print them at home, but please do not copy or distribute them. I also allow all designs to be made and sold at fundraisers, craft fairs, etc. If you are selling a piece made from one or more of my free tutorials in your online shop, I require that you use your own, original photography, and include a link back to my website to credit me as the designer.

I hope you enjoy what you read here, and please be fair when you share!

Reader Interactions

Comments

  1. PHYLLIS says

    03/26/2015 at 5:27 am

    LOVE LOVE LOVE ALL YOUR PROJECTS. WAITING “PATIENTLY” FOR MY ORDER TO COME IN SO I CAN
    MAKE THESE. YOU ARE AWESOME!!

    Reply
  2. Marilyn says

    03/25/2015 at 9:01 am

    This bracelet is so sparkly and fun! :)

    Reply

Trackbacks

  1. CraftCrave | DigiFree | CraftCrave says:
    03/26/2015 at 6:28 am

    […] DIY Braided Glitter Bracelet – 1 freebie(s)? […]

    Reply

Leave a Reply Cancel reply

Your email address will not be published. Required fields are marked *

Primary Sidebar

Hello, and welcome! I'm Adrianne, an artist, author, designer, and blogger in mid Michigan. I work from home, chase my two kids, and this once-city-girl is learning how to care for chickens and adjusting to life out in the country. I have a compulsion for daily creativity... sometimes it's jewelry-making, paper crafting, metal stamping, mixing and baking, or giving new life to recycled items. But with 2 young kids, time is short! My goal here at Happy Hour Projects is to share projects and tips that you can do in an hour or less. The ideas you find here are designed to add a little creativity in your day, no matter how much (or how little) time you have!

BUY MY BOOKS!

Copyright © 2026 Happy Hour Projects on the Brunch Pro Theme