• Skip to primary navigation
  • Skip to main content
  • Skip to primary sidebar

  • home
  • about adrianne
  • buy the books
    • DIY T-Shirt Crafts (2015)
    • DIY Stamped Metal Jewelry (2016)
    • Rock Painting for Beginners (2019)
  • videos
  • crafts
    • diy beauty projects
    • kids’ crafts
    • paper craft projects
    • polymer clay
    • sewing projects
  • jewelry
    • bracelet projects
    • earring projects
    • necklace projects
    • jewelry tools & supplies
  • metal stamping
    • beginners’ tutorial
    • video tutorial
    • project ideas
    • metal stamping supplies
  • recipes
    • cocktail recipes
    • appetizers
    • main and side dishes
    • sweets and treats
  • by season
    • birthdays
    • new year
    • valentine’s day
    • st. patrick’s day
    • easter and spring
    • mother’s day
    • patriotic
    • fall
    • halloween
    • christmas
    • thanksgiving
  • privacy

Happy Hour Projects logo

02/16/2015

Stamped and Riveted Floral Layered Necklace

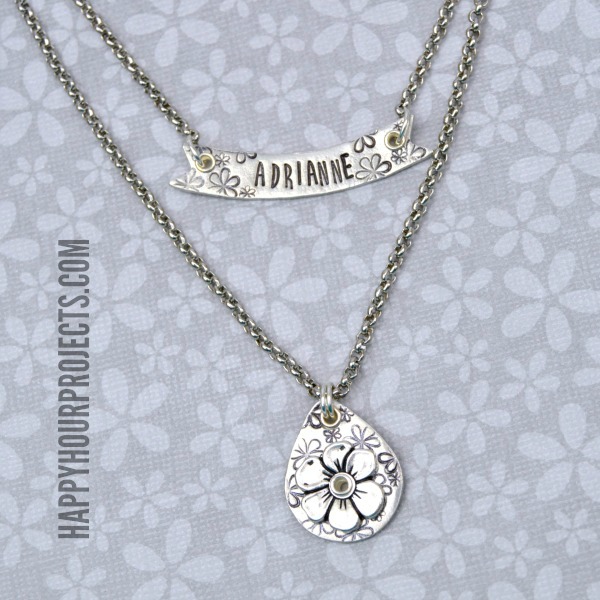
I liked the floral riveted earrings I designed last week so well that I decided to make them part a matched set!  I stamped up this layering necklace to go along with it, adding a personalized banner blank to the mix.  I stamped my name on it (I guess I was feeling all self-centered that day, teehee) but you could stamp your word of the year, a short uplifting message, or anything that speaks to you.  I really LOVE the layered look when it comes to necklaces, because you get the effect of a larger statement piece without having to use large elements to design it.  And if you didn’t catch the riveting video tutorial last week for the earrings (or if video just isn’t your thing) I’ll share how to set rivets and how to stamp jewelry with photos today.

Stamped and Riveted Floral Necklace at www.happyhourprojects.com

I’ve got a comprehensive post for beginners that addresses jewelry stamping, if you find after reading this post that you want to know more.  The banner blank will take a little more patience and probably practice if stamping is new to you, but if that’s intimidating to you then you can also just stick with the random floral design instead – it’s your piece, after all, so make what you want!

Stamped and Riveted Floral Necklace at www.happyhourprojects.com

I’ll leave links below to where you can buy your supplies, if you’re looking to make a purchase online today.  (They are affiliate links, which means if you do decide to buy, then it supports my blog at no extra cost, and thank you if you do!)  Here’s what you will need to make this double-pendant stamped necklace:

  • Bench block and hammer
  • ImpressArt 6mm Whimsy Flower design stamp and ImpressArt 3mm Whimsy Flower design stamp
  • ImpressArt Lollipop 4mm alphabet stamps
  • Drop shaped pewter stamping blank
  • Banner pewter stamping blank
  • Permanent marker and polishing pad
  • 2-Hole Punch (3/32 inch)
  • Rivetable flowers
  • 5.3 mm eyelets
  • 3.7 mm eyelets (optional)
  • Eyelet setter
  • 34 inches of rollo chain, 7mm jump rings, and lobster clasp(s)
  • Jewelry pliers

Stamped and Riveted Floral Necklace at www.happyhourprojects.com

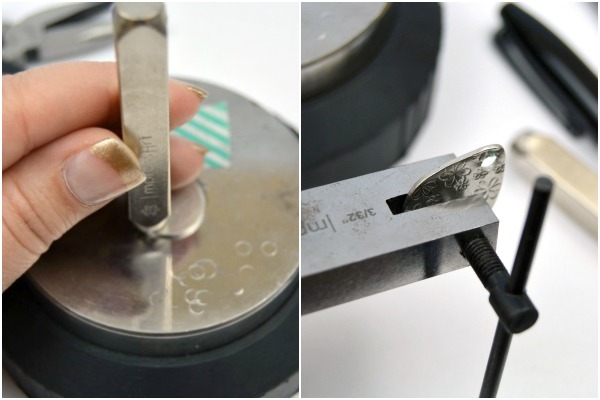
First things first: stamp!  if you prefer to watch this on video, you can check it out in last week’s earring post.  But what you will be doing is using your two sizes of design stamps to cover the blank with an all-over pattern.  When you have covered it, punch a 3/32 inch hole in the center of your blank.

Stamped and Riveted Floral Necklace at www.happyhourprojects.com

Next, darken the impressions you have stamped.  I typically use a permanent marker and polishing pad – color all the impressions, and then buff away the excess ink.  You can also use acrylic paint for this step if you prefer!

Stamped and Riveted Floral Necklace at www.happyhourprojects.com

Adding eyelets is probably easier than you think!  Using the setter base, stack up your layering pieces.  The eyelet will look the same from front to back, so you may choose to add your layers right side up or upside down.  I do mine face up so that I can better show you the layering, but it’s your preference!  I used a 5.3mm size to accommodate the thickness of the pewter blank and the floral accent.

Center the setting tool on the narrow end of the eyelet, and tap the top of the setter with your hammer until it secures the two pieces.  It’s important to keep the tool vertical when you set the eyelet.  It should take 4-5 taps of your hammer to set.

Stamped and Riveted Floral Necklace at www.happyhourprojects.com

I also added 3.7mm eyelets to the holes in the blanks before adding the chain, to give them a more finished look.  That’s a totally optional step!

Stamped and Riveted Floral Necklace at www.happyhourprojects.com

Finally, cut 3 lengths of chain.  I cut my long piece at 19 inches (though you may prefer 18 inches) and then two lengths of 7.5 inches.  Add the drop pendant to the longer chain by stringing it on through a jump ring, and attach the two shorter chains directly to the chain using jump rings.

I opted to attach both necklaces to one lobster clasp, though you may certainly make them up as two separate necklaces – then you have the option of wearing them together or separately!  I just like keeping them together.  (Besides, when you’re an addicted stamper as I am, I’m more likely to just make up another new piece if I get tired of wearing them together… hehe.)

Stamped and Riveted Floral Necklace at www.happyhourprojects.com

It goes without saying that stamped jewelry always makes a beautiful and personal gift, as well.  Finishing your pieces with eyelets like this will also make them look more like boutique jewelry.

Stamped and Riveted Floral Necklace at www.happyhourprojects.com

Happy stamping, guys!

adrianne signature

Filed Under: Fashion, Jewelry, Metal Stamping, Necklaces, Tutorials Tagged With: accessories, eyelets, floral, flower, jewelry, layered, metal, metal stamping, necklace, personalized, rivets, stamped

copyright policy and terms of use

I love it when you love my work! All tutorials and photos published at Happy Hour Projects are copyrighted. If you would like to feature my tutorial on your website or share it on your social media you may use one photo to feature, as long as you provide a link back to the original post.

If you feature a photo, it may not be accompanied by the project tutorial or recipe, whether in my own words as it originally appears or paraphrased by you. This also includes personal sharing on social media and Pinterest. Publishing multiple photos from a project, or including instructions with an accompanying photo are not permitted and you will be asked to remove them.

I love to share my projects, and my tutorials, recipes, and e-books are ALL free for your personal use. However, photos and ideas that are published to this site are my protected intellectual property. You may print them at home, but please do not copy or distribute them. I also allow all designs to be made and sold at fundraisers, craft fairs, etc. If you are selling a piece made from one or more of my free tutorials in your online shop, I require that you use your own, original photography, and include a link back to my website to credit me as the designer.

I hope you enjoy what you read here, and please be fair when you share!

Reader Interactions

Comments

  1. nuria says

    02/23/2015 at 12:09 pm

    Hello,
    Very nice jewelry!
    Can you also stamp on steel with this metal stamps ?

    Reply
    • Adrianne says

      02/23/2015 at 2:09 pm

      You’ll need stamps that have been hardened for steel, but yes, steel can be stamped! These are what I use on steel: https://www.goodybeads.com/store/products/TL00126.htm

      Reply
  2. Julie says

    02/21/2015 at 4:33 pm

    Hi Adrianne! I love your blog and wanted to show you something I made with the rivetable hearts but I can’t attach a picture to my comment. Ahhh! Lol

    Reply
  3. Krista says

    02/18/2015 at 11:59 am

    Gorgeous! This is a great set–I really want to learn to do this someday.

    Krista

    Reply
  4. Barbara says

    02/17/2015 at 6:34 pm

    Do you have a link for the letter stamps?

    Reply
    • Adrianne says

      02/17/2015 at 7:15 pm

      Oh hah, I guess that’s what I get for writing late at night! I’ve updated the list now to include the Lollipop font set – https://www.goodybeads.com/store/products/TL00161.htm

      Reply
  5. Barbara says

    02/17/2015 at 6:32 pm

    love the layered look. Still delicate & feminine.

    Reply

Trackbacks

  1. WDORL 11: 5 Great Weekend DIYs! says:
    05/03/2021 at 12:36 pm

    […] Stamped and Riveted Floral Layer Necklace (Free Jewelry DIY) from Happy Hour Projects: […]

    Reply
  2. Let’s Get Messy: 16 DIYs to Try says:
    03/01/2015 at 9:38 am

    […] to make a homemade loom 10 wooden mobile 11 stamped layered necklace 12 crochet […]

    Reply
  3. Nine Delightful DIY Projects DIY Doyenne says:
    02/26/2015 at 12:58 pm

    […] how to make this stamped and riveted DIY Layered Necklace using ImpressArt products with Happy Hour […]

    Reply
  4. CraftCrave | DigiFree | CraftCrave says:
    02/17/2015 at 12:47 am

    […] Stamped and Riveted Floral Layered Necklace – 1 freebie(s)? […]

    Reply

Leave a Reply Cancel reply

Your email address will not be published. Required fields are marked *

Primary Sidebar

Hello, and welcome! I'm Adrianne, an artist, author, designer, and blogger in mid Michigan. I work from home, chase my two kids, and this once-city-girl is learning how to care for chickens and adjusting to life out in the country. I have a compulsion for daily creativity... sometimes it's jewelry-making, paper crafting, metal stamping, mixing and baking, or giving new life to recycled items. But with 2 young kids, time is short! My goal here at Happy Hour Projects is to share projects and tips that you can do in an hour or less. The ideas you find here are designed to add a little creativity in your day, no matter how much (or how little) time you have!

BUY MY BOOKS!

Copyright © 2023 Happy Hour Projects on the Brunch Pro Theme